
Create this fun cutout effect that makes the subject look like it’s coming in or out of a printed photo. In this Photoshop tutorial, you will learn how to use Photoshop’s Extract tool, layer masks, and layer styles to create a cutout from a photo.
Preview of Final

Photo Cutout Photoshop Tutorial
Step 1: Open a photo into Photoshop
To begin this tutorial, open a photo into Photoshop. To do this, open the File menu and select Open. Browse for and select a photo with a subject that you can use as a cutout then click OK.

Step 2: Duplicate the layer
Press Ctrl+J to duplicate the layer.

Step 3: Open the Extract tool
To extract the subject, we’ll be using Photoshop’s Extract tool. Open the Filter menu and select Extract.

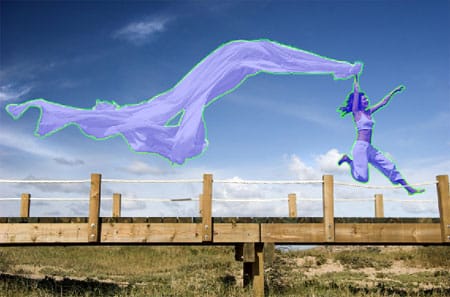
Step 4: Extract the subject
To extract the subject out of the photo, we highlight the edge around the subject with a brush. Before we begin, select a brush size that is just thick enough to cover the edge. Then, checkmark “Smart Highlighting”. Now press Ctrl++ to zoom in until you can see the pixels clearly. Paint over the edge of the subject. When you reach the edge of the screen, hold the spacebar, click, and drag to move to a different part of the photo. When highlighting the edge, let go of the mouse button every few seconds. This way, when you make a mistake, you can simply press Ctrl+Z to undo that small portion. Although extracting can be quite boring, if stay slow and steady, you can avoid mistakes and complete this step faster.

Step 5: Fill the area
Once you’re done creating an outline of the edge, select the fill tool and fill the subject. Your subject should now have a blue fill with a green outline. Click OK.
Step 6: Unlock the background layer
We need to add a layer mask to the background layer. But before we do this, we need to unlock it. Double-click on the Background layer. A window should appear where we can specify the layer options. Click OK and you should now have a layer called “Layer 0”.

Step 7: Add a layer mask
Now we’ll add a layer mask to the layer. Open the Layer> New Layer Mask menu and select Hide All. This will create a black layer mask and will make the layer invisible.

Step 8: Select the Rectangular Marquee tool
From the toolbar, select the Rectangular Marquee tool. It should be the second one listed in the toolbar. Once you select it, the option bar near the top of the Photoshop window should have a drop down menu where you can select the style. Select Fixed Ratio as the style and enter 6 as the width and 4 as the height. This will ensure that the selection you create will be of the same aspect ratio as a printed 4×6 photo.
11 responses to “Photo Cutout”
-

nice effect
-
not bad ……
-
nice one
-
nice tutz
-
me gusta mucho la pagina
-
Great Tutorial!. Thank you so much!.
-
Ytah
-
tahnks ytou
-
Nice tutorial..
-
why i cant use the pixelate after gaussian blur??im using cs3 anyway
-
Thanks for this fine Tutorial
Leave a Reply