Learn how to create this landscape matte painting with Photoshop! This tutorial will show you how create our own mountain scene by arranging multiple stocks together and blending them correctly using layer masks and adjustment layers. You will also learn effective techniques for adding waterfalls and mist.
Preview of Final Results

Create A Misty Landscape Matte Painting in Photoshop
Resources
- Sky-sxc.hu
- Background mountain– Stockfreeimages
- Left rock– Pixabay
- Right rock– Pixabay
- Mid rocks– Pixabay
- Trees 1– sxc.hu
- Tree 2– Morguefile
- Tree 3– Morguefile
- Tree 4– Stockfreeimages
- Bottom right rock– Stockfreeimages
- Waterfall 1– Pixabay
- Waterfall 2– Morguefile
- Arch 1– Morguefile
- Arch 2– Stockfreeimages
- Ruin 1– sxc.hu
- Ruin 2– Morguefile
- Ruin 3– sxc.hu
- Mist brushes– Ideasplayer
Step 1
Create a new document and fill it with white or any light and bright colors. I choose the size with 1300×900 px. Open sky stock. Use Rectangular Marquee Tool (M) to make a selection on sky part as shown below:

Then active Move Tool (V) and drag this selection into our white canvas:

Step 2
Open background mountain stock.Take the background with misty mountains only and place it at sky part (don’t resize it):


Click the second button at the bottom of Layer Panel to add layer mask to this layer. Now use soft black brushes with large size (I use 250-260 px) to paint on the top of this background to reveal sky added in first step:
Step 3
To reduce saturation and increase brightness of the mountains to fit the sky, I use some adjustment layers with Clipping Mask. On background mountain layer, go to New Layer-New Adjustment Layer-Hue/Saturation:

Curves:


Step 4
Open mid rocks stock. Extract them and locate them at the middle section of our picture. Right click this layer, choose Convert to Smart Object then use Cmd/Ctrl+T to resize it as shown below:

I want to remove the rock on the right so I add layer mask to this layer. Use Polygonal Lasso Tool (L) to make selections at the left corner and right rock:

Now on layer mask use black brush to remove selected areas:

Step 5
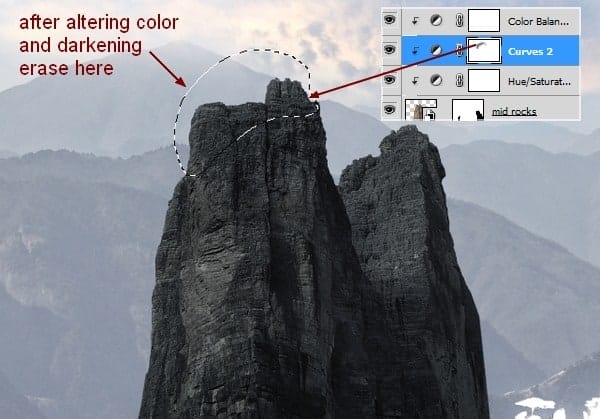
I create some adjustment layers to change color and darken the rocks.
Hue/Saturation:

Curves:

Color Balance:

I use soft black brush with opacity about 40% to blur dark effect on the top of the rocks (they will get more light from sky so should be brighter than the rest):

Step 6
I add a new layer (Clipping Mask) to darken more the front of the rocks. Use soft brush with color #7a7e7e to paint over there avoiding the top and middle area then change the mode to Multiply 80%:
22 responses to “How to Create a Mountainous Matte Painting in Photoshop”
-
Good
-
bhai iski photoshop file bhej do kam urgent
-
it`s not sxc.hu but scx.hu existed while the linked did`nt worked.
-
Thank you, this has been a real help
-
Очень замечательный урок!:) Делаю с огромным удовольствием!:) Правда остановился на 33 шаге, не могу сообразить где эта часть горы которую нужно вставить в правый угол на передний план. Уже измучился и не пойму как тут разобраться:) Просидел над этим куском горы уже весь день:)) Неужели тут придётся вырисовывать… так скажем проявить смекалку…)
-
ur all amazing i wanna give u all hugs!!!!
-
Thank you very much:)
-
how to download this video
-
Beautiful, creative and acutely enjoy able!
-
Great, thanks for all the helpful info!
-
please, you might place the images: Background mountain y Bottom right rock ?
-
thank you very much :)
-
nice tutorial
-
I don’t understand where have you found (seen) the steps in this tut.?
sorry, but I can’t see them(
hope you help me
-
-
That’s amaging tutorial and I feel happy
-
I really fell happy.
-
This tutorial is amazing. Thanks Ms. Le
-
Really nice and very useful. Thank you very much….
-
Really nice and fun to work with. I’m very nooby at photoshop and I learnt a lot from this.
-
thanks machan…….
good buy….. -
Amazing tutorial
-
nice tutorials…thanksss


Leave a Reply