Photoshop is a great tool to create many forms of art. With it, there is no limit of what kind of artwork we can create. The only limit is our imagination. In this tutorial we will create a kind of surreal artwork, which I call ‘Surreal Head Stacking Photo Manipulation’. I’m only using two stock photos to create this, the rest is heavy use of selection, masking, grouping and several color correction. So let’s get started!
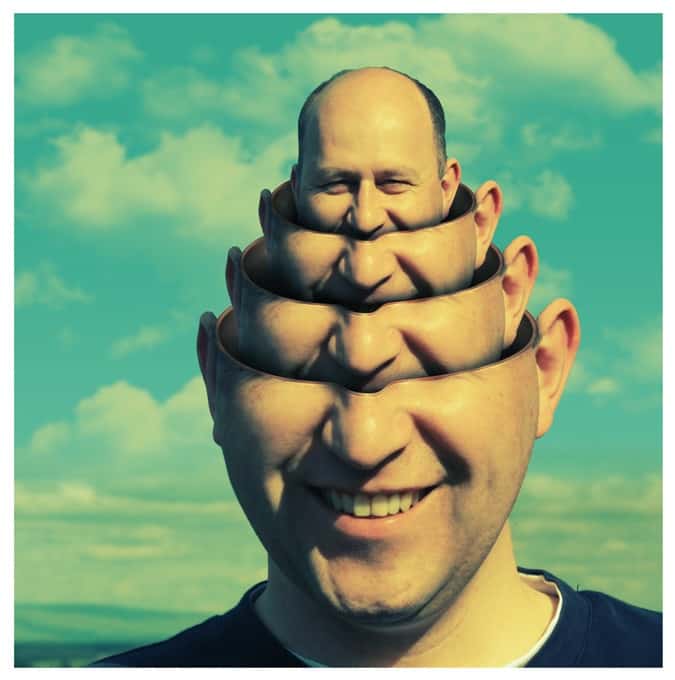
Preview of Final Results

Tutorial Resources
- Rural Self Portrait – ColinBroug
- Cloud II – avanzero
Step 1
Download and Open in Photoshop the Rural Self Portrait photo. Using Rectangular Marquee tool, create selection around the head and shoulder area like on the screenshot.

Step 2
Use Image> Crop to crop selected area, deselect with Ctrl+D. Now we get a nice close up view.

Step 3
Using Pen tool, create selection path covering shoulder and head area perfectly.
Right click the paths, choose Make Selection from the pop up menu. Click OK to transform path into selection.
Copy selected area to a new layer by pressing Ctrl+J.

Step 4
Draw an ellipse path using Ellipse tool, this path will mark the cut area of the head later. Edit the path’s bottom part using Direct Selection and Path Selection tool, so the path will arched following the nose shape.

Step 5
In order to create thickness for the cut area, create a second elipse path or simply duplicate the first one.
Hold Alt while dragging the first path, this way the path will be duplicated when you start dragging it. With the second path still selected, click subtract from shape area button.
Go to Edit> Free Transform to reduce second path’s size and re-align its position to the center of the first path.

Step 6
Open the Paths panel (go to Window> Paths in case you didn’t know), click Load path as selection button to change the path into selection.

Step 7
Go back to Layers panel, duplicate selected area to a new layer by pressing Ctrl+J.
We also need to duplicate the half head layer. When you done duplicating layers, hide the rim cut and background layer.

Step 8
Drag full head layer to the topmost layer stack. Within the Paths panel, select rim cut path we created earlier and then Load this path as selection.
34 responses to “How to Create a Surreal Head Stack in Photoshop”
-

Surreal head stack is great practice to improve photoshop skill. I do this when learning photoshop.
-
I like this manipulation but the instagram filter is horrible!!
-
this tutorial sucks, most of the functions does not work
-
Thanks. Very resourcefull
-
Thank you brother, at last I finally found what actually I am looking for. I have tried lot of apps and ad-ons with photosop. But this is manual and perfect solution. Thanks again buddy. From today I will be your daily reader :)
-
absolute brilliant ta
-
This tutorial is so cool. That heads effect just makes me giggle and I’m sure a lot of people appreciate it. I want to complete as many tutorials as possible. I would hate myself if I didn’t save my work.
-
awesome and unique collection of sequence photography i love it.
Thank for sharing. -
Nice tut :)
-
Wonderful. I created a simpler version of this effect from my son’s image and I want to surprise him with it. Thank you Jayan Saputra.
-
Great tutorial, thanks :)
-
Thanks very much for very good lesson!
-
Jesus man, this is so ridiculous to follow.
-
this is discusting
-
Very nice surreal tutorial. I wanna learn this kind surreal technique from long time ago,thank you very much Jayan Saputra :)
-
I like this one.it’s different.
-
Horrible
-
can any budy tell me how can i make bigger panaflex.
if any budy known so please tell me as a help, -
Nice
-
This Sucks
-
I’m having trouble finding subtract from shape in cs6,is it Subtract ‘Front’ shape? I think this may be why I cant load both paths to a selection at one time. Please help.
-
Nice a tutorial .
-
this tutorial is a little bit chaotic
-
la verdad se me ha complicado el tutorial no ce si es por que no trabajo con la misma imagen o le falta algo al tutorial agradecería que me explicaran gracias
-
Amazing
-
vsd
-
-
great job bro…. U have sharpened my skills!!! tnkq
-
I’d leave the top head out and keep it hollow
-
nice work..appreciated.. ! may i plz gt the .pdf of this tutorial.
-
NICE ONE
-
Good Ideas …..
-
vinod
-
Amazing!!
-
i like this project nd i will be try to make like this but different
Leave a Reply