
Learn how to tone map with Photoshop CS3 to create beautiful high dynamic range (HDR) photos. The final result is exceedingly better than Photoshop’s local adaptation and similar to Photomatix’s tone mapping.
HDR Tone Mapping
What is Tone Mapping?
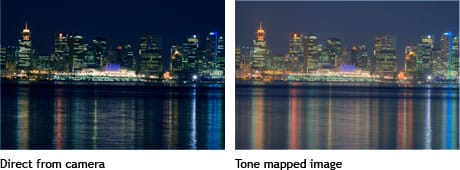
Tone mapping compresses the tonal values of a high dynamic range image into a lower one. The result is an image with more visible details that would not be seen on an image with lower dynamic range.
How does Tone Mapping Work?
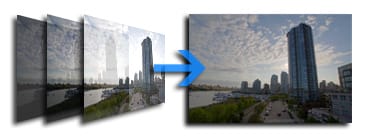
Tone mapping works by merging multiple images with different exposures into one image. Each image contains details not visible in another. To take these images, use the Automatic Exposure Bracketing feature on your camera to capture three images of different exposures. You may need to place your camera on a tripod to prevent camera movement.
Tone Mapping Methods
Most common methods :
- Using Adobe Photoshop to merge the images into a HDR file then converting the image to an 8-bit file using local adaptation.
- Using HDRsoft Photomatix to create a HDR file then tone mapping the HDR file into a 8-bit file.
The latter usually produces better results that Adobe Photoshop isn’t capable of producing. If you don’t have Photomatix, here’s a Photoshop solution for tone mapping:
Layered Tone Mapping with Photoshop
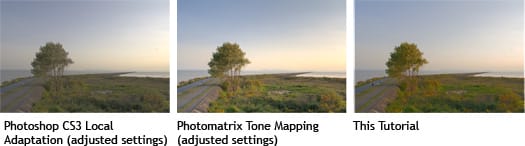
Although Photomatix produces amazing results and Photoshop’s local adaptation methods can create satisfactory results, none of them can produce a layered file. In this Photoshop CS3 tutorial, you’ll learn how to tone map three exposures with results better than Photoshop CS3’s local adaptation and similar to Photomatix tone mapping. In addition, the document will have seperate layer allowing advance Photoshop users to tweak their image with greater control.
The Photoshop HDR Tone Mapping Tutorial
Before We Begin
Download the following three images to your hard drive (Right mouse click> Save As). You will be using these images to follow the tutorial.
Step 1
First, we’ll need to load the three images into Photoshop. We will use the Load Files into Stack feature for this. To access this, select the File> Scripts menu and choose Load Files into Stack.
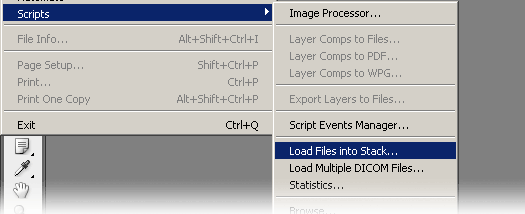
The Load Layers window should appear. In the Load Layers window, browse for the three images you’ve downloaded and add them to the list. Checkmark the “Attempt to Automatically align Source Images. With this checked, Photoshop CS3 will try to align the images.
One response to “Layered HDR Tone Mapping”
-
[…] Luminosity masking is one of the oldest and most useful retouching techniques. I’ve been teaching this since the beginning of my first Photoshop website which was over 12 years ago and I’ve seen […]
Leave a Reply