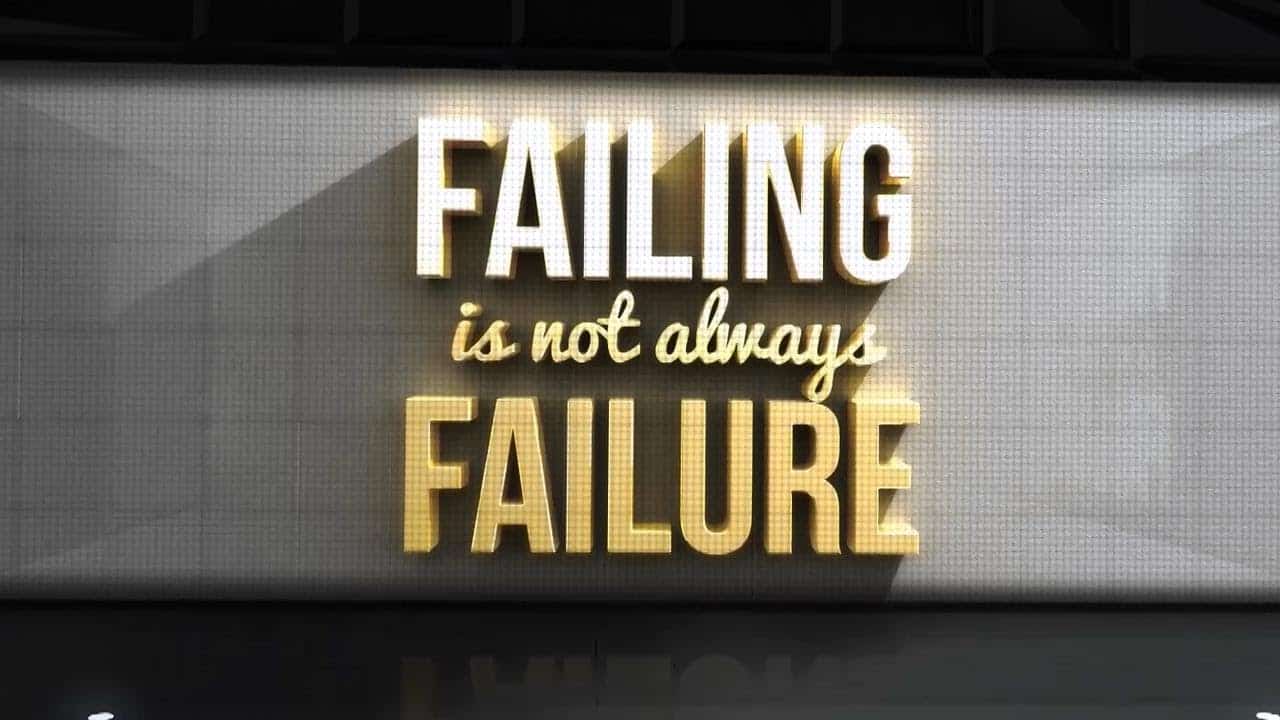
Learn how to make any inspirational message look more meaningful by turning it into a 3D typography poster. In this Photoshop tutorial, you will how to create striking 3D gold text, add reflections with image-based lighting, create a drywall background from scratch, and position your lights using an easy method that feel like you’re playing a 1st person shooter game. To follow this tutorial, you’ll need Photoshop CS6 Extended.
Preview of Final Results


Tutorial Resources
- Bebas Neue – Font Squirrel
- Pacifico – Font Squirrel
Step 1
Start by creating a new 1920×1200 pixels document. Select the Text tool and type in your inspirational text. The font we’re using is Bebas Neue and Pacifico. These fonts are free. Adjust the font size and leading to your likings. Use the Free Transform tool (Ctrl/Cmd+T or Edit > Free Transform) to scale your text then position the text in the middle.

To position your text perfectly in the center, select your text and background layers, switch to the Move tool, then click on the align center buttons in the options bar.

Step 2
Next we’re going to convert the text to 3D. To do this, right-click on the text layer and choose New 3D extrusion from layer.
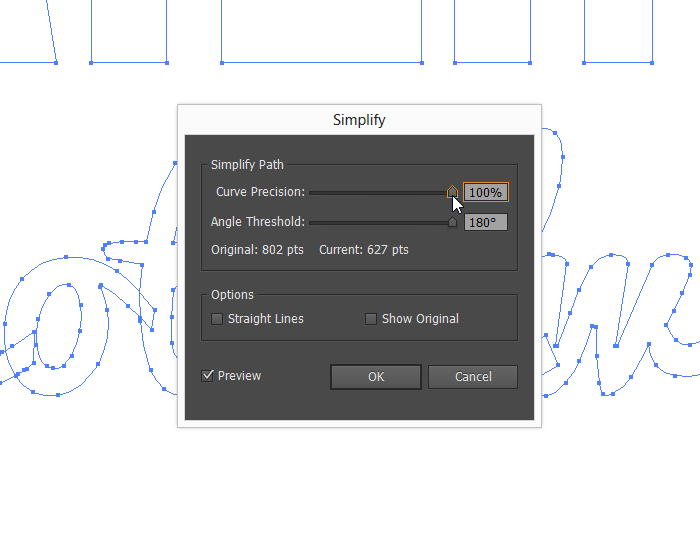
Depending on how complicated your text is, Photoshop might give you a message that your text is too complicated for it to process. If this happens, you need to convert it to a path and use Adobe Illustrator to simply the path. To do this, right-click on the text layer and select Convert to Shape. Copy the shape layer to your clipboard then paste it into a new document in Adobe Illustrator. In Illustrator, go to Object > Path > Simplify. Checkmark the preview option then adjust the settings so that you get the least amount of points without distorting the text much. Copy and paste the text back into Photoshop. When you paste, Photoshop will ask how you want to paste your text as. Select Shape Layer then click OK. Delete the other text layer then right-click on the new shape layer and select New 3D Extrusion from selected layer.


Step 4
Once you convert your text into a 3D extrusion, Photoshop will switch you to the 3D interface. Go back into the Layers panel and select the background layer. We’re going to convert this to a 3D object so that we can use it as a wall for the 3D text. Right-click on the background layer and select Postcard. Switch back to the Layers panel and select the two layers. Merge the layers into a single 3D layer by pressing Ctrl/Cmd+E.
30 responses to “Create Inspirational 3D Gold Text with Photoshop Extended”
-
this tutorial sucks. difficult to follow. not enough direction on where to find the options.
-
I tried it but the results on mine looked alot more basic/cheaper – on the tutorial photos the effects look higher quality, more like after effects
-
Good Jb
-
can you make an action of this ?
-
nys 1
-
No such thing as New 3D extrusion from layer. useless tutorial
-
Excellent post. Thanks for sharing……….
-
Thanks for sharing such informative post its help me to know deeply Photoshop work step by step.
-
I can’t get the 3d to be an option in step 2. What am I doing wrong?
-
Thanks for tutorial.But I have not Illustrator.
8/10
-
Faaaaaccccckkkk my head hurts
-
Working on the background, I was wondering if there is the possibility to make it transparent: I mean, a soft (really soft) black just around the borders of the main writing, black that then fades to transparent.
If you are able to indicate me a few steps to achieve this effect I will appreciate your help. -
Is it possible to follow this tutorial with Photoshop cs5.5?
For example, I see that in PsCS5.5 I have not the voice “New 3D Extrusion from selected layer” with right click on the shape layer.-
I’m pretty sure you can do it with Photoshop CS5.5 Extended but the interface will look different. You need “CS5.5 Extended” (not the CS5.5) for 3D work.
-
-
Firstly, this is just beautiful! Love it! I’d like to try creating this…..in CS4 Extended. Is this an adventure worth trying or are the 3D Tools/Techniques in CS6 far too advanced for my endeavor?
-
bonjour…give it a shout..at a go
-
-
Fabulous! Photoshop, with the right tutorial, never fails to amaze me. Thank you.
-
Awesome tutorial! Thank you for offering it. Can you tell me how I can make the background behind my text translucent/transparent, please?
-
Excellent tutorial! One of the best I’ve read for a long time
-
Forgot something. Tutorial was damn helpful managed to create my own dictum.This is my final result…;added some more lightning effects……..
http://stthomaschss.com/ashith/3d.jpg
Thanks a lot..
-
Where did you get the overlay texture with the circle lights?
-
@Joachim:
It’s a simple technique ; The shape dynamics.
1. Create a new layer.
2. Goto window->Brush, choose a circular brush with 100% radius
3. Use spacing and set to 1000%.
4. Opt for shape dynamics and use size jitter 40% and roundness jitter to 25%(yup you can experiment your own values)
5. Now draw above the layer we created at step one to get uneven circles.
6. Give it a bit of Gaussian Blur (filter->blur->Gaussian blur….yes u know).
7.Use overlayrepeat steps 1 through 7 with different brush sizes and colors if you prefer…
voila, you are there……
-
Sorry at step two read as 100% hardness not radius..my bad.
-
-
the option U specified in Step 2 . .”choose New 3D extrusion from layer.”
this option is not highlighted . . what to do?? tell me some solution
-
Precise dense video tutorial…Not a second is useless….highly informative and descriptive with clear explanation…..awesome is the word…….
-
I love your videos. Best voice ever!
-
best tutorial but where is font?
-
Sorry about that! Updated the tutorial with the links:
http://www.fontsquirrel.com/fonts/bebas-neue
http://www.fontsquirrel.com/fonts/pacifico -
Please el link de descarga PSD..
-
-
Great end results!


Leave a Reply