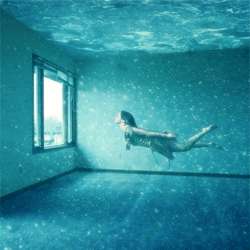
In this Photoshop tutorial, you’ll learn how to create this magical underwater room. This tutorial covers techniques such as blending images, color correction, adding photo effects.
Preview of Final Results
")
Breathtaking Underwater Apartment Photo Manipulation Photoshop Tutorial
Tutorial Details:
- Program: Adobe Photoshop CS2
- Version: 9
- Difficulty: Medium
- Estimated Completion Time: 1 to 1.5 hours
Resources
- Apartment Stock 2 by Disney-Stock (Creative Commons License)
- Fairy S – 15 by mjranum-stock (Creative Commons License)
- Water by Jazzeri (Creative Commons License)
- Aquarium Bubbles by Michael Vincent Manalo (Royalty Free License)
- Calm Water strwberrystk by strwberrystk (Creative Commons License)
Step 1 – Create the Photoshop document
To start things off, let’s open a new image file, go to the Menu bar and click on File > New, then when the box opens, locate the Preset drop-down menu and click on A4 from the menu, or you may input following settings:
- Width: 2480 pixels
- Height: 3508 pixels
- Resolution: 300 dpi
- Color Mode: RGB Color; 8bit
- Background Contents: White

A landscape type of canvas is what we need for this image, so we would need to rotate the newly created layer; when the new layer opens, go to Image > Rotate Canvas > 90’ CW.
Step 2 – Create the water room
In this step, we will create a room filled with water. To start, let’s open our fine stock image: Apartment Stock 2. After you’ve opened it, we won’t be doing anything to it, except moving it to our A4 canvas. Activate the Move tool (V) and drag the image to our canvas and then activate the Transform tool (Ctrl/Cmd + T) to scale the image to fit our canvas. To use the Transform tool, drag the small box/s to a direction which would successfully transform the image.

Now, we would need to change our room’s color tone. On the Menu bar, go to Image > Adjustments > Color Balance or you may simply hit the shortcut key which is Ctrl/Cmd + B and then input the following values:
- Color Balance: -40, 0, +10
- Tone Balance: Midtones
- Preserve Luminosity: Checked

Next, we will be changing the ceiling into water! Open the stock image: Water and drag it to our canvas using the Move tool (V). Upon moving, let’s change the name of this layer to “water ceiling” to avoid confusion throughout the creation process. To rename a layer, double-click on the word “layer 1” and the text box would appear and you may now rename the layer. Notice the ceiling, how do you think we would transform our “water ceiling” so it would fit the real ceiling’s shape? It’s easy; we will utilize the power of the Distort tool! Activate the Transform tool (Ctrl/Cmd +T) and right click on our image to bring up the contextual menu, when the menu appears, click on Distort. So you won’t have a hard time transforming the image, a good thing to do would be to reduce its opacity to 40%. To reduce an image’s opacity, go to the Layer window (to where your layers are located) and change the % value on the Opacity drop-down menu. Change it to 40%. After you’ve done that, the transforming process begins. See image below:
8 responses to “Breathtaking Underwater Apartment Photo Manipulation”
-

Are these even real?
-
Such a great concept! It is like a dream.
-
HI the bubbles stock is missing can you fix?
-
OMG I DID THIS AND IT WAS AMAZING THANKS DUDE AND YES THIS IS CAPS LOCK WORTHY!! YOU ROCK :-)
-
FINALLY AN UNDERSTANDABLE TUTORIAL FOR A VERY BRAND NEWBIE LIKE ME. THANK YOU SOOOOOO MUCH!
-
do you have the aquarium picture left still cuz erm its not on the website anymore!
-
i don’t get the point of a single page if i still have to go trough the others pages
-
Just click to “Older Entries”
-
Leave a Reply