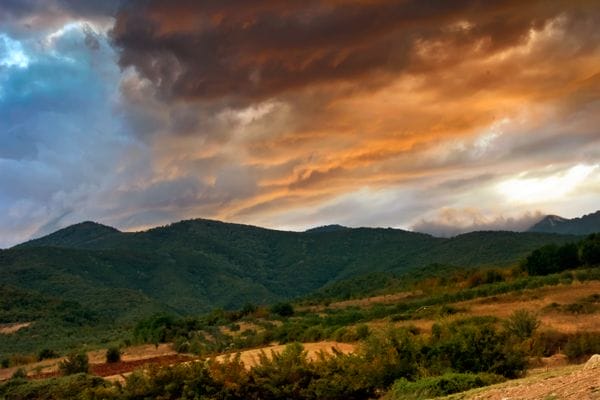
How to vastly enhance landscape shots using Adobe Camera Raw (ACR) and then Photoshop. This tutorial will show step by step tips and tricks in order to get out the most out of your landscape pictures.
Preview of Final Results

Amazing Landscapes using Adobe Camera Raw and Adobe Photoshop
Step 1 – Photo Selection
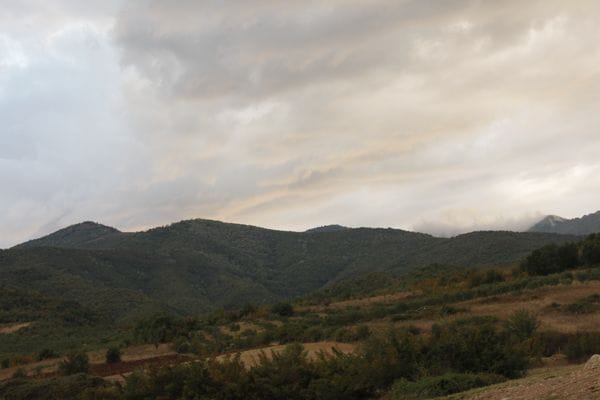
Select the photo you’d like to edit. This is apparently the obvious, but there are some important criteria here. Photoshop is an image enhancer, not Jesus Christ, meaning that it makes good pictures look astonishing, mediocre pictures look good, while bad images will just look mediocre. A good landscape shot, is a shot that keeps the maximum detail possible inside the digital color and exposure range. The biggest problem when shooting landscape is the exposure difference between sky and ground if you are not using filters on your camera to prevent this. This difference can be huge in bright noon daylight, up to 12 stops, while it gets smaller during sunrise or sunsets, up to 6 stops. Here in this tutorial we will work on a mediocre picture though, taken during a sunset, in order to perform a lot of enhancing actions regarding exposure, contrast, white balance and vivid colors. But the important fact is that the exposure difference between the sky and ground was not vast, 6 or maybe 7 stops. This picture was taken with a net lens, without any polarizing filter or graduated nd filter attached. Also note that we are working on a JPG, not a .CR2 image.

Step 2 – Open in Adobe Camera Raw
So opening in Adobe Camera Raw (ACR), is the obvious step. First get a good look at the image and spot out what this image could use in order to get top notch. No Photoshop tool replaces a good eye for what needs to be done, so just dedicate some time observing, even if your photoshop skills are not great, both skills and your intuition can be trained simply by observing. So for this image I made a few remarks. For you to comprehend them better I note them on the image using red. This is just to show my mindset when observing an image to enhance, I never actually write anything. I made 4 quick remarks here:
- Exposure difference between the ground and the sky
- Plants are dark and lack light detail
- This area is pale and less contrasty than the rest of the ground
- Cloud detail is minimum because of darks absence.
and generally this image has very low contrast, it is colorless, somewhat underexposed but in the little histogram that ACR offers you can see that all information of this image is inside the exposure range, no information is lost, and you can obviously see the two little histogram mountains there, clarifying the two worlds of exposure in this image, ground and sky.
10 responses to “Amazing Landscapes using Adobe Camera Raw and Adobe Photoshop”
-
Wow, this one seems real easy. I am going to save this for future photos that I am editing.
-
I am having the same problem as Josh in step 20. Can this be achieved without shortcuts? Perhaps they have changed with new versions (I am using CS6 on Windows)
-
The selection must be active when you press the backspace, otherwise the fill button appear. (I’ve cc 2014 and work great)
-
……..also you must work on a new\copy layer, and not with the background layer.
-
-
On step 20, when I hit the backspace button, I get the fill menu. It does not darken the greyscale. What exactly should the backspace button do in this instance. Is this function somewhere else in PS that backspace is just a shortcut to?
-
helpful one .. thanks :)
-
Why don’t I get the options “Fill light” and “Recovery”?
-
I’v gotten lost on the masking process, i followed your steps meticulously, but achieved a big fail. I need a more dumbed-down instruction for the masking, something is missing here.`
-
Up until step 21 I was going great, I’m using Photoshop CS5 and every time I try to “select Channel Alpha 2 to create a levels 2” i get “Warning: No pixels are more than 50% selected. The selection edges will not be visible.”
-
I was having this problem too, but I FINALLY figured it out. The key is in Step 20: “With the selection still loaded, select Channel Alpha 2 and press
Backspace once. Select Channel Alpha 3 and press Backspace twice then
select Channel Alpha 4 and press Backspace 3 times. When you are done,
your created Alpha channels should look like this, every next one a
little bit lighter that the previous one.”Once I read that and noticed my Alpha channels were getting DARKER with each deletion, I double-checked my foreground and background color. You’ll want black as foreground and white as background. Hope this helps!
-


Leave a Reply