
Photo manipulations don’t have to be a mess of layers. Many complex photo manipulations can be recreated in less than 15 layers by taking advantage of Smart Objects. Learn how to create photo manipulations with a fraction of the layers you’d normally use with these 10 tips.
1. Convert your layers into a Smart Objects
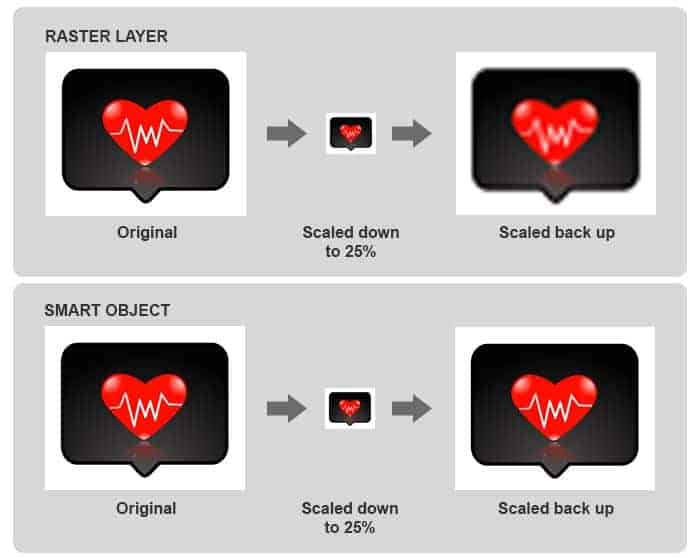
It’s surprising how many people don’t use Smart Objects – the most important nondestructive editing technique. Smart Objects are layers – just smarter. Unlike regular layers, Smart Objects give you:
- Nondestructive transformations. You can scale, rotate, skew, etc. multiple times without losing the original image quality. For example, if you were to scale layer to a smaller size then decide you want to enlarge it back later, you can do so without losing any image quality.
- Nondestructive filterings. When you apply filters to Smart Objects, they are applied as Smart Filters which lets you edit the settings at any time. Most filters in Photoshop CS6 are compatible with Smart Objects.
- Syncing/Linked instances. If you duplicate a Smart Object, you can update the contents within the Smart Object and both of the layers will be updated. This is useful when you need more than one copy of the same layer but want them all to be synchronize.
To convert your layers into Smart Objects, right-click on the layer then choose Convert to Smart Object.
2. Use the File > Place command to place images
Often times, photo manipulators would open an image in Photoshop then copy & paste it to another document. There’s no reason to do this anymore. Copying & pasting takes more time and effort and the Place command automatically places your image as a Smart Object saving you even more time.
Using the File > Place command also lets you place RAW, AI, and other types of files directly as Smart Objects. For example, you can place your RAW files and use the Adobe Camera RAW to edit the RAW file at any time just by double-clicking on the Smart Object. You no longer have to convert your RAW files into JPG images before placing them into your photo manipulation.
3. Use layer and clipping masks
Most of you already know about layer and clipping masks but they still aren’t being used properly by many. A lot of times, photo manipulators would create a cutout of the image directly on the layer then use a layer mask to erase more parts of an image. If your layer was a Smart Object, Photoshop would prevent you from doing this and force you to make changes in your layer mask. If one layer mask isn’t enough, you can always add more by placing them into groups.

Need to use more than one layer mask? Put it into a group and add a layer mask to the group.
Clipping masks is another great way of recycling those layer masks/cutouts you’ve created. Instead of copying/pasting layer masks, just use clipping masks. If you really can’t use clipping masks, you can always place those layers into a group and apply a layer mask to the group instead. With Photoshop CS6, you can even clip layers to layer groups.
9 responses to “10 Important Nondestructive Editing Techniques for Photo Manipulators”
-

Wow! Just learning and this is great info. Thanks
-
Have a nice work…………thanks for sharing.
-
Thanks! Great tips and trick!
-
I find Point 4 completely rubbish to be honest. No pun intended. But the two effects are quite different – while the first one is a really nice film effect, and the second one looks like a cheap downloaded free preset.
-
The shadows are getting clipped in the first one with many layers as a result of using too many adjustment layers.
She is simply stating that there’s no point creating a bunch of adjustment layers so that you “get lucky” on a film effect. Rather, understand what each layer does exactly so you don’t end up with so many layers -
To me, they’re similar enough to necessitate the fewer layers.
But that’s not what I’m here to talk about. I’m here to say that the article could use a better example for the bad effect. Could have just used any one of those random vintage-look Photoshop action because 9/10 of them are a bunch of accidental layers: Duplicate layer, change blend mode, merge down, add color layer, change blend mode, merge down, etc etc.
-
-
If folks would realize the advantages of the Smart Object feature, they’d never go back! Great run-down! Thank you!
Su
-
Second this… I cringe when I see people brag about how many layers their PSD has
-
-
Beautiful Thank You
Leave a Reply