

Step 11
Now, press right click on layer then select “Blending Options”. Then drag left slider (Underlying layer) to right(30) and then press and hold ALT and keep moving to 145.

Step 12
Now select the Man and Woman layer and add Adjustment Layer “Hue/Saturation”
Step 13
Add Adjustment Layer “Curves”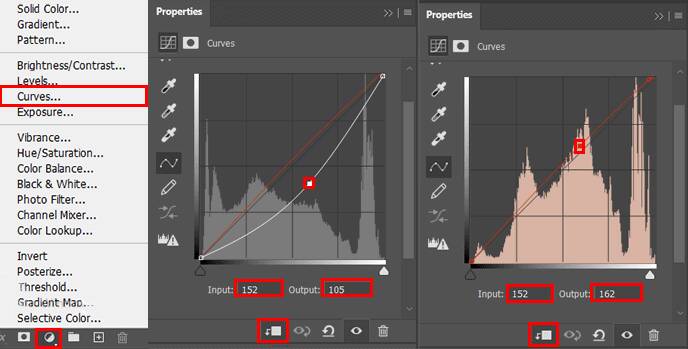
Step 14
Add Adjustment Layer “Gradient Map” and change Blend mode form Normal to Soft Light with Opacity 10%.
Step 15
Add Adjustment Layer “Color Lookup” and 3DLUT File set to FuturisticBleak.3DL. Opacity set to 39%.
Step 16
In this step we will add an adjustment layer “Hue/Saturation” and press Ctrl/Cmd + I to invert. Now use Brush Tool(B) Soft Round with foreground color white and paint the edges of the wall and people. Opacity reduce to 50%, you can see the pictures below.


Step 17
Next we will openSeagull, go to File > Open and select Seagull. Now we need to select, I use a Pen Tool(P) but we can use Quick Selection Tool or some other tool. If you use a Pen Tool(P), the procedure is simple. When you are done with selecting press the right click on the mouse and click on Make Selection. Feather Radius set to 0 then press OK.
Step 18
Then simply copy (Ctrl / Cmd + C) and Paste (Ctrl / Cmd + V) it to our work canvas. Position the image with the transform tool (Ctrl / Cmd + T). Hold Alt + Shift and resterize like image below. In Photoshop CC only hold Alt to resterize al sides together.
Step 19
Next, create a new layer and putt it below Seagull, it will be a shadow. Use Brush Tool(B) Soft Round with foreground color black and Flow 5%. Then start a painting.


Step 20
Select Seagull layer and add Adjustment Layer “Curves”
Step 21
Add another Adjustment Layer “Curves” and press Ctrl/Cmd + I to invert it. Now use Brush Tool(B) Soft Round with foreground color white and start the painting white side of Seagull.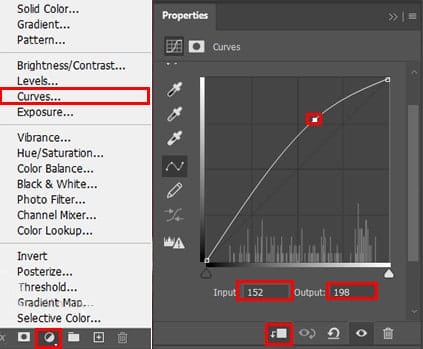

Step 22
Add Adjustment Layer “Curves” and repeat the same process from last step. Invert it (Ctrl/Cmd + I) and use Brush Tool(B) Soft Round with foreground color white and paint the dark side of Seagull.

Step 23
Add Adjustment Layer”Hue/Saturation”
Step 24
Add Adjustment Layer “Selective Color” and in Colors panel set Whites.7 responses to “Create an Emotional Sunset Scene Above the Clouds in Photoshop”
-

Nice
-
thank you
-
Nice tut! Thank you!!
I’m getting a 404 page on the download link, tho.Su.
-
Sorry link should be working now.
-
-
link psd is dead?
-
Thanks for letting us know! Link has been fixed
-
always impossible :)
-
Leave a Reply