
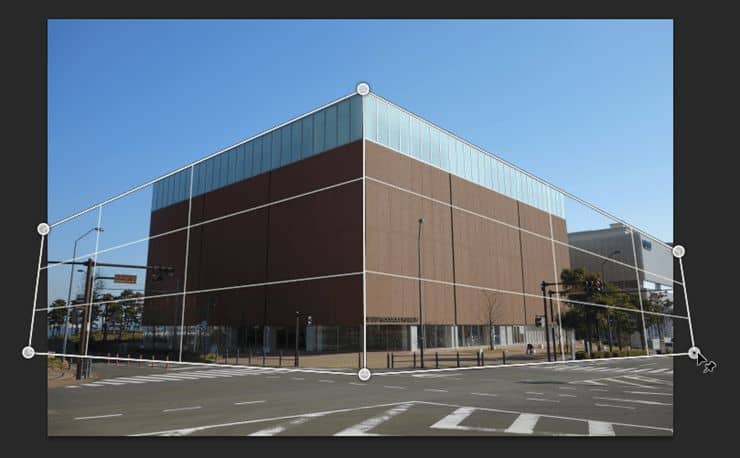
Continue dragging the rest of the points towards the other corners of the building.
Next, switch to the Warp mode by clicking on the button in the options bar.

You can move the points around but it’ll usually skew your image which isn’t what we want.
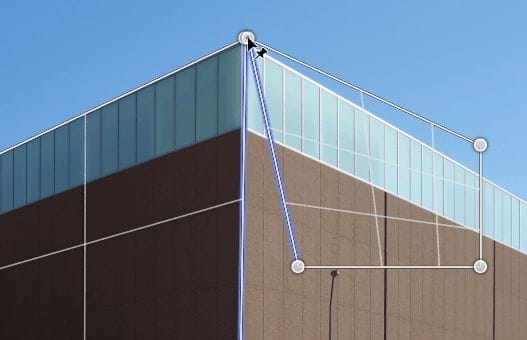
Instead, hold the shift key and click on the middle line. This will straighten the line and make the two points link to each other. Now when you drag one point, the other will follow it horizontally.


Hold the shift key and click on the other two vertical lines.

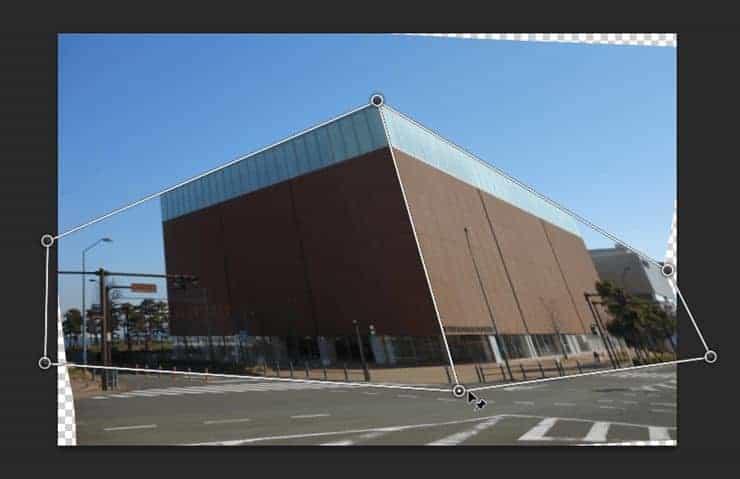
Drag the points so that it fits your image.

You can complete the image by trimming off the edges with the Crop tool. If you get any

If you get any transparent spots, you can use the Healing brush tool to fill it in. You can’t use it directly on the Smart Object, but here’s how to get around it. Create a new layer then select the Healing Brush tool. In the options bar, checkmark the Sample All Layers option. Now you can click on a transparent spot and it’ll heal the area using the data from all your layers.


Here’s a before and after shot of the Perspective Warp tool.


Match Perspective
Another useful purpose for the Perspective Warp tool is to match the perspective of two images. For example, we found two images on ShutterStock.com – one of a truck and one of a road. The perspective is similar but not close enough for us to simply place the truck on the road. To fix this, we can use the Perspective Warp tool to change the perspective of the truck.

Using the Perspective Warp tool, draw two boxes around the sides of the truck. Hold the shift key and click on a vertical line that you want to move.

That’s all! This feature is great for photo manipulators who spend countless hours finding the right stock photo with matching perspective. There’s still some fixing required especially around the wheels.

To fix this, we can use the Puppet Warp tool by going to Edit > Puppet Warp. Click to create four points on the edge of the wheel then drag the middle two points upwards to align the wheels.

We’re done! Simply add some shadows and your image is done.
28 responses to “4 Useful Ways to Use Perspective Warp”
-

yes, prespective wrap not active for me…i tried many times…please let me know what to do?
-
Go to Edit > Preferences > Performance and enable the “Use Graphics Processor” setting.
Without the “Use Graphics Processor” setting, Perspective Warp will be grayed out in the menu.
Screenshot: https://i.imgur.com/9z7vHcu.png
-
-
This is the best guide I’ve read on perspective warp. You’re the only one who showed why it’s useful.
-
Thanks
-
Oh yes, thanks for this one!
-
The fourth example was a STUPID. Architects and designers need to know how to take an image in perspective into elevation. You failed miserably.
-
Thanks for this!
-
Cool tech but only works on some photos. And expect a lot of warped areas. The road in your example picture made the straight lines curved. Photoshop needs to implement AI into this for better rendering.
-
It’s really amazing tutorial.Thanks for sharing.
-
Thanks
-
Hell yeah!<3
-
:D
-
Thanks so much for that:D
-
Any one can tell the name of the software. ..
-
Selvam its Photoshop
-
Is it adobe 7. Or cc
-
Hell yeah!:D
-
-
Thanks !
-
dope
-
Yes!:D
-
-
Update me all your. Tutorial
-
Agreed… Cool post thanks
-
Hey will u make a tutorial on mocha AE for my motion tracking. I have a little. Problem solved
-
To solve
-
-
:D
-
vanishing point is cool to point out but alpha channels are for what now?
-
For the first image. Were is link for downloading?
-
Your image works beautifully with the mask Nancy!
Leave a Reply