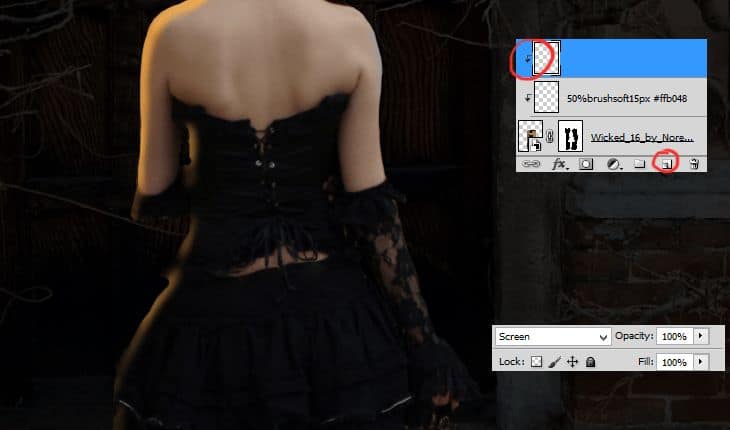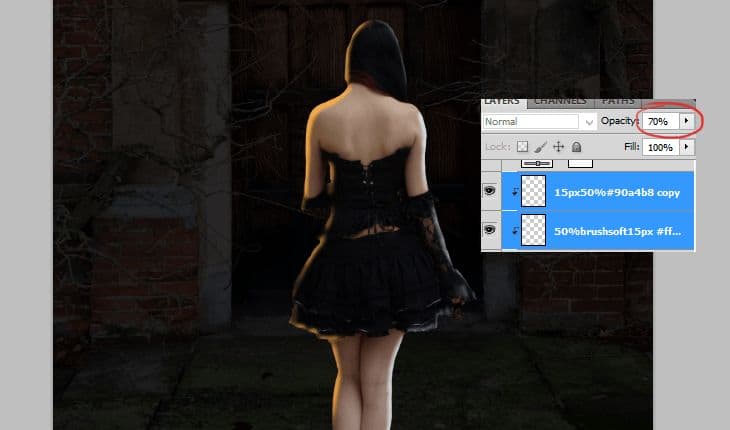

Step 10
Cool! Now you will copy two layers with lights. Choose layers by holding ctrl. Then, drag layers on “New layer symbol”.
Step 11
Now, again click with holding Ctrl duplicated layers. Decrease opacity of marked layers to 70%.
Step 12
Time to set exposure of model. Add adjustment layer with Exposure (marked shortcut or Layer > New Adjustment Layer > Exposure). Set it as shown. Then, click on created layer by RMB. Choose “Create clipping mask” – Adjustment layer will fill only model’s layer.
Step 13
Back below model’s layer. Add new layer. Pick big, soft, gray brush and draw some shadows below feet. Then, use smaller brush with darker color and draw darker shadows. If you aren’t glad of your effect, just blur it. This is optional, but shadows will be smoother. Avoid use black color (#000) – it’s not naturally occurring.

Step 14
Add new layer with shadow. Use big, soft, gray brush and draw something like triangle.

Step 15
Night isn’t ready yet. You should add night colors to your image. To create this effect, add adjustment layer with Color/Balance (marked shortcut or Layer > New Adjustment Layer > Color/Balance).
Step 16
Add new layer (Shift+Ctrl+N, Layer > New > Layer… or marked shortcut). Pick big, orange brush. Draw glow of your light source. Door’s line will guide you! :).
Step 17
It should be glow, not something solid. To fix that, choose from top menu Filter > Blur > Gaussian blur. Set it as shown.

Step 18
Add new layer (Shift+Ctrl+N, Layer > New > Layer…, or shortcut). Now you should create true light source. In my vision behind doors is fire. And whole room is burning. I used 7px hard round brush (#f9d77b color, pressure size) for drawing it.16 responses to “Born of the Dragon – Create this Symbolic Gothic Composite in Photoshop”
-
Hi, this tutorial helped me learn things, and was cool. The only 3 things about it made me frustrated.
1. You only used one specific color code and the rest of the colors were hard to get right.
2. The 1px soft brush for the hair strands did not work for me. It was too big and pixelated and I wasn’t sure what effects you used..? Maybe I missed it.
3. I couldn’t use trees. it was hard to follow the tutorial properly. I use a different door. One you used not available.
thank you for this tuorial and keep up the good work.
-
This tutorial was cool, but frustrating for me because it was hard to find the exact colors, because you only gave one specific color code. Also I’m not sure exactly how you did the hair, mine wasn’t working well at all. I was using a soft round 1px brush and it was too pix-elated and it was too big . Here is what I came up with . I didn’t use the trees because It didn’t go well
with the door (because the one you used wasn’t available) . Thank you for making this tutorial. Keep it up. -
Amazing tutorial!
-
Great tutorial, I tried to make Something like that. Thanks
-
nice tut, just lost a bit in translation, if you know what i mean.
But thanks anyway !!!! -
This is really fantastic. The unlimited access makes it even better
-
Great tutorial. Thanks!
-
Looks amazing. Thank you, I want to try this and have read through the tutorial. Can you please tell me what you mean by click RMB. I know all the tools in Photoshop (using CS5) but RMB is new to me. thank you.
-
RMB = right mouse button
-
I think RMB = right mouse button :)
Great tutorial, thank you. I tried it, but I got some trouble with the orange color, it isn’t like yours. Can you tell me the color-code? It looks really dark and it is not “shining” on my manipulation.
Thank you for this tut :)
-
-
very nice
-
(y) Thanks
-
Very nice article. I will learn from this a huge resource. Thanks for share.
-
lel
-
so nice thanq i learned a lot of the tutorial love al your work on this site
-
so cool.Thanks for your tutorials


Leave a Reply