Adjustment Layers-Photo Filter Adjustment Layers- Gradient mask . Both layers are clipping masks.


Step 5
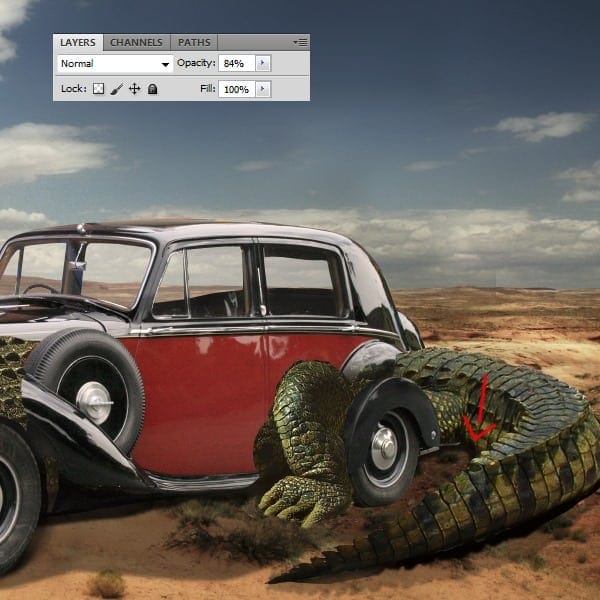
Open the first crocodile photo. We will use the tail from this crocodile. So cut out it and place it at the back side of the car as you see in the image below.


Use a clipping mask to add to make the tail look darker, so go to Adjustment Layers-Curves. You have the presets in the image.

We need to add some shadow to the tail so using the pen tool create a shape that resembles to the tail’s edge. Fill the path with black and the opacity to 70%.

Using the same techniques as you did on the step before this , create a bigger shadow. Set the opacity to 28%. Remember that the tail casts a shadow in the inner corner so create a shadow there to. Set the layer’s opacity to 84%.


Step 6
Open the second crocodile photography. We will use this crocodile’s torso for the front of the car and his back will be the texture that we will use to cover the entire car. Also his back leg will be in front of the back wheel.

Cut out the leg and place it in front of the back wheel. Use the image below for guidance. The fingers are in the light but this is not possible since the leg sits in the car’s shadow. Go to the adjustment layers-curves and add some shadow to the foot. This layer needs to be a clipped to the foot’s layer.


Step 7
Open the second crocodile photo again and place it in front of the car. Using the layer’s mask erase all the parts that you don’t need. Be careful to leave the front wheel uncovered.


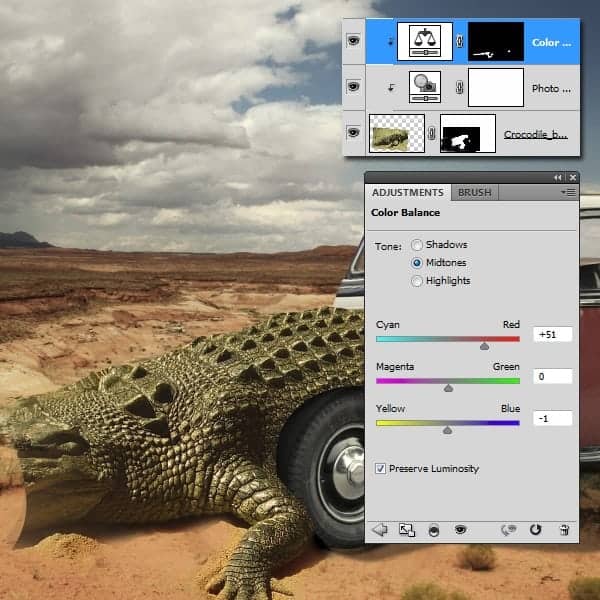
We need to create 3 clipping masks to adjust the crocodile’s colors, so go to the Adjustment layers-Photo filter, Adjustment layers-Color balance ( use the presets as you see below) and Adjustment layers-Hue/saturation.


Step 8
In this step we will cover the car with crocodile texture. For this we will use the texture from the crocodile’s back, so using the pen tool cut out the back the marked part.

Clip this part to the car’s layer and leave only the part that covers the door. Remember to leave out the upper wheel. This wheel casts a shadow on the door so using the burn tool we will create that shadow. Use the image below for guidance.
27 responses to “Combine a Crocodile with a Car to Create an Exotic Crocomobile”
-
7/10
-
so if you actaully look at its teeth, you can easily tell its an alligator, butt yall wouldnt know
-
boo
-
bruh
-
wow
-
Loredana…i love You :x
-
This tutorial is very interesting and helpful for the learner to understand everything very quickly. I loved this work. Great job.
-
uuuuhh how big is the file you start on it doesnt say
-
nice
-
The information which is given in this tutorial that will helpful for the learner to understand each and every thing easily.
-
I like the idea of this tutorial, it’s very creative and the result looks great.
-
Keep it up!
good job..
-
Please where can i download photoshop tutorial videos?
-
very nice tutorial………..
-
think you very mash for your tutorial :)
-
Loredana…i love You :x
-
lol
-
-
Very Nice! Tutorial. Can U send me your email ID or Chat ID
for further support & help in PS
Please…………….Thanks from Bangladesh
-
Nice Tutorial. can u send me ur mail ID or chat id for further help in PS
Please!!!!!!!!!
-
looks awesome! I’ll try to do my version this weekend.
-
What on earth is this supposed to be its not surreal its just stupid. What a waste of time. Surprised that this was even considered to be a credible tutorial.Absolute pants!
-
ur sad
-
are you like ok at home? its a crocomobile what’s not to love
-
-
This is a very interesting tutorial on creating the worlds only car, with a crocadile exterior. Good read.
-
How about making a tut on how to combine a bat with a car? :P
-
i see what you did there!:D
-
-
dangerous the girl is so dangerous. Thanks for the detailed tutorial.


Leave a Reply