
Step 52
Now time for some brushes.
Open grass6_alegion-stock.png file. Name its layer GRASS.

Step 53
Right click on GRASS, if your layer is in smart object mode, you will see Rasterize Layer, click it. If you don’t see, Its ok , your layer is already in Rasterize mode.
I will explain about Smart Object and Rasterize a little. Smart Object is just like a vector, you can scale it in and out without losing any detail, but you can’t do anything to Smart Object but transform them.
Otherwise, Rasterize is a normal layer that we usually meet in Photoshop. When you scale it into smaller size then scale it again to bigger size, it will lose some detail.

Step 54
Now with rasterize Grass layer, press CTRL + L ( Levels ) and setting like this.

Step 55
Now right click again in Grass layer then Convert to Smart Object. You don’t need to adjust this layer anymore, just transform it.

Step 56
Drag your Grass layer below of PROTECT layer, then transform it ( CTRL + T ) like this.

Step 57
Duplicate your Grass layer ( CTRL + J ) to make some other brushes, I put them in like this. I also hide PROTECT layer for you to see them clearly.

Step 58
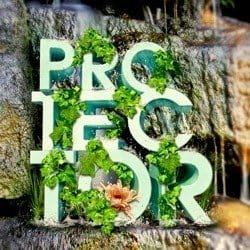
If you did it right, we will have this.

Step 59
Now time for some nice splashes.
Open Splash_I_by_BestStock.jpg in new window. CTRL+A > CTRL+ X > CTRL + V. And you will have this.

Step 60
Time for a little magic! Pick Magic Eraser Tool and delete all the back ground, we just need a splash.

Step 61
Use Eraser tool to make it clean and nice. Don’t worry about how it looks like, we will only need a splash.

Step 62
Open Splash_V_by_BestStock.jpg file and do the same thing.

Step 63
Now paste this two images to our file. Name it SPLASH1 and SPLASH2.

Step 64
Pick Splash2 layer, press CTRL + U ( Hue/Saturation ) and setting like this.

Step 65
Next, press Ctrl + L ( Levels ) with this setting.

Step 66
Pick SPLASH1 layer and CTRL+L for Levels adjustment

Step 67
Still SPLASH 1, now for Hue/Saturation Adjustment ( CTRL + U )

Step 68
Okay. Now just like step 40, just like what we did with the leaves, now we did with the splashes!
Make lots of back ups for Splash1 and Splash2 , then one by one transform them to their position.
7 responses to “Create a Nature Text Effect Poster in Photoshop”
-

Hello There,
Thanks for taking out your time and create this awesome step by step tutorial of Natural Poster.
Definitely good to use your tips in my new poster design -
How to restore image after fixed?
-
Chomir Ali I want delete sun image what to be made by effect
-
-
Thanks for this tutorials…really helpful
-
niceeee
-
WOW….
-
thanks
-
Leave a Reply