
Step 83
Duplicate your Lotus Layer to have Lotus copy layer. ( Use Ctrl + J on Lotus layer )

Step 84
Now set Lotus layer to Screen Blending mode , and Lotus copy layer to Multiply Blending Mode. It will help the blending more effective.

Step 85
Now it’s nearly done!
Grab the Crop Tool and Crop your image. Please mind that there are 4 golden points in your image ( I spotted them below ). Try to keep these 4 points in something important.

Step 86
Create a new layer on the top of all layers. Then press Ctrl+Shift+Alt+E to make a Stamp Visible to this layer. Name it ALL.

Step 87
On ALL layer. Choose Filter> Blur> Lens Blur.

Step 88
On Lens Blur dialogue, have this setting:

Step 89
While selecting ALL layer, click Add Layer Mask Button at the bottom. Then pick Brush Tool with 11% Opacity and black color to paint on the mask.
Mind that your painted area with disappear. So to make a good focus effect , try to paint all the PROTECTOR text, and a little of the background around the text.

Step 90
Next step, Create new layer above ALL layer , name it BLACK.
Pick Rectangle Tool ( Press U ) , black color and draw 2 black rectangles like below, then adjust the opacity of the layer to 80%

Step 91
Create another layer above BLACK, name it LINE. Use Rectangle Tool in white color to draw one thin rectangle like this.

Step 92
Choose Filter> Blur > Motion Blur . Setting Angle to 0 and distance in 284

Step 93
Duplicate LINE to have 2 nice lines just like this:

Step 94
I also added some texts and WWF logo to make this picture more epic ( lol – it’s just a fake for fun but I love to make something for the WWF, I hope they don’t mind it )

Step 95
On the top of all layers, create a adjustment layer , choose Photo Filter , choose Deep Yellow and 25% Density. More epic, huh?

Step 96
Want some more epic ? Then create another adjustment layer, get Exposure with this settings:
And we’ve done!

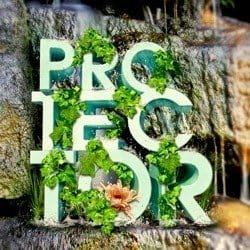
Final Results
![final[1]](https://cdn.photoshoptutorials.ws/images/stories/05f0e95414c2_296E/final1.jpg?strip=all&lossy=1&webp=82&avif=82&w=1920&ssl=1 "final[1]")
Download the PSD
Nature Text Effect Poster.zip | 64.82 MB
Download from FileSonic
Download from Website
Authors Comment
 I hope you’d enjoy watching this tutorial. Please feed back to make it better. Thanks for your attention. My website’s going to open soon. I’ll tell you all as soon as I can.
– XIN KUN
7 responses to “Create a Nature Text Effect Poster in Photoshop”
-

Hello There,
Thanks for taking out your time and create this awesome step by step tutorial of Natural Poster.
Definitely good to use your tips in my new poster design -
How to restore image after fixed?
-
Chomir Ali I want delete sun image what to be made by effect
-
-
Thanks for this tutorials…really helpful
-
niceeee
-
WOW….
-
thanks
-
Leave a Reply