
Learn how to this surreal photo manipulation of an Great Enchantress with Photoshop. In this tutorial, you’ll learn how to create your amazing atmosphere and adventure tales with realistic shadows and lighting, then complete it with a bleak color tone effect. Throughout the tutorial, you’ll learn techniques that will help you create better matte paintings and photo manipulations. Read this tutorial and find out how easy it is!
What you’ll be creating
Let’s start creating pictures by creating a landscape, then add mystical items. The next step is to create the model and work with animals. The final step will be drawing the shadows and work on atmospheric paintings, correction and adding effects. You’ll need any version of Photoshop, inspiration and good mood!

Tutorial Resources
- Galaxy textures
- Ocean waves
- The ocean
- Canyon
- Dragon tower statue
- Monarch butterfly clipart
- Model-1
- Model-2
- Dark angel
- Smoke brush
- Planet
- Mandala
- Sparks
Step 1
Begin with we will create a vast landscape for our further manipulations. I believe that we will create that – something like an amphitheater. This will give depth and mystery our picture.
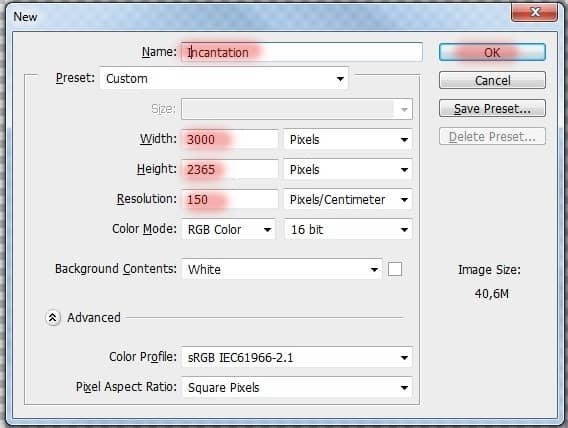
Start by creating! Create a new document. Go to File > New or the short key Ctrl+ N. A blank document with size of 3000 pixels wide and 2365 pixels high. I named the document “Incantation”.
Step 2
Let’s start off adding the landscape to our manipulation. Go to File > Place and select the image of landscape.

Step 3
After addition Place a landscape in the lower right corner without changing its size.

Step 4
Duplicate the landscape 2 times. The short key Ctrl+ J.

Step 5
Transform (the short key Ctrl+ T) the layer “background copy” on the size of a little more the working document.

Step 6
Repeat the same with the last layer. Transform (the short key Ctrl+ T) the layer “background copy2” on the size of a little more the working document. Place it to the left, as shown in Figure.

All we have done is to make the landscape more and more expressive. I think that if all the original picture landscape stretch for the entire document, it is not realistic to happen and there will be little space for our next steps.
Step 7
Begin to create. You have a unique opportunity to become briefly creator and create a new piece of magical scenery :) First, add a layer mask to “background copy” By clicking on the layer mask icon in the Layers panel.
30 responses to “How to Create This Amazing Artwork of a Great Enchantress in Photoshop”
-

Whew, this is a looooooooooooong tutorial. I followed it and once you get into all the layers, it is amazing what you can pull out of the other end. Thanks!
-
I can’t find the files for the planets.
-
Woow
-
NA WA FOR ADOBE OH:
-
ARE U A FASHION DESIGN
-
This looks horrible, most of them has said it to be beautiful, but very frankly it seems like everything has been forced upon to put together without matching itself.
Art is not a mere claustrophobic thing, it should be simple but elegant. There are many brilliant Photoshop manipulation which looks beautiful, true many things have been imposed but there is a perfect balance in them. I am very sorry, that this manipulation is not impressive nor very attractive, mere imposing of glitters or emphasising of too many characters with rainbow colours will not make everything beautiful, hoping to get more creative and good manipulative PS from you. -
That’s really thnniikg out of the box. Thanks!
-
An excellent tutorial, very clear and a fantastic outcome, thank you very much.
-
Great job on this! You made something that is usually pretty confusing very simple and easy to understand. I LOVE your tutorial.
-
I love your work, how to look like, I spent a long time learning PS, but do not produce good works, I would like to chat with you, but I can’t speak English well, Hello, friend.
-
thank you very much!
-
Which one is the landscape for step #1?
-
That is “Canyon” http://burtn.deviantart.com/art/In-The-Canyon-387085816
-
-
I would like to know if there is a difference with the photoshop version your using and adobe photoshop elements 10? I was trying to follow this step by step but my version is different please help.
-
great work
-
Thanks for the nice tutorial!
-
Wonderful tutorial…
But, where is the links for the fishes please ?-
Thank you very much! I am very pleased!
I do not focus on certain fishes because everyone can choose what he like :) I do not remember what I used the fish and source files I deleted, but it’s to mine these fishhttp://emzazasstock.deviantart.com/art/koi-stock-18-146933935
http://emzazasstock.deviantart.com/art/koi-stock-20-146934150
-
That’s a smart answer to a tricky quoisten
-
Hi ShadowPuma, I’m a T2G dev student too. In the same siittuaon you were in really. Iv been working on my portfolio projects in section 2 and I’m struggling to find any extra information outside of the course content and one useful site on path finding. I haven’t had any luck with any of the other subjects so do you have any useful links you could send my way? would really appreciate it. Nice work on this site too by the way.regards
-
-
oWxUM tuToRiAl…!!! :D
-
Thank you very much! I am very pleased!
-
-
waw that amazing i like it
-
Thank you ever so much! I am very pleased!
-
-
Great tutorial
-
Thank you very much!I am very pleased!
I hope tutorial has been useful to you.
-
-
Magnífico y muy claro
-
Thank you ever so much!
-
-
Great tutorial. Good Luck!
-
Thank you very much!I am very pleased!
I hope tutorial has been useful to you.
-
Leave a Reply