
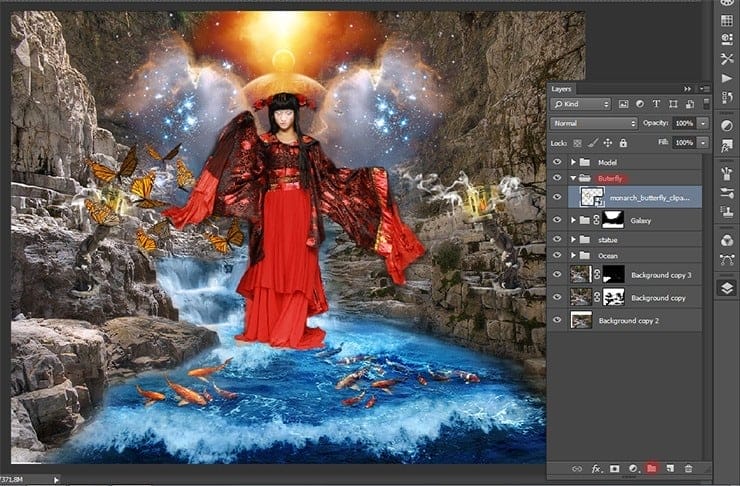
Step 105
Create a new group and name it “butterflies”. This group will be sorted butterfly on the right and left. Then color. In this group will fire.

Step 106
I will begin with fiery butterflies on the left side. Transform the butterflies to the desired size. Near dresses butterfly should be small. Tilt them a bit to give the direction of flight.

Step 107
Duplicate the layer with butterflies 2 times. Using Move Tool butterflies to move to the desired position.

Step 108
Transform (the short key Ctrl+ T) each layer, making more and more butterflies.

Step 109
Now duplicate group. Transform it (the short key Ctrl+ T). Click RMB on the document, in the drop-down list, select Flip Horizontal.


Step 110
Now go to the duplicated group. Move some layers to make it distinct from the left group.

Step 111
Now add a mask to each group, and then take Brush Tool (B). Set these settings: Size: 135px, Hardness: 0% Opacity: 100% Flow: 100%. Remove some butterflies that there was a strong crowding.

Step 112
The first figure shows the reconciliation to the mask, the second after the application of the mask.


Step 113
Now combine the two groups into one (the short key Ctrl+ G).

Step 114
Add to a group adjustment layer Hue/Saturation…

Set the settings as shown in the figure.

Step 115
Take Brush Tool (B). Set these settings: Size: 135px, Hardness: 0% Opacity: 50% – 100%, Flow: 100%. Change the opacity of the brush to achieve a smooth transition between colors.
On the layer mask, I cleaned the front with red butterflies. Red allocations where adjustment layer should remain.

Step 116
We proceed to the cosmic butterflies. Duplicate 2 times group with leftist butterflies “Group 14” and move it above the adjustment layer.


Step 117
Transform this layer the short key Ctrl+ T. Make small butterflies.

Step 118
In-group “Group 2 copy” duplicate the very first layer. Butterflies move it to obtain an extension of butterflies.

Step 119
In the same way Change the left butterflies.

Step 120
Add to a group adjustment layer Hue/Saturation… Set the settings as shown in the figure.


Step 121
Take Brush Tool (B). Set these settings: Size: 75px, Hardness: 0% Opacity: 50% – 100%, Flow: 100%. In addition, remove the layer mask bit color.
30 responses to “How to Create This Amazing Artwork of a Great Enchantress in Photoshop”
-

Whew, this is a looooooooooooong tutorial. I followed it and once you get into all the layers, it is amazing what you can pull out of the other end. Thanks!
-
I can’t find the files for the planets.
-
Woow
-
NA WA FOR ADOBE OH:
-
ARE U A FASHION DESIGN
-
This looks horrible, most of them has said it to be beautiful, but very frankly it seems like everything has been forced upon to put together without matching itself.
Art is not a mere claustrophobic thing, it should be simple but elegant. There are many brilliant Photoshop manipulation which looks beautiful, true many things have been imposed but there is a perfect balance in them. I am very sorry, that this manipulation is not impressive nor very attractive, mere imposing of glitters or emphasising of too many characters with rainbow colours will not make everything beautiful, hoping to get more creative and good manipulative PS from you. -
That’s really thnniikg out of the box. Thanks!
-
An excellent tutorial, very clear and a fantastic outcome, thank you very much.
-
Great job on this! You made something that is usually pretty confusing very simple and easy to understand. I LOVE your tutorial.
-
I love your work, how to look like, I spent a long time learning PS, but do not produce good works, I would like to chat with you, but I can’t speak English well, Hello, friend.
-
thank you very much!
-
Which one is the landscape for step #1?
-
That is “Canyon” http://burtn.deviantart.com/art/In-The-Canyon-387085816
-
-
I would like to know if there is a difference with the photoshop version your using and adobe photoshop elements 10? I was trying to follow this step by step but my version is different please help.
-
great work
-
Thanks for the nice tutorial!
-
Wonderful tutorial…
But, where is the links for the fishes please ?-
Thank you very much! I am very pleased!
I do not focus on certain fishes because everyone can choose what he like :) I do not remember what I used the fish and source files I deleted, but it’s to mine these fishhttp://emzazasstock.deviantart.com/art/koi-stock-18-146933935
http://emzazasstock.deviantart.com/art/koi-stock-20-146934150
-
That’s a smart answer to a tricky quoisten
-
Hi ShadowPuma, I’m a T2G dev student too. In the same siittuaon you were in really. Iv been working on my portfolio projects in section 2 and I’m struggling to find any extra information outside of the course content and one useful site on path finding. I haven’t had any luck with any of the other subjects so do you have any useful links you could send my way? would really appreciate it. Nice work on this site too by the way.regards
-
-
oWxUM tuToRiAl…!!! :D
-
Thank you very much! I am very pleased!
-
-
waw that amazing i like it
-
Thank you ever so much! I am very pleased!
-
-
Great tutorial
-
Thank you very much!I am very pleased!
I hope tutorial has been useful to you.
-
-
Magnífico y muy claro
-
Thank you ever so much!
-
-
Great tutorial. Good Luck!
-
Thank you very much!I am very pleased!
I hope tutorial has been useful to you.
-
Leave a Reply