Step 36
Select the lightbulb and with a black brush with the size around 200-300px make a shadow at the bottom of the bulb like in the photo.

Set Blending Mode of the layer on Soft Light and Opacity 45%.

Step 37
Click on the “Create new Fill ar Adjustment layer ” icon and select from the menu Photo Filter.

Select the “Underwater” Filter and set Density at 75%.

Step 38
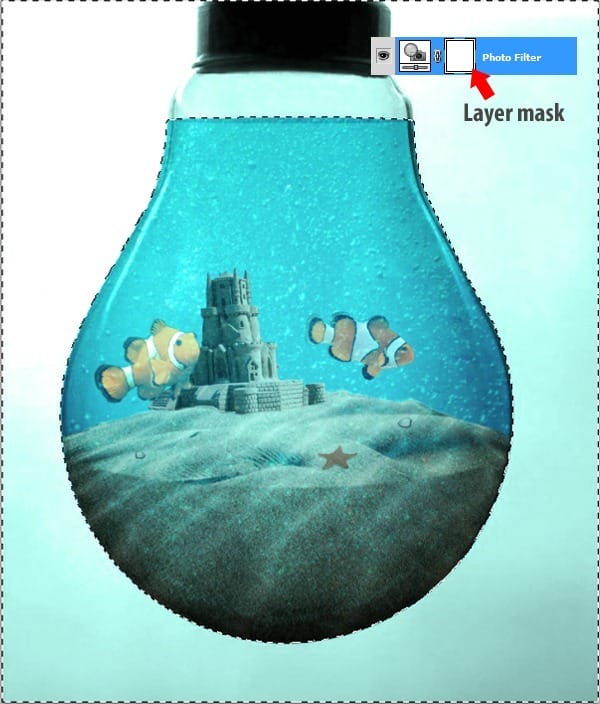
Select the entire surface of the water pressing Ctrl+Click on the “aqua background” thumbnail layer and go to Select > Inverse or press Ctrl+Shift+I. Click on the Layer mask thumbnail of the Photo Filter (see photo)

Go to Edit > Fill or press Shift+F5 and select from menu Black.

That was it, I hope you enjoyed this tutorial and you will manage to do your own magic world.
Final Results
![final-results[2]](https://cdn.photoshoptutorials.ws/wp-content/uploads/2016/07/Magic-World.jpg?strip=all&lossy=1&webp=82&avif=82&ssl=1)
Download the PSD
Authors Comment
17 responses to “Create an Aquarium Inside a Light Bulb with Photoshop”
-
selamm
-
yanii idare ederimsiii
-
wooww yes
-
-
I think the steps should be more detailed for example, try giving better pictures and deeper instructions for beginners.
-
Great concept and artwork but the tutorial writing needs improvement. More effort describing each step would help.
-
period
-
-
This tutorial was slightly confusing, but by the end I got the hang of it. Thanks, the results were impressive!
-
I am a graphic designer so I just ended up using this as a basic guideline since following these directions was getting confusing. I do like the result though. Thanks for the tut.
-
Thanks
-
:p :)
-
-
Chitea…a mí me gustó ,estás en todos los detalles justo para personas que están aprendiendo como yo.Te felicito.(desde mar del plata (argentina)
-
?
<3 ;)
:) <3
-
The spelling in this is awful. It’s very confusing and doesn’t always make a lot of sense.
-
This is terrible . He calls the layers by different names the whole time, its inconsistent, confusing, and pretty vague. This tutorial will drive you crazy.
-
I was lost llike 5 or 6 times…it started off okay then it just got awful…wasted hours trying to do this smh.
-
Obrigado
-
Agreed
-

![profile[1] profile[1]](https://cdn.photoshoptutorials.ws/wp-content/uploads/migrated-images/5c2bee5a3d99_1390C/profile1.jpg?strip=all&lossy=1&webp=82&avif=82&resize=125%2C125&ssl=1) Thank you for following my tutorial. My name is Chitea Viorel Costin, I have 18 years old and I`m living in Slatina, Romania. I like graphic design and web design and I`m working in Photoshop since 2007.
Thank you for following my tutorial. My name is Chitea Viorel Costin, I have 18 years old and I`m living in Slatina, Romania. I like graphic design and web design and I`m working in Photoshop since 2007.
Leave a Reply