![step-010[1]](https://cdn.photoshoptutorials.ws/images/stories/a1c4a9a9bc40_B964/step-0101.png?strip=all&lossy=1&webp=82&avif=82&w=1920&ssl=1 "step-010[1]")
Set the layer to Soft Light.
![step-011[1]](https://cdn.photoshoptutorials.ws/images/stories/a1c4a9a9bc40_B964/step-0111.png?strip=all&lossy=1&webp=82&avif=82&w=1920&ssl=1 "step-011[1]")
Step 14
Create a layer below the one you have just done. Pick the color #572e07. With the Gradient tool (linear – #572e07 to transparent) make a gradient like the image below.
![step-012[1]](https://cdn.photoshoptutorials.ws/images/stories/a1c4a9a9bc40_B964/step-0121.png?strip=all&lossy=1&webp=82&avif=82&w=1920&ssl=1 "step-012[1]")
Set the layer to Multiply with Opacity and Fill at 80%.
![step-013[1]](https://cdn.photoshoptutorials.ws/images/stories/a1c4a9a9bc40_B964/step-0131.png?strip=all&lossy=1&webp=82&avif=82&w=1920&ssl=1 "step-013[1]")
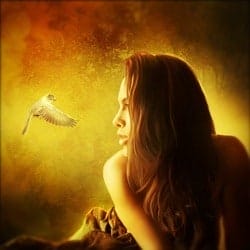
Step 15
Create a new layer below the one containing the bokeh texture and add the flying bird.
![step-014[1]](https://cdn.photoshoptutorials.ws/images/stories/a1c4a9a9bc40_B964/step-0141.png?strip=all&lossy=1&webp=82&avif=82&w=1920&ssl=1 "step-014[1]")
Step 16
Add a Hue / Saturation Adjustment Layer only for the bird. Check ‘Colorize’ and put these settings:
- Hue 44
- Saturation 15
![step-015[1]](https://cdn.photoshoptutorials.ws/images/stories/a1c4a9a9bc40_B964/step-0151.png?strip=all&lossy=1&webp=82&avif=82&w=1920&ssl=1 "step-015[1]")
Step 17
Create a new layer over the Hue/Sat you edited in the previous step. Pick the color #ffe7ba and with a soft round brush paint something like the image below.
![step-016[1]](https://cdn.photoshoptutorials.ws/images/stories/a1c4a9a9bc40_B964/step-0161.png?strip=all&lossy=1&webp=82&avif=82&w=1920&ssl=1 "step-016[1]")
Set the layer to Soft Light with Opacity 81% and Fill 87%.
![step-017[1]](https://cdn.photoshoptutorials.ws/images/stories/a1c4a9a9bc40_B964/step-0171.png?strip=all&lossy=1&webp=82&avif=82&w=1920&ssl=1 "step-017[1]")
Step 18
Create a new layer above everything and paint with yellow tones some lights as shown before. (I used mostly #efd981, #f6d373 and #f6d373).
![step-018[1]](https://cdn.photoshoptutorials.ws/images/stories/a1c4a9a9bc40_B964/step-0181.png?strip=all&lossy=1&webp=82&avif=82&w=1920&ssl=1 "step-018[1]")
Set the layer to Soft Light with Opacity 60% and Fill 80%.
![step-020[1]](https://cdn.photoshoptutorials.ws/images/stories/a1c4a9a9bc40_B964/step-0201.png?strip=all&lossy=1&webp=82&avif=82&w=1920&ssl=1 "step-020[1]")
Step 19
Create a new Layer and paint some light where shown below as you did in the previous step. I did it with color #fff3b0.
![step-021[1]](https://cdn.photoshoptutorials.ws/images/stories/a1c4a9a9bc40_B964/step-0211.png?strip=all&lossy=1&webp=82&avif=82&w=1920&ssl=1 "step-021[1]")
Set the layer to Soft Light.
![step-022[1]](https://cdn.photoshoptutorials.ws/images/stories/a1c4a9a9bc40_B964/step-0221.png?strip=all&lossy=1&webp=82&avif=82&w=1920&ssl=1 "step-022[1]")
Step 20
Create a new layer and we’re going to do the same as before. This time we’ll add some shadows. Pick a dark color from the background (not pure Black) and paint something like you see below in the image.
![step-023[1]](https://cdn.photoshoptutorials.ws/images/stories/a1c4a9a9bc40_B964/step-0231.png?strip=all&lossy=1&webp=82&avif=82&w=1920&ssl=1 "step-023[1]")
Set the layer to Soft Light.
![step-024[1]](https://cdn.photoshoptutorials.ws/images/stories/a1c4a9a9bc40_B964/step-0241.png?strip=all&lossy=1&webp=82&avif=82&w=1920&ssl=1 "step-024[1]")
Step 21
Create a new layer and fill it with 50% Gray (Edit > Fill > 50% Gray). Set the layer to Overlay. Now we have to Burn and Dodge. I used two different Range: Midtones and Highlights.
- Burn: Range > Midtones, Exposure > 10% (It’s where you see dark parts)
- Dodge: Range > Midtones, Exposure > 10% (It’s where there is white)
Where you see lighter white I used Dodge with same settings but putting Range: Highlights. Below you can see where I painted shadows and lights.
![step-025[1]](https://cdn.photoshoptutorials.ws/images/stories/a1c4a9a9bc40_B964/step-0251.png?strip=all&lossy=1&webp=82&avif=82&w=1920&ssl=1 "step-025[1]")
And this is the result.
![step-026[1]](https://cdn.photoshoptutorials.ws/images/stories/a1c4a9a9bc40_B964/step-0261.png?strip=all&lossy=1&webp=82&avif=82&w=1920&ssl=1 "step-026[1]")
Step 22
Unify the whole work with CTRL+ALT+SHIFT+ E. Go to Filter and choose Lens Correction. Choose the Custom menu and where you see ‘Vignette’ put -50 in the Amount.
![step-027[1]](https://cdn.photoshoptutorials.ws/images/stories/a1c4a9a9bc40_B964/step-0271.png?strip=all&lossy=1&webp=82&avif=82&w=1920&ssl=1 "step-027[1]")
Step 23
Duplicate last layer. Go to Filter > Other > High Pass and put 1 px. Set the Layer to Overlay. You can put the value you want, it depends on your taste. Just make some tries until you are happy with the result.
![step-028[1]](https://cdn.photoshoptutorials.ws/images/stories/a1c4a9a9bc40_B964/step-0281.png?strip=all&lossy=1&webp=82&avif=82&w=1920&ssl=1 "step-028[1]")
Step 24
Unify the whole work with CTRL+ALT+SHIFT+ E. Go to Filter > Gaussian Blur and add some blur (usually 10px is good).
18 responses to “Create an Portrait Artwork with Autumn Colors”
-

ohh my god unbelievable its amazing tutorial mindblowing supperppppppppppppppp
-
Fabrizio Panattoni, thanks for this romantic beautiful tut. I knew many interesting moments. I enjoy it It”s me pic http://j-p-g.net/if/2015/11/07/0011717001446904092.jpg
-
wow..its a really fantastic and awesome font, its can be very use full for to make my design.Thanks for sharing this nice post.
-
Me ha gustado mucho y he realizado un trabajo con esta técnica. Muchas gracias
-
Muy bueno el tutorial y el trabajo queda precioso. Gracias
-
Really Awsome, been looking for a tutorial like this one for some time.
Thnx -
it would be interesting to know how did you treated the hair because it is much better on your montage than the original picture
-
how you did in step 21?
-
Well this is something I have been trying to create for a while though mine didn’t come out exactly like Thank you for this tutorial.
-
Amazing!! very helpful and useful tutorial!!! lots of thanks to you.
-
thank you very much
you are very nice
from iran -
This embodies everything I wish to do with the photoshop version I purchase. But it is exceedingly unclear which one will serve my purpose….PLEASE HELP
-
What version of photoshop did you use for this?
-
hey can you tell me how to work only with the layer of the Lady
-
Thank you very much gorgeous pic
-
Download didn’t work, but nice tutorial & images
-
nice…good…excellent…)
-
i like that !
Leave a Reply