

Step 76
In the layer mask use the Linear Gradient Tool to limit the effect only to the upper part of the scene. This is how my layer mask looks.

Step 77
And this is how the scene looks now. One more step and we are done.

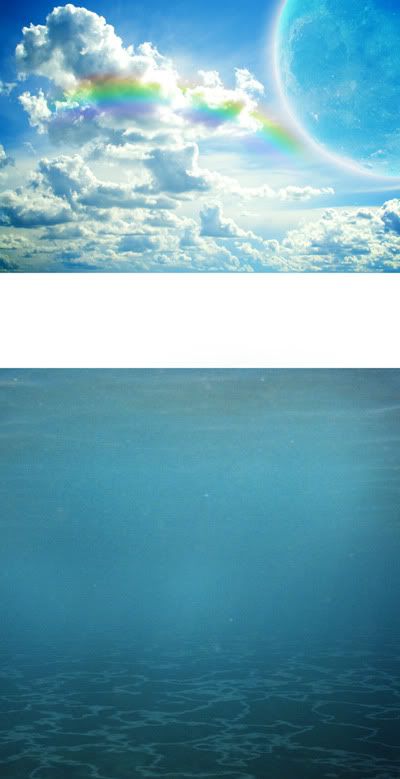
Step 79
As a final adjustment I decided to make the underwater color a little more cyan and intense so I added another Color Balance Adjustment Layer.

Step 80
…using the Linear Gradient Tool and the layer mask I limited the effect only to the lower part of the scene.

Step 81
And this is where I decided to step with my adjustments. Off course you can continue to add little details and elements to improve your image but in my case I consider the scene looks complete.

Final Results

Download the PSD
Tutorial by Adrian Scheff
 Thanks for following this tutorial. I hope you learned some useful stuff and improved your Photoshop skills. You can see some of my other art deviations here. Have fun photoshoping!!
25 responses to “Create an Underwater Scene of a Giant Goldfish in Photoshop”
-

I hate you!
-Joshua Gragas -
alguno de los tutoriales estan en video para mi es mejor en video gracias
-
I would definitely be interested in getting that set!Thanks for sharing.
-
This is really fantastic. The unlimited access makes it even better
-
Fantastic idea. I especially like the water surface.
-
Either I’m blind and don’t see what happened to the “ripples” layers after Step 25 or there are steps missing. There’s no way they go from the jagged-edged difference render to smooth realistic ripples by just blending the edge in with a brush. Clearly there is more manipulation needed to make that layer looks like it does in Step 26.
-
What’s the point of having the already-completed project available for download? I can’t access DeviantArt and would love it if the zip file just contained the images and brushes so that I can actually DO the project. Thanks
-
hi
-
Tutorial is great. It helps me so much. Thanks
-
You are awesome.
Thank you so much. -
nice work guys…….. its awesome
-
Hi
I reached the point where i should get a nice ripply light on the bottom of the sea .. i did everything just the way it was illustrated but all i get is this ..
http://i1124.photobucket.com/albums/l567/abdelrahman11/abdelrahmans%20album%202/194081.jpg
what should i do ?-
Don’t you See the next pages
-
-
I like It. Good Job. Thanx
-
You are awesome.
Thank you so much. -
The best tutorials!
-
Sir need can you send pictures in zip file? My email is .
-
What is it>>???
-
-
TRYING to learn the basics, here bro.
The eye was not hidden. I know to check that much.
An explanation WHY something works is how a lot of people learn, not just me. I wasn’t complaining or blaming, just wishing there was more to it.
-
OK I’m ****ing sorry about that bro
-
-
I wish you could say WHY certain things are done (so I can understand when I might need to use them in the future) and so I can understand what the outcome is supposed to look like.
For instance… I don’t understand why we need a layer mask in Step 18 and why we are painting in white over the top of it…
Since it doesn’t seem to want to let me do it as stated (I get an error, “Could not use the brush tool because the target layer is hidden”), I have no idea what the outcome is supposed to be and can’t figure out how to get to the next step without just skipping Step 18.
-
your fault for not knowing the basics. Dont blame the tutorial bro. You can’t paint because your layer is hidden. Click on the EYE icon. Layer mask is like a mask to show\hide what is visible on the layer.
-
-
This is so beautiful but please tell me, do I really have to pay for those images? :(
-
no you dont because sxc is a free site
-
-
wow…an amazing photoshop tutorial about create a rainbow.
Leave a Reply