Learn how to create a captivating street dance competition poster with Photoshop. You’ll start with some quick and dirty tricks about selection, playing with layer blend modes, changing object color the easy way, import and place some 3d render, adding lens flare (which is so fun to do!) and many more. Throughout the tutorial, (hopefully) you can make another captivating poster design with Photoshop fast and professionally.
What you’ll be creating
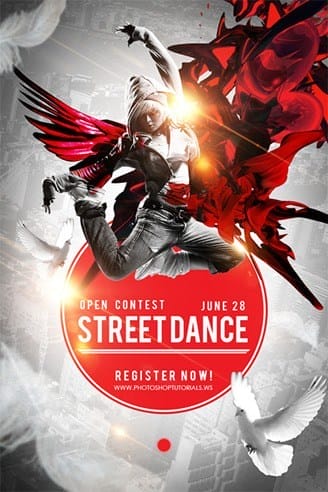
This image was created while playing with some stock images and resource i just found from the internet. I try to picture the spirit of freedom of Street Dancer by using symbols like wings and flying birds. The challenge is creating a captivating design by using restricted color palette like red, black and white to bring a powerful contrast. The lens flare was added in the last step, because i think it can make the composition look more sleek and cool. To follow this tutorial, you need Photoshop CS4 or newer.

Tutorial Resources
- Pigeon – rewton stock
- Dove – rewton stock
- Feather – tash11 stock
- New York CityScape – raindroppe
- Optical Lens Flares – psdbox
- Dance Stock – DeviantART
- 3d Render pack – DeviantART
Step 1
First of all, we need to extract the dancer model from this stock. Because I’m a lazy guy, I’ll just do it the easy way. Using Magic Wand tool, select the background color (turn on the add selection button and reduce the Tolerance value, and make sure to check the Contiguous option on ~ follow this setting, and you’ll finish the selection in no time, just a couple of clicks here and there)

Step 2
Click the Quick mask button to activate the Quick mask edit mode. In this mode, red indicates isolated areas. As you can see below, some isolated selection areas need some fix.

Step 3
The solution is simple, create a new selection on those areas with Polygonal Lasso tool. When you done creating selection, fill it with black. Remove the selection by pressing [CTRL] [D].

Step 4
Continue using Polygonal lasso tool to fix another parts of the isolated areas.

Step 5
Exit from the Quick mask mode by clicking back the Quick mask button. Right now the selection is active but if you remember, the selected areas are the background ~ not the dancing model. Fix this by inversing the selection from menu Select> Inverse.
20 responses to “Create a Captivating Street Dance Competition Poster with Photoshop”
-

thankyou yaaa i enjoyed
-
really enjoyed following your tutorial!
-
Thanks for sharing such useful tutorial. i am big fan of street dancing and making the poster for street dancing that will be awesome. Definitely going to follow your tips in the next poster of street dance.
-
That poster would get my attention!
-
great!! thanks for the technique
-
Thanks for offering this! I learned some new tricks as I worked my way through your tutorial. You have a very artistic eye, too.
-
Thanks! I learned new tricks as I worked my way through your tutorial!
-
I’ve always wondered how these posters were made, now I know! I really like the subtle touch of the bird’s feathers. Thank you for sharing. I’m looking forward to using some of these techniques in my own work.
-
класс!!!!!!!!!!
-
Thank you for the time and efforts!
-
Awesome resources.Huge collection.Great job.Very useful post.
-
Nice turotial and I learned what is the smart object use in photoshop. Thank you.
-
thanks . Awesome tutorial. I learned another something useful from your tutorial :)
-
Thank You1
-
Awesome tutorial. Managed to get it right and learned a few things along the way. Thank you!
-
glad you like it ^_^
-
-
Halo Mas Jayan Saputra, salam kenal..
-
halo salam kenal juga :)
-
-
Step 10 is confusing. Please elaborate
-
draw an ellipse shape, set the fill color to red and set the stroke width/size to 5px, pick white as stroke color (i made this with photoshop cs6)
after that, just add layer style Stroke
-
Leave a Reply