
Step 6
You may notice some selection edge was still look rough and jagged. To smoothen the selection’s edge, click the Refine Edge button and follow the settings shown below. Play with Adjust Edge option until you satisfied with the result. Click OK to apply Refine Edge setting.

Step 7
Press [CTRL] [N] to Create a new document with 800×1200 px size. As for the resolution, set it to 300 ppi and click OK.

Step 8
Copy and paste the dancing model inside the new document we just created. Press [CTRL] [T] to transform its size and position.

Step 9
Desaturate the dancer’s color by hitting the [CTRL] [SHIFT] [U] on the keyboard (another way to do this by going to menu Image> Adjustment> Desaturate).
Duplicate the dancer’s layer easily by pressing [CTRL] [J] and then set the blend mode to Overlay. That’s how we get the high contrast look.

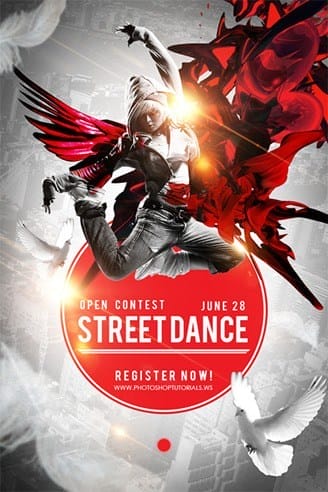
Step 10
Using the Ellipse tool, draw a red colored circle below the dancer. Set the stroke color to white and size to 5px. To get the double stroke effect, add layer style Stroke to the ellipse layer and follow the stroke setting shown below.

Step 11
Okay next step is easy, just adding text inside the red circle using the Type tool. In case you wondering, the font used here is “Bebas” and “Century Gothic”. If you feel lazy about typing, ask you friend to do the work (that’s a joke, don’t be too serious! *LOL* )

Step 12
To make the double lines below the “Street Dance” text, just type an “equal symbol” using the Type tool. Any font will work, but i choose “Bebas” in hope it will blend smoothly with other texts.

Step 13
Go to Type> Convert to Shape menu to convert the type to shape (d’oh!). With the text now working as shape, use the free transform command to adjust its width.

Step 14
Now go to Edit> Transform path> Perspective and grab one of the corner control point’s to skew the shape perceptively.

Step 15
Add another red circle by copying the first one we created before (click on the ellipse layer, then press [CTRL] [J] will do the work). Make this second circle smaller, and reduce the stroke width to 1px from both the option bar and layer style’s dialog.
20 responses to “Create a Captivating Street Dance Competition Poster with Photoshop”
-

thankyou yaaa i enjoyed
-
really enjoyed following your tutorial!
-
Thanks for sharing such useful tutorial. i am big fan of street dancing and making the poster for street dancing that will be awesome. Definitely going to follow your tips in the next poster of street dance.
-
That poster would get my attention!
-
great!! thanks for the technique
-
Thanks for offering this! I learned some new tricks as I worked my way through your tutorial. You have a very artistic eye, too.
-
Thanks! I learned new tricks as I worked my way through your tutorial!
-
I’ve always wondered how these posters were made, now I know! I really like the subtle touch of the bird’s feathers. Thank you for sharing. I’m looking forward to using some of these techniques in my own work.
-
класс!!!!!!!!!!
-
Thank you for the time and efforts!
-
Awesome resources.Huge collection.Great job.Very useful post.
-
Nice turotial and I learned what is the smart object use in photoshop. Thank you.
-
thanks . Awesome tutorial. I learned another something useful from your tutorial :)
-
Thank You1
-
Awesome tutorial. Managed to get it right and learned a few things along the way. Thank you!
-
glad you like it ^_^
-
-
Halo Mas Jayan Saputra, salam kenal..
-
halo salam kenal juga :)
-
-
Step 10 is confusing. Please elaborate
-
draw an ellipse shape, set the fill color to red and set the stroke width/size to 5px, pick white as stroke color (i made this with photoshop cs6)
after that, just add layer style Stroke
-
Leave a Reply