Step 16
Until this step, i assume you already download all the stock images, including the 3d render pack from here.
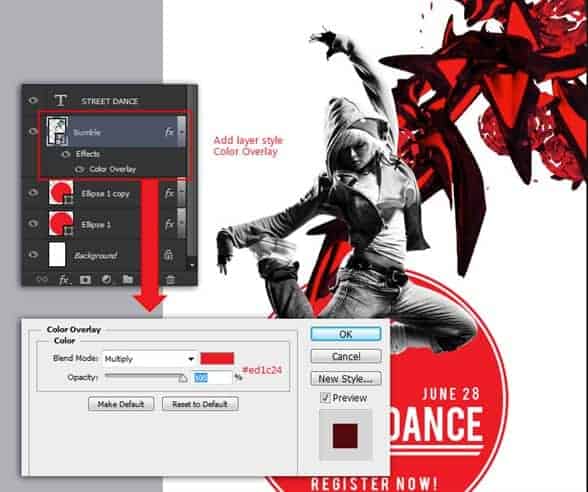
Use the File> Place… menu to import 3d render “bumble” into the canvas. Adjust the size and position, press Enter when you’re done. This way, the 3d render stock will be treated as a smart object (meaning: whatever you do to the image, the quality will always be good because it is protected).

Step 17
Add layer style “Color Overlay” to the “bumble” layer. Pick red as color and set the blend mode to Multiply. Click OK, the bumble color now changes to red.

Step 18
Place another 3d render pack above the first one. See screenshot below to take a look of the image competition.

Step 19
Repeat the same process in step 17 for both the “Reef2” and “Octave” layer, in order to change their color to red.

Step 20
Open up the pigeon stock we got from here. We just need the left wing, so grab the Pen tool and draw paths following the wing’s shape. Make sure you select the option: Path from the option bar before start creating those paths. This is the right time to practicing your skill with Pen tool, am I right?

Step 21
When you done creating path, right click on it and choose Make Selection from the pop-up menu. Inside the Make Selection dialog, you can adjust the selection the way you need it, but i will skip it by straightly clicking OK button.

Step 22
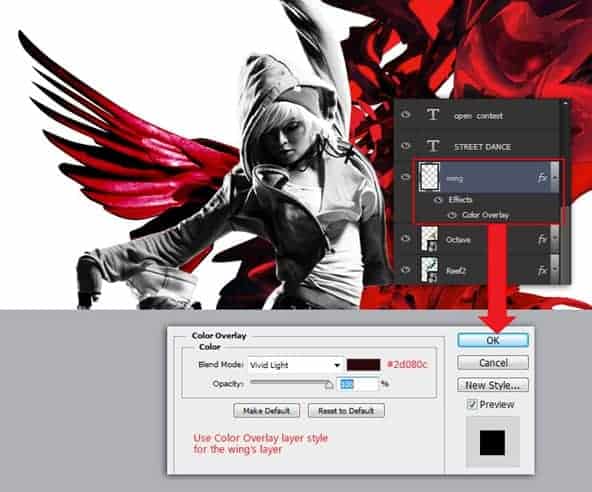
Copy and paste the wing into our work, place it under the dancer’s layer. Use free transform command again to adjust its size and position.

Step 23
Use the same technique to change wing color to red. Add layer style “Color Overlay“, but this time pick a darker red color and change the blend mode to Vivid Light.

Step 24
Press [CTRL] [J] to duplicate the wing layer. Create new empty layer below it by [CTRL] clicking the new layer button.

Step 25
Right click the wing copy layer, choose Merge Down command form the pop up menu. This will merge the wing and empty layer below it, deleting the layer style “Color Overlay” in the process but keep the color effect intact.

Step 26
Drag the merged wing layer above all layers available, then change the blend mode to Overlay. nice!
20 responses to “Create a Captivating Street Dance Competition Poster with Photoshop”
-
thankyou yaaa i enjoyed
-
really enjoyed following your tutorial!
-
Thanks for sharing such useful tutorial. i am big fan of street dancing and making the poster for street dancing that will be awesome. Definitely going to follow your tips in the next poster of street dance.
-
That poster would get my attention!
-
great!! thanks for the technique
-
Thanks for offering this! I learned some new tricks as I worked my way through your tutorial. You have a very artistic eye, too.
-
Thanks! I learned new tricks as I worked my way through your tutorial!
-
I’ve always wondered how these posters were made, now I know! I really like the subtle touch of the bird’s feathers. Thank you for sharing. I’m looking forward to using some of these techniques in my own work.
-
класс!!!!!!!!!!
-
Thank you for the time and efforts!
-
Awesome resources.Huge collection.Great job.Very useful post.
-
Nice turotial and I learned what is the smart object use in photoshop. Thank you.
-
thanks . Awesome tutorial. I learned another something useful from your tutorial :)
-
Thank You1
-
Awesome tutorial. Managed to get it right and learned a few things along the way. Thank you!
-
glad you like it ^_^
-
-
Halo Mas Jayan Saputra, salam kenal..
-
halo salam kenal juga :)
-
-
Step 10 is confusing. Please elaborate
-
draw an ellipse shape, set the fill color to red and set the stroke width/size to 5px, pick white as stroke color (i made this with photoshop cs6)
after that, just add layer style Stroke
-


Leave a Reply