

Step 21
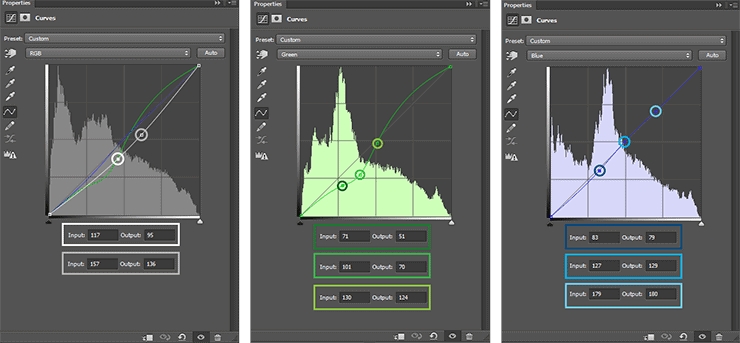
Now I proceed to Adjustment layers. Go to Layer > New Adjustment Layer > Curves… Set the coordinates for each point and channel, as shown in image below. I do this layer darker the entire image (dark colors), as well as blue and green colors. So I can enhance color effect and create contrast.
Next adjustment layer is “Brightness/Contrast” (Layer > New Adjustment Layer > Brightness/Contrast…). Set Brightness: 1, Contrast: 10. With this layer all understanding :) I wanted to make a very saturated colors to emphasize the atmosphere of mystery and a little scare the viewer.

Last adjustment layer is “Selective Color” (Layer > New Adjustment Layer > Selective Color…). Use image below to set the settings for Reds, Yellows, Cyan, Blue and Neutrals tones. Here I have selectively concentrated in the tone I needed a certain range. But most importantly, I would like enhance red color. That’s it! The picture is ready.


Step 22
Now a little bonus. I have not used it in the original work, but I think it would be interesting to add glass to the image. This step is optional, so all up to you. So create a new layer and using a Rectangular Marque Tool (M), circle middle of the image to be made small frame. Go to Select > Modify > Feather… (Shift + F6). Set Feather Radius: 60px.

Inverse selection (Cmd/Ctrl + Shift + I). Create a new layer and press Q on keyboard to go to Quick Mask mode and add filter “Color Halftone” (Filter > Pixelate > Color Halftone…). Set settings like shown in image below (You can experiment with the values to achieve interesting results).

Again Inverse selection and fill it with black color (Cmd/Ctrl + Del). That’s it!

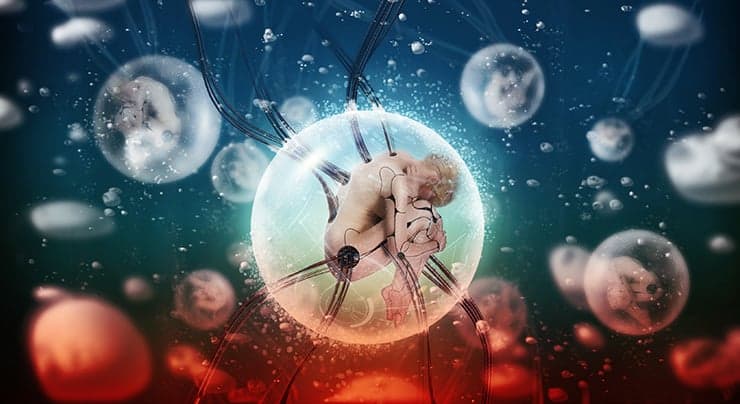
Final Results
That’s all, the tutorial is over. I hope you liked it and you will find a lot of interesting and useful for your creativity! Experiment and create! Thank you very much for your attention and good luck!
Tutorial by Maria Semelevich.
Thank you very much for taking the time to study this tutorial! I hope you benefited it! I wish all lucked in your future achievements! I thank the authors of resources for their excellent work and good quality! Thank you very much! If you have questions or need help, please contact me. I look forward to your feedback and creative works! You can contact me by e-mail – [email protected] or FacebookDeviantartBehance. I am open to suggestions and cooperation! With best wishes!
3 responses to “Create a Chilling Sci-Fi Scene of Cyborgs in Bubbles”
-

love it
-
Nice one..enjoy ur tutorials..pls I have questions ..what does a vector mask do
-
Thank you, a cognitive a lesson )) the result from the by curves differs
Leave a Reply