

Step 47
Using the same thin brush draw some lines on the upper margin of the hand.

Step 48
Increase the brush size to 10 pixels and create a new layer with the Overlay blending mode. Paint an outline around the hand.

Step 49
Create a new layer and change the blending mode to Linear Dodge. Using a white brush at 10% Opacity paint over the hand to make it look brighter and ethereal.

Step 50
Are you still with me? Congratulations for having patience to follow these steps. Now the things will get a bit easier so stay with me until the end. Let’s add a vignette to our scene. Create a new layer and fill it with white. Change the blending mode to Multiply and apply Filter > Lens Correction with the settings shown below.

Step 51
Add a Brightness/Contrast Adjustment Layer and increase the contrast to 50.

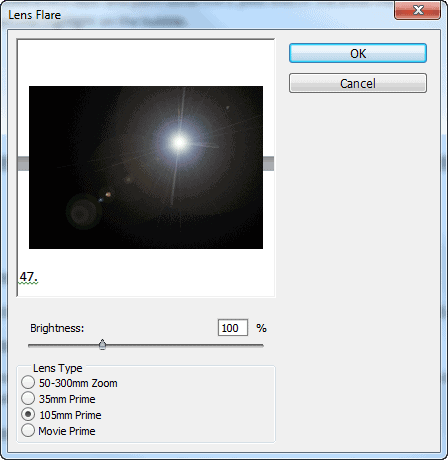
Step 52
Create a new layer and fill it with black. Create a flare by going to Filter > Render > Lens Flare and using the settings shown below.
Step 53
Now change the blending mode to Screen and lower the opacity to 36%. Move the flare as you see fit and if you see any hard edges simply hide them by adding a layer mask and painting with black over them.

Step 54
Create a new Gradient Map Adjustment Layer (Layer > New Adjustment Layer > Gradient Map) and set the blending mode to Overlay. Lower the fill to 46% and use the settings shown below.

Step 55
Choose the “Small Dawn” brush from the brush presets and paint with white some glam/bokeh over the scene. Lower the opacity to 10%.

Step 56
Repeat the previous step but this time use a deep blue (#274e9d) and lower the opacity of the layer to 47%. Also you should set the blending mode to Color Dodge.

Step 57
Open the file “Snow Texture”. Select all, copy and paste it in our scene. Set the blending mode to screen and lower the opacity to 14%. You can also hide away this snow effect in the center by using a layer mask and painting with black over the bubble.

Step 58
Import the “Mist” brush and paint some white mist below the hand on a new layer.

Step 59
Import the “Trees” brush. Find the pines in the brush presets and on a new layer create some white pines below the hand. Add a glow effect.
10 responses to “How to Create a Magical Christmas Snow Globe in Photoshop”
-

linn
-
can u update the images? none of the links are working and showing the right images.
-
Some of the original images don’t exist anymore and so we’ve updated them to use alternative images. Unfortunately, this happens a lot with free images. You can still follow the tutorial using similar images and get the same composition.
-
-
GREAT tutorial!
-
this is briliant. at first i thought it was difficult to follow when it turn out very easy
-
At first it seemed to be a difficult tutorial, but infact is not.
-
Too much going on?
-
This is lovely. It looks like a lot of work, but it’s worth it! I might do something like this for next year’s Christmas cards. Thank you for sharing. :)
-
luke
-
At first I thought this was going to be hard to follow, but the resource list was a real big help. Thanks for posting!
Leave a Reply