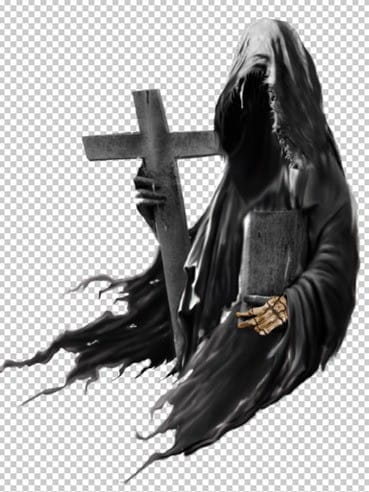
Here is the result.

To define more contrast and brightness of the blending, we can duplicate this layer and set its blending to soft light and give it burn or dodge on some parts.

Step 7 (smudge on cloth on main body)
Create another new layer and give some smudge on the main body. Do similar way as in previous step 6 to do this. Here is the result so far….

Step 8 (Adding hood)
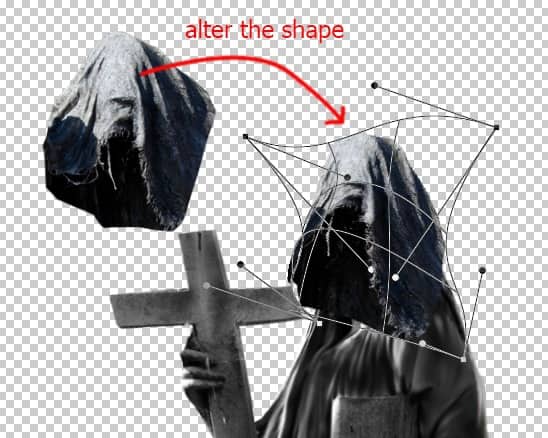
Now we will add hood for the figure. Open the stock image and cut out the part needed.


Place the cut out above the smudge layers in the main document. Scale its size and warp to alter its shape.

Go to layer > new adjustment layers > hue/saturation. Make sure to give this adjustment layer a clipping mask by checking use previous layer to create clipping mask.


To blend the hood with the rest part of the image, we do this by applying similar ways like the ones in previous step 6 and 7. I did this on a new layer.

Step 9 (fixing the fingers)
Next, we will replace the fingers of the figure. We will give it skeletal fingers. Open the stock image. Cut out one of the skeletal arms.

Place the cut out on the main document. Scale and arrange its position in such way that it is fit the original fingers.

Mask unneeded part..

Cut out one of the fingers and place the cut out right on the thumb finger of the figure. Select all the finger layer and hit Ctrl+E to merge them.

Adjust the color of the merged finger layer to match the rest of the image. We just simply give it two adjustment layers with clipping masks : Hue/saturation and level.

Do similar way to add skeletal fingers to the other ones.

Step 10 (Adding lower cloth)
Let’s complete the figure by adding lower cloth for the figure. Create a new layer below all the other layers. On this layer, create a shape for the cloth like the one shown in the screenshot.

Giving the cloth some details by adding some worn and crumpled parts where needed. Remember previous steps to do this because these are just repeating steps. Here is the former shape I created, however………

I don’t think all of you will find a good result ;-) so just skip this step and find the other simple way to add some lower cloth. To do this we will add the lower cloth by cutting out part of the cloth from the stock image below and use it as the texture for the cloth.
16 responses to “Create an Eerie Photoshop Manipulation of a Dark Queen in a Cemetery”
-
Assume this assume that
===ASS OUT YOU AND ME -
so good
-
Important Info
-
HIIIII!! there is a huge problem…. the first four images –I think the free image website ones are not available could you please make the stock image available and let me know when you’ve done that. I need this for a business project!!!!! VERRRRRYYYY IMPORTANTTTTTT!!!!!!!
-
Hi Taylor,
Unfortunately broken links are a common issue with free images. We recommend searching for other similar images.
-
-
Beautiful, creative and acutely enjoy able!
-
brilliant tutorial, time consuming but well worth it.
-
好厉害
-
Wow amazing and Professional tutorial,It’s relay nice.
-
awesome
-
the Best Professional tutorial for Photoshop
-
Its simply owesome man keep it up.
-
I just love the statue transformation starting from step 3!
-
weldone
-
Wow great tutorial. I am too a Photoshop artist, but i am only 17 years old and don’t have so much skills. On my Website are projects from me (jan.leibacher.ch) its on german, but it have possibilty to translate the site :)
-
AWESOME!!! Good job mate


Leave a Reply