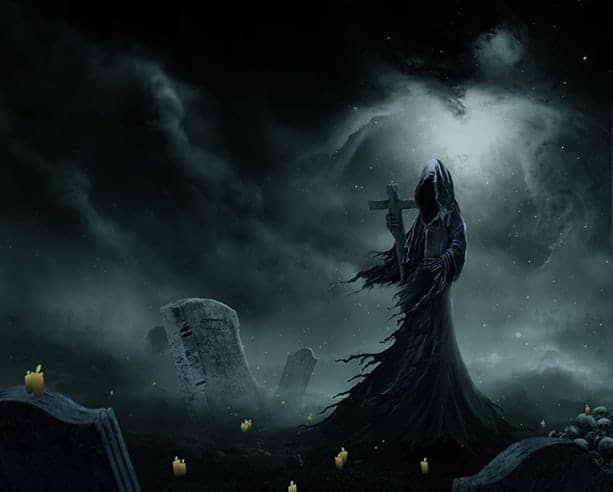
Finally, give this figure an adjustment layer: brightness/contrast. Here is the result I created.

Step 23 (Overall highlight and shadow)
Create a new layer above all the other layers. Fill this layer with 50% opacity set to overlay blending. With combination use of the dodge and burn tool paint highlight and some shadow on the smoke and light source areas. Here is the normal blending of this layer will look.

Here is the result in overlay blending at 100% opacity.

Step 24 (Overall adjustments)
Finally, we will set overall adjustments for the scene. What we should do is create a new layer above all the other layers and fill this layer with solid color of #033335. Set the blending of this layer to multiply at about 45-50% opacity.

Mask some parts of this layer as indicated below. Make sure to use a very soft round brush set to low opacity of 10-15% to do masking to be able to determine how transparent the masking will be.

Proceed to create a new layer again above the previous solid color layer. Fill this new layer with solid color of #43f6f4. Set this layer to soft light at 20% opacity. Finally, mask a bit on the light source area.

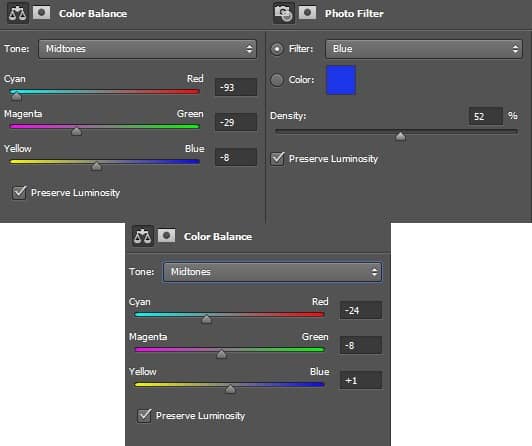
Next we will add some adjustment layers to the scene. Firstly we will add color balance set to normal at 65-70% opacity. Next we give it photo filter set to soft light blending at about 20% opacity. Finally, we give it another color balance set to normal at 100% opacity. Take a look at the screenshot to find out the values of each adjustment layer.


Step 25 (Light on the candles and more highlight)
In this step we start to give some highlight on the ground. To do this, create another new layer above all the other layers. Fill this layer with black and set its blending to color dodge. Take a very soft round brush set to a very low opacity of about 3-5% opacity. With that brush, paint yellowish orange color to the areas on ground where the highlight should fall. Give some soft white color to areas where needed as well. Here is the normal blending of this layer I created.

Here is the result in color dodge at 100% opacity. We can duplicate the layer to give more vivid color and play around the opacity to get desired result.
16 responses to “Create an Eerie Photoshop Manipulation of a Dark Queen in a Cemetery”
-
Assume this assume that
===ASS OUT YOU AND ME -
so good
-
Important Info
-
HIIIII!! there is a huge problem…. the first four images –I think the free image website ones are not available could you please make the stock image available and let me know when you’ve done that. I need this for a business project!!!!! VERRRRRYYYY IMPORTANTTTTTT!!!!!!!
-
Hi Taylor,
Unfortunately broken links are a common issue with free images. We recommend searching for other similar images.
-
-
Beautiful, creative and acutely enjoy able!
-
brilliant tutorial, time consuming but well worth it.
-
好厉害
-
Wow amazing and Professional tutorial,It’s relay nice.
-
awesome
-
the Best Professional tutorial for Photoshop
-
Its simply owesome man keep it up.
-
I just love the statue transformation starting from step 3!
-
weldone
-
Wow great tutorial. I am too a Photoshop artist, but i am only 17 years old and don’t have so much skills. On my Website are projects from me (jan.leibacher.ch) its on german, but it have possibilty to translate the site :)
-
AWESOME!!! Good job mate


Leave a Reply