
Step 7
Now you can delete duplicated layer.

Step 8
Add adjustment layer (shortcut or Layer > New Adjustment layer…) with Hue/Saturation. You will make monochrome tones. Click on adjustment layer with RMB and choose “Create clipping mask”.

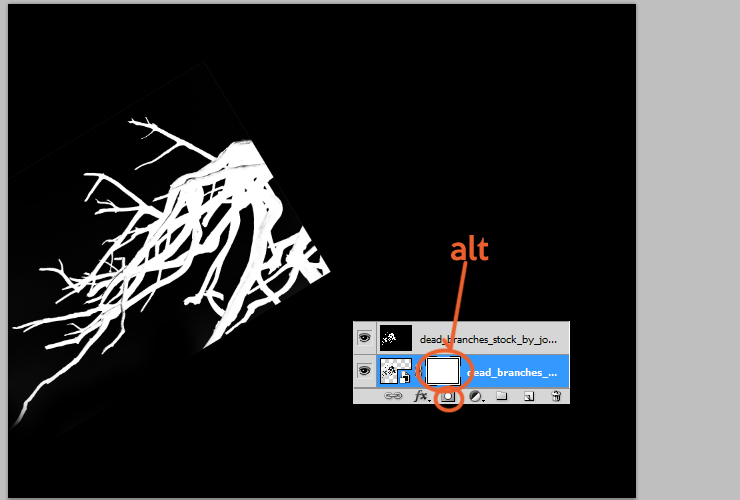
Step 9
Now with holding Ctrl, click on “Dead branches” layer and on Hue/Saturation clipping layer. Drag and drop it to “New layer” symbol.

Step 10
Duplicate it several times and transform it (Ctrl + T). Use golden ratio proportions to make focus point.

Step 11
Place “Rose” stock to your file. Use trick from Step 5 to mask it. Remember about golden ratio! :)

Step 12
Colors are weak. Let’s fix that! Add adjustment layer (shortcut or Layer > New Adjustment layer…) with Brightness/Contrast. Then, click on it with RMB and choose “Create clipping mask”.

Step 13
It’s time to transform effect on the rose. At first, place “Ashes” stock image to your file. Then, click on it with RMB and choose “Create clipping mask”.

Step 14
With big, soft brush, mask part of stock.
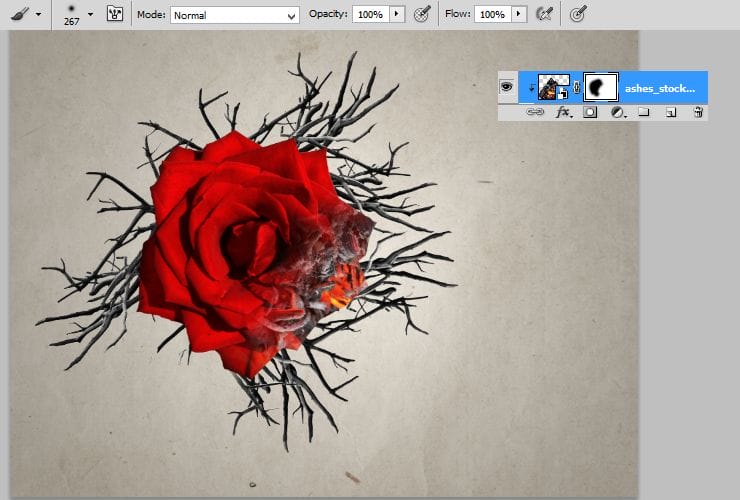
Now, change blendning mode to Overlay. Petals will look like damaged and destroyed.

Step 15
It’s time to decrease Saturation – rotten petals would be monochromatic. Add adjustment layer with Hue/Saturation. Then, with the same brush as in 14 step, erase part of the layer.

Step 16
Ok! It’s time to load brushes. Choose debris brush which you want. Load it to your Photoshop.

Step 17
Now use loaded brushes on “Rose” layer mask. Click on mask canvas at right side and use black debris to mask rose.

Step 18
Back below layer with rose (and above layers with branches) place foliage stock. Follow golden proportion guides. Duplicate it several times and transform it (Ctrl + T). Use golden ratio proportions to make focus point. If it’s needed, mask some of leafs.

Step 19
Above first layer with foliage stock, add new layer (ctrl + Shift + N, or Layer > New… > Layer). Pick 60px soft brush and draw some shadows below leafs.

For more realistic effect, decrease its opacity to 60%. Absolute black doesn’t exist in real – remember! :)

Step 20
Add another new layer, just below rose layer. Use the same brush as in Step 19 and draw shadow below flower.
12 responses to “Create an Emotional Abstract Photo Manipulation of a Rose”
-

I got lost at the golden ratio. What do you mean by transform it at the focal point of 1.68?
-
Very Informative and Lovely Tutorial! I always love the way you have narrated is awesome. I will follow you to make something like this. Thank you so much.
-
Lovely
-
No follow up on Tutorials is so frustrating. It really is to bad, great design, but half the effort to help I have noticed..Step 5 worked beautifully for me, but when I tried to do the rose..total frustration. I must be having a real slow day or maybe 2..
-
I got lost at step 6… I can’t copy…
-
I got lost at step 5, what is RMB? Can someone please show me in details of step 5?
-
Right mouse button.
-
-
I got lost at step 5, can someone please show me?
-
is there any next step?
-
yes
-
-
This is really beautiful! You have quite an eye for creativity, and I’m grateful for this tutorial you have shared with us.
-
Sorry, could not find a link to blood
Leave a Reply