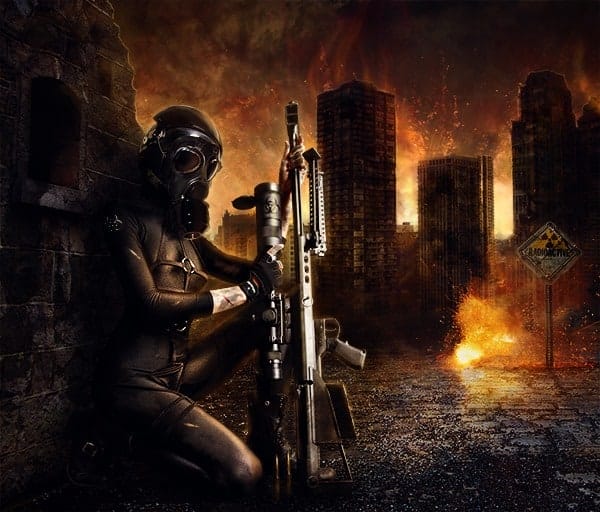

Step 25- The model
Place the model at the image and select all with the magic wand tool or the lasso tool

Step 26 – Layer mask
After you have the selection create a layer mask and instantly you will have only the model without the background

Step 27 – Gas Mask
Repeat the process before to cut the gas mask, press ctrl+ T to change the size of the mask to fit the model.

Step 28 – Helmet
Pick the same color of the helmet pressing ctrl+ I and then in a new layer paint over the star and reflections of the helmet.

Step 29 – Radioactive
In the model’s weapon paint with a brush a radioactive symbol, use layer in overlay mode.

Duplicate the symbol and put it in the model’s shoulder change the layer mode to divide.

Step 30 – Bullets
Add some bullets repeat the process you did with the mask and duplicate the layer ( ctrl+J) to have 2 bullets.

Step 31 – Dirt
Create a new layer and with a chalmy brush paint over the model’s skin with a dark brown tone to create dirt. Go to the brush menu and click the option shape dynamics, use size jitter in 10% and Angle jitter in 82% Also use the spacing in 90%

You are ready to paint.

Step 32 – Suit
Change the tone to a gray tone and paint in the model’s suit . Use the same configuration of the brush

Step 33 – Blood and Cuts
Create some cuts and blood in the model, to do this pick a soft round brush with 3px or 2px and paint.

Step 34 – Shadow
Make the shadow of the model in a new layer with a soft round black brush use 150px size and 50% of opacity

Step 35 – Light
Paint with a soft round brush over the model’s suit.

Then reduce the opacity of the layer to 80% and change the mode to color dodge

Step 36 – Ground
Repeat that process on the ground near the model, to make the effect that the ground is reflecting the light from the fire of the scene. Use a orange tone and layer mode in color dodge also the opacity can be 40%

Step 37 – City Strokes
With a soft round orange brush (2px size) make strokes over the top of the buildings to create lighting

Step 38 – Model Light
With the same orange tone paint over the model to create the lighting, you can also add some Gaussian blur(Filter-Blur-Gaussian Blur) to give a softer look, add 15% of radius in the Gaussian Blur

Step 39 – Radioactive Sign
Place the radioactive sign and select the sign and add a layer mask to hide the rest. Press Ctrl+T to change the size
9 responses to “Create a Fiery City War Scene in Photoshop”
-

I just review your every single blog post related photoshop work..and it was awesome..will be back to read this blog soon.
-
This is really fantastic. The unlimited access makes it even better
-
please give me a link to YT video for that work
-
This is a decent tutorial, but be mindful of the perspective on the buildings in the background. It is way off as the picture you pulled it from was taken from atop another building, but the camera in the collage is at ground level. Just an FYI.
-
Its awsome!
-
Hi
Im realy Like this
why you not attach pdf file ( this Learn in PDF ) for easear learn and download that ? if that happens its will be perfect
sorry for My bad english :)-
easear = easier ;)
-
-
no commet? very good!!
-
DRTFIPHGFFLKJH]HG
Leave a Reply