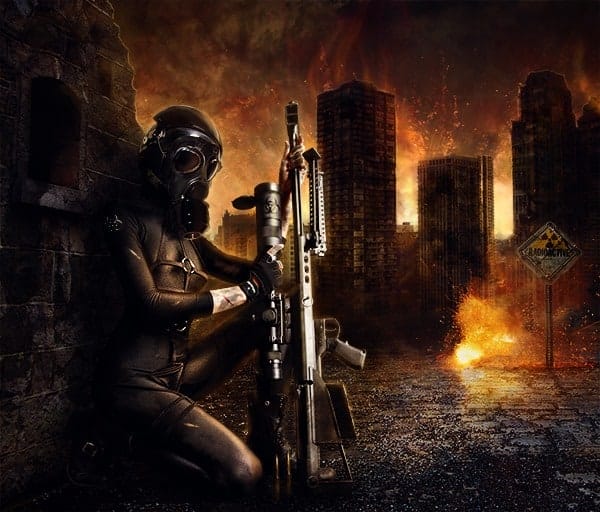

Step 40 – Metal
Then add the metal stick for the sign from another sign, repeat the process: select the metal part with lasso tool, add layer mask and resize it (ctrl+t) to fit the sign

Duplicate (ctrl+J) the stick layer and use the layer in multiply mode, then reduce the opacity to 70 from the sign and the stick

Step 41 – Cracks
With the same brushes as before in color black make some cracks over the sign

Step 42 – Details
With a soft round brush (2px size) with orange tone make strokes to the sign and to the model’s weapon, you can make them softer by passing the blur tool over them.

Step 43 – Fire
Add fire close to the sign, erase the edges with a layer mask and use the layer in screen mode with 90% of opacity

Step 44 – Fire Reflection
Duplicate the fire layer (Ctrl+J) and then with Ctrl+T modify the position in the top of the menu of transform you have to add an (-100) at the option H:. This will rotate the image to look like a reflection.

Step 45 – Details
Reduce the opacity to 55% and hide the part that are far from the original fire, the closest reflection is stronger and the one that is farthest is going to be softer.

Step 46 – Light
Below the model’s layer create a new layer and paint around her with an orange tone, use the layer in soft light mode with 70% of opacity

Step 47 – Color
In a new layer paint with a dark brown tone and with some other lighter tones. When you need a lighter tone go to the color picker, see the image below.

Paint something like this:

Then apply a Gaussian blur to blend about 50 of radius

Step 48 – Layer mode
Change layer mode to soft light and reduce the opacity to 60%

Step 49 – Orange
Add a new layer and with an orange tone fill the layer with the Paint bucket tool.

Use the layer in soft light mode with 65% of opacity

Step 51 – Color Lookup
Go to the menu create new fill or adjustment layer on the bottom of the layer’s and then select the option “color Lookup” select the option film stock reduce the opacity to 25% and the fill to 65%
Color Lookup is only available at the cs6 or cc version of Photoshop.

Then use another color lookup this time tealorangepluscontrast. With 50% of opacity and 50% of fill.

Step 52 – Curves
If you don’t have that version of Photoshop you can use curves, the result is very similar. And that’s it.
9 responses to “Create a Fiery City War Scene in Photoshop”
-

I just review your every single blog post related photoshop work..and it was awesome..will be back to read this blog soon.
-
This is really fantastic. The unlimited access makes it even better
-
please give me a link to YT video for that work
-
This is a decent tutorial, but be mindful of the perspective on the buildings in the background. It is way off as the picture you pulled it from was taken from atop another building, but the camera in the collage is at ground level. Just an FYI.
-
Its awsome!
-
Hi
Im realy Like this
why you not attach pdf file ( this Learn in PDF ) for easear learn and download that ? if that happens its will be perfect
sorry for My bad english :)-
easear = easier ;)
-
-
no commet? very good!!
-
DRTFIPHGFFLKJH]HG
Leave a Reply