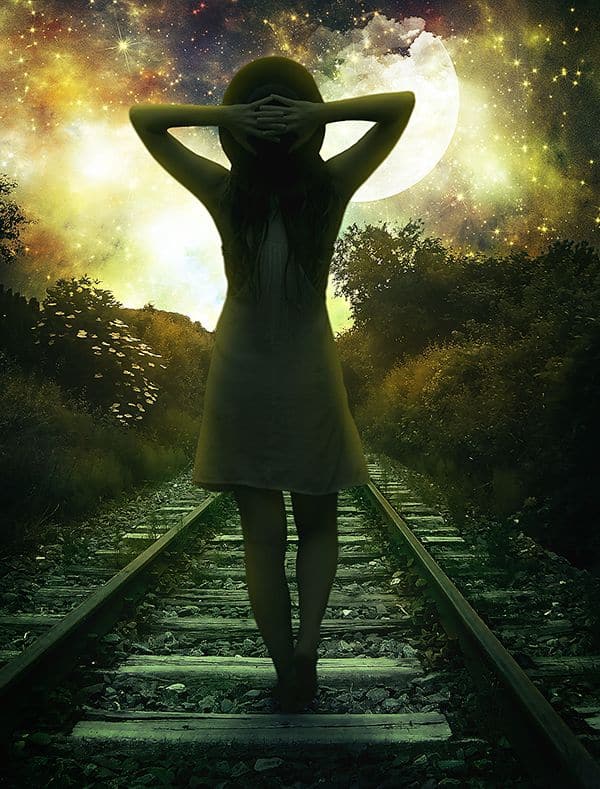


Step 35
The creation of the background is ended. Now it’s time to add our subject. Go to File > Place and open the ‘Model’ stock. Name the layer ‘Model’.

Step 36
Now we have to extract the lady from the background. I will use the Pen Tool. Grab the Pen Tool and place the points around the lady’s edges.

Step 37
Once the points are in place right click on the image and choose ‘Make selection’.

Step 38
When you click ‘Make Selection’ a window will pop up. In Radius Feather put 2 (px). Now you have the model selected.

Step 39
Just click on the Layer Mask button and you’ll have your model extracted with a Layer Mask.

Step 40
As you can see there are some parts that have to be cut off. You can do it as we did before. With the Pen Tool make a selection of the area you want to delete.

Step 41
Now select the Model Layer Mask and paint with black in the selected area. The unwanted part will disappear.


Step 42
Repeat this step until you have deleted all the unwanted parts.

Step 43
Now that the model is extracted we have to make some adjustments to blend her in the scene. Before doing this I will remove the bracelets. I will use he Clone Stamp Tool.
We want to be safe so we will clone in a new layer. Create a new layer and clip it to the Model layer. Grab Clone Stamp Tool and be sure that in the settings you have Sample: Current & Below (1). Now hold down the Alt key click on the point you wish to use as a sampling point (2). The cursor will change to a target. This area will be used as the reference point for cloning. Click and draw where you want the cloned image to appear.
As you draw, a cross (3) will appear on the original image while a corresponding circle (4) appears where you are drawing. With a little practice it becomes quite clear how this process works and how to achieve the best results.
TIP: If you want to achieve a real effect sample from several point or you will have patterns of skin.


Step 44
Below you can see my result. As you may notice there are some parts (outside the Model layer) that we can’t clone. Go over the Model Layer Mask and paint with black the areas you want to remove.
52 responses to “Create This Gorgeous Moonlight Poster of a Girl Walking on a Railway”
-

THIS PAGE IS THE BEST PS TUTORIAL PAGE EVER.
I always wanted to do like professionals in PS but never found any page that could teach me free but you are the best teacher I got so far. THANK YOU SO MUCH:))))
PLEASE KEEP UPLOADING LATEST EFFECTS IN PS. -
Cool photo
What are further tools you use for the picture
-
Quite interesting !
-
Excellent
-
Love all the tutorials ;)
-
Thank you for this tutorial, it is great and I had much fun at the work :-)
-
fantastic tremendous work………….
-
Please re uploaded PSD file because when i click on download showing 404 not found error, this is best work for me i want check how did you do this
-
This is definitley one of the better written tutorials. Very concise and accurate. Thank you.
-
Thank you for sharing
-
Extremely Beautiful
-
wow! you have done a excellent work. awsomeeeeeeeeeeeeeee
-
These are amazing. Super creative and imaginative and all things that are good.
-
Great tutorial…
But at-last I got different…
Since I made some changes to make it as night mode.. :) -
Great tutorial, thanks a lot. I made a different version here http://milanaserk.deviantart.com/art/A-sky-full-of-stars-479377555.
-
Hi! Very nice tutorial!I have shared it on my Twitter Graphics account :)
-
This was really difficult to follow.
-
this tut was so soft
and easy explanation -
Very cool entry and I am so satisfied that I have found this useful information. I will definitely bookmark your site and visit this website again in the future. Thanks a lot for posting this valuable info for us. King regards!
-
It is vary nice tutorial and helpful for me .I am very happy to find this tutorial .
-
Great tutorial mate! I’ll definitely have a go at this, will subscribe too!
-
Wow! What a really inspiring! Thank you for sharing this lovely tutorial in how to photo manipulates.
-
its cool but needs better explanations
-
thank jesus its made my life come true xoxoxo :)
-
this sucks, srly why can this guy show what you should do instead of telling, may things that he says to you what to do is like playing a gamewith out telling the rules but only he knows them. the´r is only one layer that can be clipt one not tow. ti have bin really frustrating trying to get throe this tutorial.
-
Powerful tutorial. So many features are used here. Nice one. I ll like to be seeing other tutorials lik this.
-
I love this one. very nice :) Extremely helpful
-
it is very useful for beginners
-
learnt so much, and it is not obvious when you start, I had to discover how to set up personalised gradients and that was great. Sorry for the abuse from Jesse 007, must have a little problem.
-
thank you so much… :)
-
Great job I Love this website
-
Great job! Thanks.
-
How do you get the girl onto the image?
-
thank for knowing manipulating in photoshop
-
wow!fabulus designe i like it.
-
Can anyone help me with this, I was not able to make this exactly.
-
Am I able to do this in PSE?
-
wow, awesome thank you!
-
thanks for sharing this.its just spactaculas!
-
Cool tutorial
-
I am happy to find this post Very useful for me, as it contains lot of information. I Always prefer to read The Quality and glad I found this thing in you post. I will be grateful if you continue this in future.
-
Thank You… Amazing… :)
-
wow love it!!! THANK YOU
-
Awesome design….
I also done the same.. -
Amazing piece of artwork!
-
This tutorial sucks. Be more accurate when you speak. Show commands from the keyboard. Plain and simple, speak clearer proper english
-
This is an awesome tutorial that is VERY easy to follow. IF, which I very very much doubt create a tutorial yourself! Just because you have barely progressed beyond your Janet & John reading books, don’t expect people to create tutorials to be written at your level of intelligence and reading standard!
-
-
Incredible!!
-
Very clear and easy to understand the instruction.
Thank you.
God Bless You! -
Thanks dude,
Awesome ! -
Great tutorial! Thank you for sharing this Fabrizio
-
Thanks
-
Leave a Reply