

Step 54
Let’s complete our work on the Model with some adjustments. Add a Color Balance Adjustment Layer clipped to the Model Layer with these settings:
- Shadows +11 +8 -4
- Midtones +5 +8 -16
- Highlights -17 5 -15

Step 55
Add a Brightness/Contrast Adjustment Layer Clipped to the Model Layer with these settings.
- Brightness -89
- Contrast 29

Step 56
Let’s add some light to the Model. Create a new layer clipped to Model layer and name it ‘Highlights’. Pick #e8dd71 color and brush around the Model edges. Below you can see where I painted (The layer isn’t clipped in my example to show to you)

Step 57
Now set the ‘Highlights’ layer to Hard Light with Opacity 80% and Fill 75%.

Step 58
Some adjustments to our work and we have finished. Add a Gradient Map like the one showed below above all layers. The set it to Soft Light with Opacity at 65% and Fill at 80%.


Step 59
Add a Curves Adjustment Layer and click the Auto button.


Step 60
Add a Levels Adjustment Layer. Drag the Black output levels slider towards the right until you reach the value 10.


Step 61
Create a new layer above all layers and name it ‘Vignette’. Pick the color #112703. With a soft brush paint a vignette around the canvas. Then pick the color #f0efb7. With the same brush paint a bit in the middle part. When you are done set the layer to Soft Light with Opacity at 80%.


Step 62
Make a stamp of all layers by clicking together CTRL+SHIFT+ALT+E Go to Filter > Sharpen > Unship Mask and put these settings
- Amount 102
- Radius 1,5
- Threshold 0

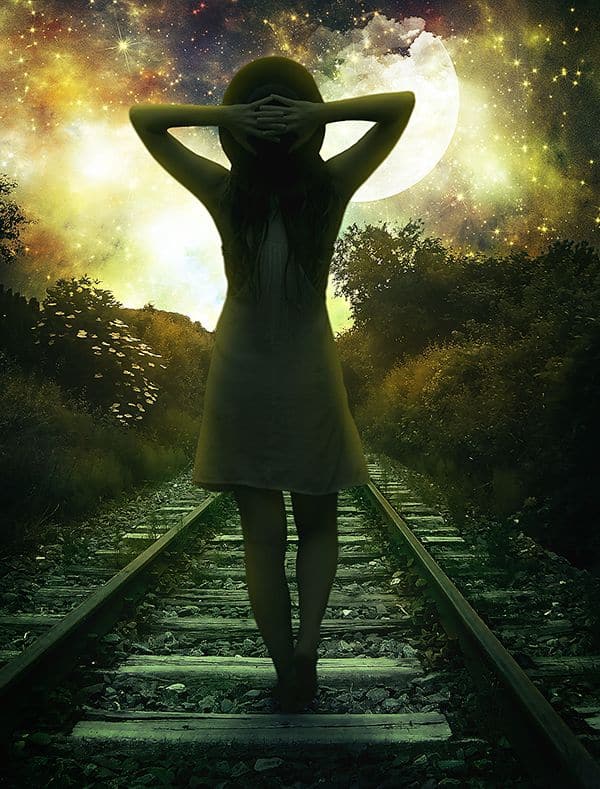
Final Results
![final-results[1]](https://cdn.photoshoptutorials.ws/wp-content/uploads/2013/09/finalresults1-1.jpg?strip=all&lossy=1&webp=82&avif=82&w=1920&ssl=1 "final-results[1]")
Download the PSD
Tutorial by Fabrizio Panattoni

Thanks a lot for your attention. I hope I could help you with this tutorial. For more guides or artworks made by me visit my dA page https://b-r-a-c-i-a-t-a.deviantart.com/
– Fabrizio Panattoni.
52 responses to “Create This Gorgeous Moonlight Poster of a Girl Walking on a Railway”
-

THIS PAGE IS THE BEST PS TUTORIAL PAGE EVER.
I always wanted to do like professionals in PS but never found any page that could teach me free but you are the best teacher I got so far. THANK YOU SO MUCH:))))
PLEASE KEEP UPLOADING LATEST EFFECTS IN PS. -
Cool photo
What are further tools you use for the picture
-
Quite interesting !
-
Excellent
-
Love all the tutorials ;)
-
Thank you for this tutorial, it is great and I had much fun at the work :-)
-
fantastic tremendous work………….
-
Please re uploaded PSD file because when i click on download showing 404 not found error, this is best work for me i want check how did you do this
-
This is definitley one of the better written tutorials. Very concise and accurate. Thank you.
-
Thank you for sharing
-
Extremely Beautiful
-
wow! you have done a excellent work. awsomeeeeeeeeeeeeeee
-
These are amazing. Super creative and imaginative and all things that are good.
-
Great tutorial…
But at-last I got different…
Since I made some changes to make it as night mode.. :) -
Great tutorial, thanks a lot. I made a different version here http://milanaserk.deviantart.com/art/A-sky-full-of-stars-479377555.
-
Hi! Very nice tutorial!I have shared it on my Twitter Graphics account :)
-
This was really difficult to follow.
-
this tut was so soft
and easy explanation -
Very cool entry and I am so satisfied that I have found this useful information. I will definitely bookmark your site and visit this website again in the future. Thanks a lot for posting this valuable info for us. King regards!
-
It is vary nice tutorial and helpful for me .I am very happy to find this tutorial .
-
Great tutorial mate! I’ll definitely have a go at this, will subscribe too!
-
Wow! What a really inspiring! Thank you for sharing this lovely tutorial in how to photo manipulates.
-
its cool but needs better explanations
-
thank jesus its made my life come true xoxoxo :)
-
this sucks, srly why can this guy show what you should do instead of telling, may things that he says to you what to do is like playing a gamewith out telling the rules but only he knows them. the´r is only one layer that can be clipt one not tow. ti have bin really frustrating trying to get throe this tutorial.
-
Powerful tutorial. So many features are used here. Nice one. I ll like to be seeing other tutorials lik this.
-
I love this one. very nice :) Extremely helpful
-
it is very useful for beginners
-
learnt so much, and it is not obvious when you start, I had to discover how to set up personalised gradients and that was great. Sorry for the abuse from Jesse 007, must have a little problem.
-
thank you so much… :)
-
Great job I Love this website
-
Great job! Thanks.
-
How do you get the girl onto the image?
-
thank for knowing manipulating in photoshop
-
wow!fabulus designe i like it.
-
Can anyone help me with this, I was not able to make this exactly.
-
Am I able to do this in PSE?
-
wow, awesome thank you!
-
thanks for sharing this.its just spactaculas!
-
Cool tutorial
-
I am happy to find this post Very useful for me, as it contains lot of information. I Always prefer to read The Quality and glad I found this thing in you post. I will be grateful if you continue this in future.
-
Thank You… Amazing… :)
-
wow love it!!! THANK YOU
-
Awesome design….
I also done the same.. -
Amazing piece of artwork!
-
This tutorial sucks. Be more accurate when you speak. Show commands from the keyboard. Plain and simple, speak clearer proper english
-
This is an awesome tutorial that is VERY easy to follow. IF, which I very very much doubt create a tutorial yourself! Just because you have barely progressed beyond your Janet & John reading books, don’t expect people to create tutorials to be written at your level of intelligence and reading standard!
-
-
Incredible!!
-
Very clear and easy to understand the instruction.
Thank you.
God Bless You! -
Thanks dude,
Awesome ! -
Great tutorial! Thank you for sharing this Fabrizio
-
Thanks
-
Leave a Reply