

Step 12
I’m recommending to align colors and lights on monk. Add new adjustment layer (Layer > New Adjustment layer > … or marked shortcut). Click on created layer with right mouse button, then choose “Create clipping mask”. Set it as is shown. Then, click on white canvas next to this layer and mask with big soft brush middle part of character – see thumbnail.

Step 13
Now, try to add more light on the hood. Add new adjustment layer (Layer > New Adjustment layer > … or marked shortcut). Click on created layer with right mouse button, then choose “Create clipping mask”. Set it as is shown. Then, click on white canvas next to this layer and mask with big soft brush whole character, beside hood – see thumbnail.

Step 14
Let’s color it! Add new adjustment layer (Layer > New Adjustment layer > … or marked shortcut). Click on created layer with right mouse button, then choose “Create clipping mask”. Set it as is shown. Then, click on white canvas next to this layer and mask with big soft brush whole character, beside hood and bottom – see thumbnail.

Step 15
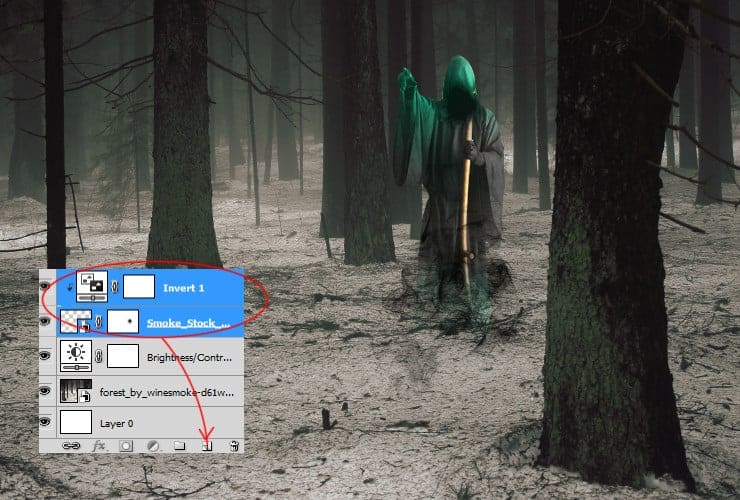
Drag, drop and place “Smoke stock 25”. Transform it as is shown. Then, click on white canvas next to this layer and mask with big soft brush remove sharpen edges.

Step 16
Add new Adjustment layer with “Invert” (Layer > New Adjustment layer > … or marked shortcut). Click on created layer with right mouse button, then choose “Create clipping mask”.

Step 17
Back to “Smoke stock 25”. Change blending mode of this layer to Multiply. Darker parts will be visable, lighter will be removed.

Step 18
Back to layer with “Smoke stock 20”. Hold ctrl and click on layer with “Smoke stock 20” and on clipping layer with Invert. Drag it and drop to “New layer symbol”.
Step 19
Drag duplicated content on the top of layers. If you need, you can mask parts of smoke by clicking on white canvas next to this layer and using big soft brush.

Step 20
Place and mask “Nordic warrior” stock. Character have to be bigger, because he is standing closer to viewer than monk. See the red guides. For masking character, use small brush. Why not Magic wand tool? Shape will be really rough and edgy. For bigger precision use brush on mask.
8 responses to “How to Create a Gothic Photo Manipulation of a Brave Warrior in Photoshop”
-

Awesome tutorial! Just none if the images want to load for me :(
-
Hey thanks for letting us know :)
The tutorial images have been fixed!
-
-
How to Design Responsive School ID in Photoshop. please make a tutorial. thank you.
-
Thx
-
msRiotte, Thanks.Another amazing lesson. You wonder. I experienced a huge plantation during this lesson. http://j-p-g.net/if/2015/09/24/0926954001443114217.jpg- my work
-
Please help me , i have a problem with the brush.
Look this http://es.tinypic.com/r/2sbx1r8/8 , my brush dont paint like you brush, dont have the same effect and i cant do a lot of projects.
Please why?? -
thanks for the very great tutorial, since i was new in this ps photo manipulation and i can’t do everything like u do, so i take couple of layers from your psd, i combine my layers with yours, is that ok?
by the way here is my final result photo :
http://williambunarto.deviantart.com/art/Green-Wizard-521571979-
sir.. william. can u help me.. can u send me ur photoshop format a PSD on that Photoshop toturial. thank you
send me via my email
[email protected]
-
Leave a Reply