

Step 55
Add new adjustment layer with Hue/Saturation (Layer > New Adjustment layer > … or marked shortcut). Set it as is shown.

Step 56
Now you’ll make blurred particles. Add new layer (Layer > New > Layer …, Shift + Ctrl + N or marked shortcut). Choose brush tool. Set soft round brush and use around 8 px size. Go to brush presets (right side, three brushes icon). Click on “Brush Tip Size” and set Spacing around 1000%.

Then, set “Shape dynamics” as shown.
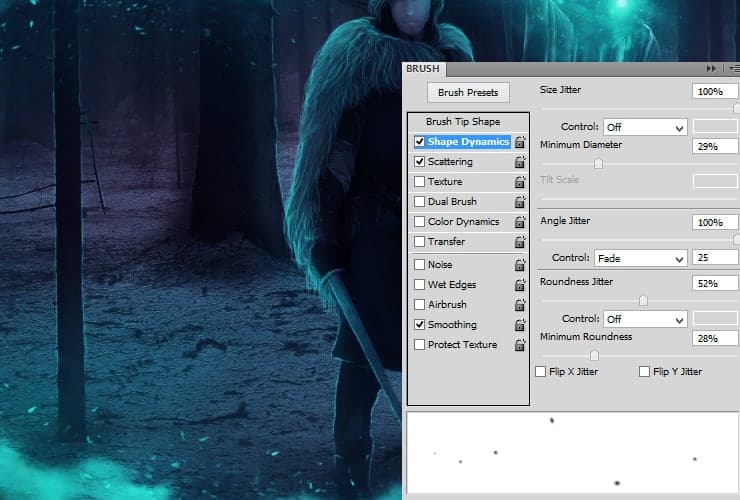
Next, set “Scattering” as shown.

Set also “Color dynamics”.
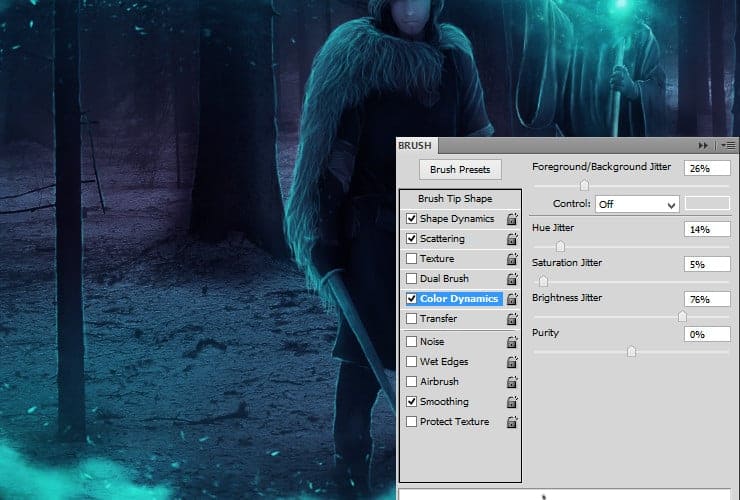
With prepared brushes, you can draw some particles, as is shown. Play with brush size and colors. I used colors from #fff to #1cc3b9 and sizes from 8px to even 20px.

Then, use blur tool (Filter > Blur > Gaussian blur) and set it to around 3-4px.

Step 57
You can repeat step 56 on new layer for deeper effect. Use wider spectrum of colors.

Step 58
Next, You will take care of light source. Our eyes are focusing on light source – so show it. Add new layer (Layer > New > Layer …, Shift + Ctrl + N or marked shortcut). Pick sharpen tool. Set its size to around 300 px and strenght around 61%. Use tool on light source.

For better effect, use on this layer another soft round brush (set its size to 30 px and its opacity to 50%). Draw lights on trees and characters.

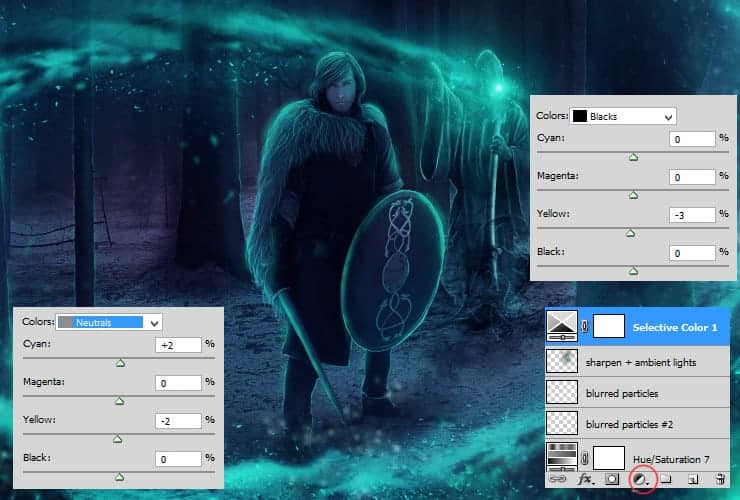
Step 59
Add new adjustment layer with Selective color (Layer > New Adjustment layer > … or marked shortcut). Set it as is shown (neutrals and black).
Step 60
Add new adjustment layer with Photo Filter (Layer > New Adjustment layer > … or marked shortcut). Set it as is shown (neutrals and black).

Step 61
If you want, you can also add some more particles to your work. Follow step 56, beside step 56e. You can also use any particle-like brush, you want with #10c9c8 color.

Final Results

Download the PSD
Tutorial by msRiotte

Thank you for following this tutorial! Hope everything was clear – if not, contact me! If you want to know me, I’m geek, goth, graphic designer from Poland. Go hereand see my other works. Watch me if you want to see new works – hereand here.
– msRiotte
8 responses to “How to Create a Gothic Photo Manipulation of a Brave Warrior in Photoshop”
-

Awesome tutorial! Just none if the images want to load for me :(
-
Hey thanks for letting us know :)
The tutorial images have been fixed!
-
-
How to Design Responsive School ID in Photoshop. please make a tutorial. thank you.
-
Thx
-
msRiotte, Thanks.Another amazing lesson. You wonder. I experienced a huge plantation during this lesson. http://j-p-g.net/if/2015/09/24/0926954001443114217.jpg- my work
-
Please help me , i have a problem with the brush.
Look this http://es.tinypic.com/r/2sbx1r8/8 , my brush dont paint like you brush, dont have the same effect and i cant do a lot of projects.
Please why?? -
thanks for the very great tutorial, since i was new in this ps photo manipulation and i can’t do everything like u do, so i take couple of layers from your psd, i combine my layers with yours, is that ok?
by the way here is my final result photo :
http://williambunarto.deviantart.com/art/Green-Wizard-521571979-
sir.. william. can u help me.. can u send me ur photoshop format a PSD on that Photoshop toturial. thank you
send me via my email
[email protected]
-
Leave a Reply