

Step 52
Select all 4 layers (hold Shift) and duplicate them (the short key Cmd/Ctrl+ J).

Then combine duplicate 4 layers one layer. To do this go to Layer > Merge layers or the short key Cmd/Ctrl+ E.

Step 53
Now, create the effect of flying glass. To do this, applicable the effect “Pinch”. Go to Filter > Distort > Pinch… and apply Amount: 50%. Click Ok.


Here’s how it looks. Blurred layer must be below all the other layers with big glass.

Step 54
Here is the whole picture at this stage.

Step 55
Now add two adjustment layers to a group with glass fragments. The first layer is a photo filter. Go to Layer > New Adjustment Layer > Photo Filter… or click on the adjustment layer icon in the Layers.
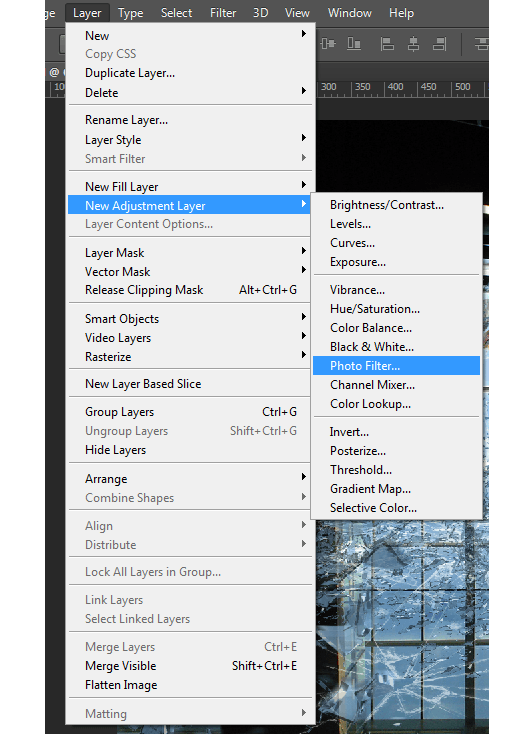
Set the settings: Filter: Cooling Filter (82). Density: 39.

Step 56
Next adjustment layers is Brightness/Contrast… Set the settings: Brightness: 82. Contrast: -50.

Step 57
How to combat fiction without weapons element? I thought that the bullets would be a good addition to the picture. I will not describe as I did one of the bullets, what you’ve downloadedJ, because it is very tedious and time consuming. Take advantage of my works, if you want :) Now get to work! Go to File > Place… and select file with bullets.

Step 58
Transform the bullet so that the big bullet half went beyond picture and add a mask to this layer.

Step 59
Use the Brush Tool (B) on the toolbar. Set it to the following settings: Size: 100px. Hardness: 0% Opacity: 100% flow: 100% and remove the excess Bullet unnecessary. Especially pay attention to the model. It should be bullets.

Step 60
Add to layer with bullets adjustment layer Black & White… with settings as shown in Figure.

Step 61
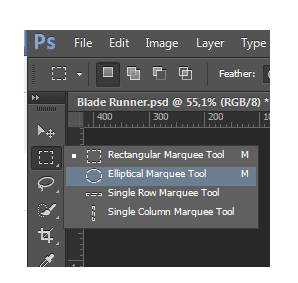
Now add to this layer black vignette. Take Elliptical Marquee Tool (M) on the toolbar and draw a large ellipse. Invert the selection (the short key Cmd/Ctrl+ Shift +I) to what you see in Figure.

Step 62
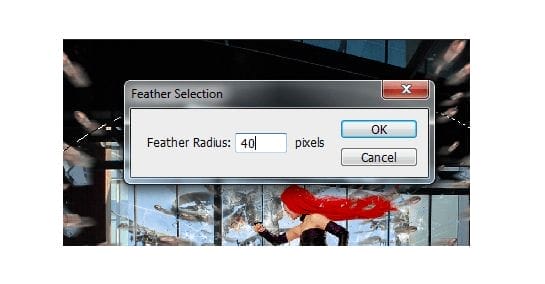
To blur the edges, click RMB on the elliptic and select from the list “Feather”. Set feather Radius: 40%.

Step 63
Now select the Paint Bucket Tool (G) on the toolbar and fill the selection black color.


Step 64
Now change the opacity to 33% of this layer. Hold down Alt and click on previous layer to get as shown in Figure.
23 responses to “Create an Intense “Blade Runner” Inspired Composition With Shattered Glass and Bullets”
-

I have the problem that the link for the model is not working can somebody please help me?
-
I added an alternative that you can use. It’s a different pose but should still work.
-
-
I have the problem that the link for the glass shatters is not working can someone please help me.
-
Thanks for letting us know about the link! It appears the artist took his stock offline but I’ve posted an alternative link to it.
-
-
Can someone please help me the link for the glass shatter images is not working I can´t find them. Hope somebody can send me a link that is working
-
Excellent Job … It requires lots of concentration and imaginative power to do such a composition … Hats of to you for this hard work ….
-
p[retyy nice lol this is amazing like wooww
-
amazing!! great to see the amazing work of great experienced art directors!!
-
Nice technique. Really useful…thanks for the post…
-
Всем привет! Все комменты не читал, может кто-то уже написал. Урок отличный! Только один недочёт, заметил всё-таки. Винты надо было по гаусу размыть. Я размыл их. А то, получается, верталёт летит а винты не крутятся, стоят. Спасибо за урок!!! Урок классный! :)
-
Спасибо большое! Я очень ценю это! Я старалась. Нет, вы первый :) С точки зрения реалистичности то все верно. Я не стала этого делать потому что много разных эффектов и винты почти не видно. Я очень рада, что вы сделали такое открытие! Значит мои старания были не напрасны! Будут вопросы, обращайтесь :) и спасибо большое еще раз!
-
-
I am currently working on this and I wanted to figure out in step 34 where you add a white to transparent gradient you show to select a gradient from black to white so I wanted to find out if this was a image error or ?
-
Hi! No there is not a black to white and white to transparent. Black can not be there. Look near numeral. This is my shortcoming in imposing numbers. Sorry. Thank you for your comment.
-
-
I did it here, thanks for the tutorial! :)
http://ednasnake.deviantart.com/art/Blade-Runner-454949929 -
it’s so cool
-
Amazing tutorial
-
Dear friends! Sorry for my mistake. Here are the correct links to the sources:
The glass ceiling — http://mariasemelevich.deviantart.com/art/The-Glass-Ceiling-451349783Ship —
http://mysticmorning.deviantart.com/art/In-Flight-stock-173857952Thank you very much for writing to me and brought to my attention! All pleasant study, good humor and inspiration!
-
Thank you Ahmad !
-
http://fc00.deviantart.net/fs12/i/2006/337/9/2/the_glass_ceiling_by_stirlace_stock.jpg
the image for the glass ceiling
-
Ñice but is more Matrix them Blade Runner.
Zora´s Death is full of Shattered Glass but you can´t see Deckards bullets.But yes it´s very cool
-
Thank you very much!I am very pleased! Yes indeed very similar :) Thanks for the criticism! I wanted to do something unusual. Because a combat fiction, you can do it all! I do not insist, as I did. This is just my version ilsh you can make your! I would very much like to see it!
-
-
“The glass ceiling” link is same as model also the link for the “ship” picture not working :) waiting for update.
-
Sorry for my mistake. Here are the correct links to the sources:
The glass ceiling — http://mariasemelevich.deviantart.com/art/The-Glass-Ceiling-451349783Ship —
http://mysticmorning.deviantart.com/art/In-Flight-stock-173857952Thank you very much for writing to me and brought to my attention!
-
Leave a Reply