Here is the result I created:

Step 6
In this step we will create eye make up to enhance the look of the eyes. Take pen tool in the tool panel (P). Start to trace the eye areas by clicking the tool to make some anchor point. Make sure to click, hold and drag the anchor point if we want to curve the path. When the path is closed, right click on the path to show the path command option. Choose Make Path Selection, this will change the path into a selection.

Set the feather radius to 2 for the selection.

Step 7
Then after making the selection, go to Layer > New Adjustment Layers > Hue/Saturation

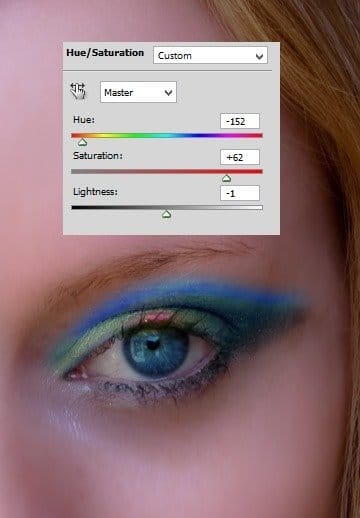
There will be a hue/saturation layer with a layer mask. Set the adjustment layer to the setting as in the screenshot.

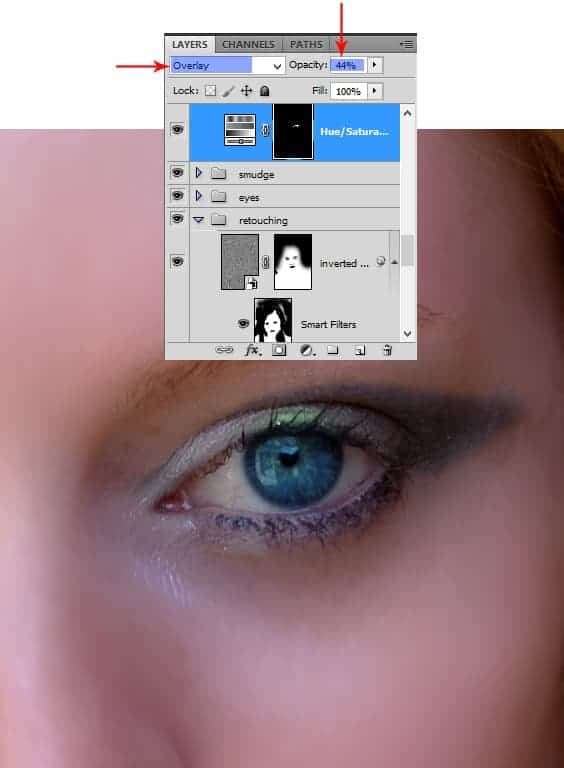
Finally, set this hue/saturation layer to overlay blending at 44% opacity.

Step 8
Proceed to create another selection around the eye.

Then, give this selection some color by adding a hue/saturation as in the previous step. Set the setting for this adjustment layer as the one shown in the screenshot.

For this adjustment layer, set it to overlay at 100% opacity.

Step 9
Do the same way to give make up for the other eye.

Here is the result

Step 10
Select all the hue/saturation layers and then hit Ctrl+G to group then in a folder. I named this folder as eye make up. Give this group layer a layer mask.

Then, mask the color of the eye make up that overlap to the model’s hair.

Step 11
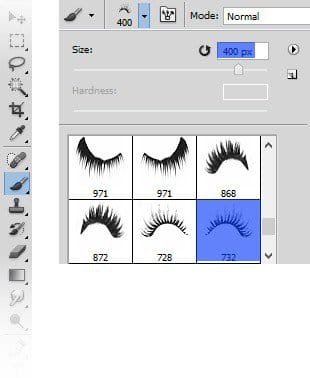
In this step, we will proceed to add eyelashes for the model. Make sure we have install the eyelashbrushes in photoshop. Create a new layer. Activate the brush tool and choose one of the eyelash brush. Set the size to fit the eye.

With black color, paint the eyelash to the model eye on this new layer. Rearrange its position to fit the eye by rotating it a bit. I named this layer eyelash.

With the eyelash layer selected, click the layer style icon in the bottom of the layer panel.

Give this eyelash inner glow layer style:

Step 12
Duplicate the eyelash layer. Then, with the duplicate layer still selected, go to edit > Transform > Flip Horizontal. Rearrange the position to fit the eye.
18 responses to “How to Create a Mystic Lady Photo Manipulation”
-
She is beautiful. Fantastic tutorial thank you
-
Amazing, thanks a lot but i got a few things to say:There is no way u gonna resize and warp and get that. Where is d ice queen’s necklace??? I thought u wld cut all that out before moving d image. I dnt knw if am d only one but after moving d cut part of d ice queen, no way am getting d next stop by warping n resizing.
-
nice explanation. What does Filter> Others> Custom do ? PSD file would have helped a lot.
-
It lets you change the brightness of pixels.
https://helpx.adobe.com/photoshop-elements/using/filters-1.html#custom_filters
-
-
wow! you have done a excellent work,thanks for sharing…..
-
Wow, these are really creative! They remind me of those Chip Fosse drawings from Overhauling’. Great work!
-
Thanks for the great tutorial, this is what I created out of this tutorial. (edit: I used a picture of my own wife, so some things might be a little off like colors and stuff)
http://helldog2004.deviantart.com/art/Ellen-robe-410515125?ga_submit_new=10%253A1383173051
-
Xosssssssssss
-
I like
-
très bon tutoriel,merci pour le partage
-
wow, is there any way to make that into a video tutorial so we can see how you do it too? Please?
AWESOME!!!! -
Awesome!! This is really cool Photoshop tutorial, thanks for sharing.
-
WOW so amazing!!! nice one
-
Very nice and creative job u have done, keep it up
-
very creative
-
Metamorphosis. Fantastic.
-
Amazing…
Plz give PSD download too…
this help us to feel your great creativity…plz
-
sayeper fri
-


Leave a Reply