

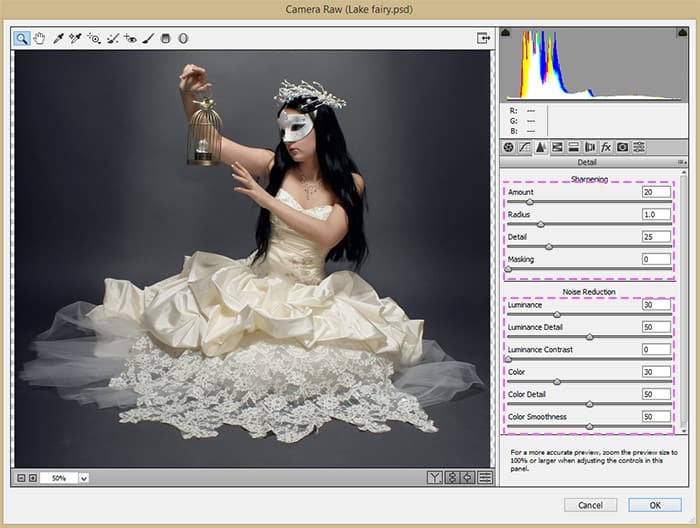
Go to tab “Sharpness” (black & white triangles) and set following values – Luminance: 30, Luminance Detail: 50, Color: 30, Color Detail: 50, Color Smoothness: 50, Amount: 20, Radius: 1.0, Detail: 25 and hit OK to apply changes.
Step 11
Let’s go back to the background. We will clearly see where our main character, and now you can remove unwanted parts in this image. Create a two new layers (“Create a new layer” icon on a Layer panel or Layer > New > Layer… > or Cmd/Ctrl + Shift + N). For a first layer set Blending Mode to “Darken”. Take a Clone Stamp Tool (S), set Sample: Current & Below, use water as the clone source. Change stamp size depending on the details that you want to remove. On the “Darken” layer remove the water lilies near the model (several groups of water lilies in the foreground is better to leave) and on the “Normal” layer remove the texture of bubbles. Arrange the layers as shown below.

Step 12
In the next step, I added new water lilies. Open image “water_lily_png_by_mariasemelevich-d8qe44z” and with Lasso Tool (L) select leaves of water lilies. Move it into a working document with Move Tool (V). To keep the image quality I suggest you convert this piece into Smart Object (right-click on layer > Convert to Smart Object or Layer > Smart Objects > Convert to Smart Object). Reduce its size by using Free Transform Tool (Cmd/Ctrl + T or Edit > Free Transform). Everything else is to your taste and wishes. You can arrange the lilies where you want. To make a larger number of lilies duplicate it (Cmd/Ctrl + J or Layer > Duplicate layer or hold Opt/Alt when using Move Tool (V)) and flip it horizontally (Edit > Transform > Flip Horizontal).

Step 13
Do the same with flowers of water lilies. In the image below you can see how I placed water lilies. Try not to overdo it and create a harmonious arrangement. The lower right corner of the lilies I do not do, because in that place there will be a plant bush in the foreground. When you’re happy with the location. Select all the layers and will integrate them in a single layer by selecting layers and hit Cmd/Ctrl + E or go to Layer > Merge Layers/ Layer > Smart Objects > Convert to Smart Object.
12 responses to “Create a Night Fairy Tale of a Mysterious Girl in Photoshop”
-

Great Tutorial Thank you!
-
Good photo editing skills.
-
Really nice best
-
Nice Tutorial (Y)
-
Great tutorial! I’ve done almost all manipulation tutorials online and this one is very nice. It used some different techniques I haven’t explored. On step 23, what color do we use on the dress? Mine just says “#”
-
same here. i just used black and i think it worked out nicely :)
-
-
nice working ,, thank you
-
Thanks a lot for uploading the tutorial. Nice work!
-
how much percent dodg and burn brother
-
on the model brother
-
-
how much percent dodge and burn sory my bad english
-
Hi, use about 10 – 25% for Dodge and Burn tools. If needed increase this value.
-
Leave a Reply