
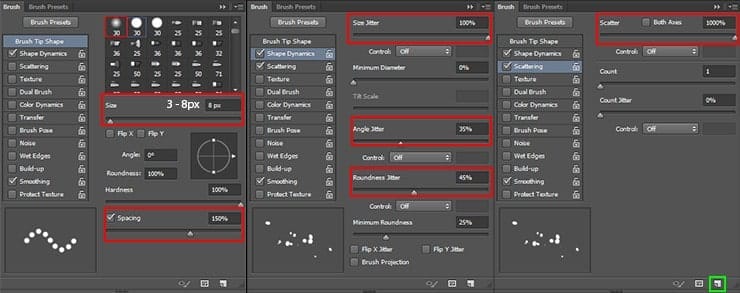
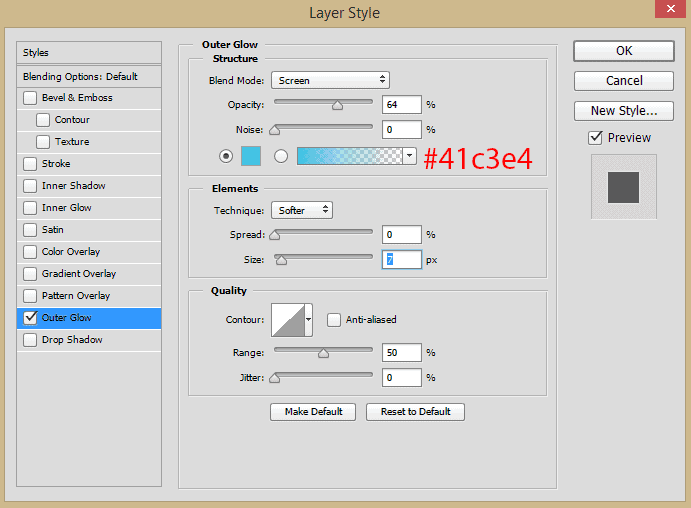
Create a new layer. Take your created brush with Size: until 8px and Opacity: 100%. Draw fireflies over flowers and a little around them. To enhance the effect, you can add layer style “Outer Glow”/”Inner Glow” (“Fx” icon at the bottom of layer panel or go to Layer > Layer Style > Outer Glow/Inner Glow). Settings for both styles are the same.

Step 21
Let’s go back to the model. First, I created a model reflected in the water. To do this, duplicate the layer with a model (Cmd/Ctrl + J or go to Layer > Duplicate Layer…) and convert it to Smart Object (right-click on the layer > Convert to Smart Object). Use Free Transform Tool (Cmd/Ctrl + T or go to Edit > Free Transform). Flip layer vertically (right-click > Flip Vertical). Move up bottom – middle point a little to change perspective. Move the image to connect model and its reflection.

Reduce layer Fill to 25%. Go to Filter > Blur > Gaussian Blur… Set Radius around 3.0 pixels and click OK.

Go to Filter > Distort > Ripples… Change Amount to 100%, from the drop-down list “Size” select “Medium”. On this, I am happy with distorted reflection. Always be attentive to details such as light, shadow, and reflection. These treacherous enemies and very good friends in the photo manipulation. Try to keep these “friends” were always realistic.

Step 23
The dress should touch the water and therefore wet. I decided to create a new layer (Cmd/Ctrl +Shift + N or Layer New > Layer…). With soft round brush, Opacity: 50% and color: # brushed lace on the model’s dress. Change layer Blending Mode to “Overlay”, Fill to 49%.

Step 24
And now burning bird! This element I drew myself, but you can also find a brush with birds on the Internet (there is such a lot). If you have trouble, you can find on the Internet the appropriate bird and redraw it. Here are the steps of my hand-drawn bird. What you need: Brush Tool (B) with hard round brush, Size: 6 – 15px Opacity: 50%, Color: #e68d1d (# eaab25 for highlights). For texture brush form: “Spatter 27 pixels”, Color: #c97a17. For the tail brush form: soft round brush, Size: 4px Opacity: 50%, Color: #f3d95e. Create a new layer and go on!
12 responses to “Create a Night Fairy Tale of a Mysterious Girl in Photoshop”
-

Great Tutorial Thank you!
-
Good photo editing skills.
-
Really nice best
-
Nice Tutorial (Y)
-
Great tutorial! I’ve done almost all manipulation tutorials online and this one is very nice. It used some different techniques I haven’t explored. On step 23, what color do we use on the dress? Mine just says “#”
-
same here. i just used black and i think it worked out nicely :)
-
-
nice working ,, thank you
-
Thanks a lot for uploading the tutorial. Nice work!
-
how much percent dodg and burn brother
-
on the model brother
-
-
how much percent dodge and burn sory my bad english
-
Hi, use about 10 – 25% for Dodge and Burn tools. If needed increase this value.
-
Leave a Reply