
Create another group for another foreground. Name the new group more foreground. Place the group under the previous foregrounds. We still do almost the stem steps as the previous ones.

Again, create another group for the last foreground. Name this group another foreground.

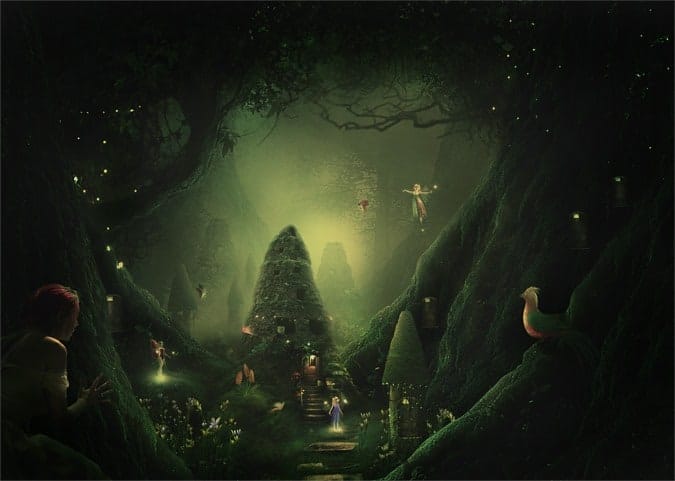
Step 4 (Adding background image)
Open the background stock image to the document. Convert this image into a smart object. Place it under the foreground groups in the layer panel. With the Free Transform Tool, scale the image up. Arrange its position where needed. Please take a look at the screenshot below for your inspiration:

Give this smart object a smart filter: Custom. Apply the same setting of the previous step 2 for the custom filter. Here is the result will look like:

Next, give this layer another smart filter: Surface Blur. To achieve this, go to Filter > Blur > Surface Blur.

Give this background layer a mask and mask some areas on the red marked ones. Try to use a very soft round brush at 10-20% opacity. The screenshot below will guide you the areas to be masked:

This is the result should be:

Click on the filter effect mask thumbnail and mask the red marked areas. Use a very soft round brush to mask the areas.

Step 5 (Adding twigs to the background)
Open another tree stock image. Crop part of the tree. Use Lasso tool to select the part and crop it into a single layer.

Add the cropped part to the main document. Place it above the background layer in the layer panel. Mask some unneeded parts.

Step 6 (Creating ground)
In this step we are going to create ground. Open the fairy house stock image on the document. Convert it to a smart object. Scale and locate it where needed. Place this fairy house layer between the first two foreground groups and the second two groups.

Duplicate the fairy house layer (Ctrl+J). Give this duplication layer of the smart object some filters by going to Filter > Filter Gallery


The result should look like this:

Give another smart filter:

Set the duplication layer’s blending to normal at 55% opacity:

Duplicate the second fairy house layer and set it to soft light layer at 30% opacity. Select all the fairy house layers and hit Ctrl+G to group them. Name this group ground
24 responses to “How to Create a Night Jungle Scenery in Photoshop”
-

Thanks for this tutorial! I finished it and my image looks just like yours! It was a lot of fun! Thank you!
-
This is one awesome collection. One of my favorites I have seen in a long time. Thanks for sharing.
-
this is really nice but its too difficult for me !
-
Your not a master assassin
-
-
hey Arsi .
nice tut , but some resources you used are not available anymore .
can you reupload them again ? thanx -
Thank you for this tutoriel but certain material(equipment) not more available sound
Ariata – DeviantART
Flowers -
amazing photo! but when I opened the tree picture in the beginning in PS it was shorter than the background. Not that perfect as your screenshot. should I change the picture size or do you have any tip?
-
Thanks so much for this wonderful tutorial n__n
-
You must be a Master Assassin to complete this
-
-
wo men ji you qun qian lai bai fang
-
Its looking super but to learn this is not an essay
-
“Links don’t work” “writing on background”, just use another picture. There’s billions out there.
-
the background has a writing on it! how do you get it off?
-
use clone stamp
-
-
I mean what a detailed and an amazing tutorial. Just loved it. It was awesome.
-
damn haha, took forever!! Amazing tutorial, I wouldn’t normally do something like this, but I need to step out of my comfort zone and learn something I may never use.
Thanks.
Amazing feeling to finish something like this lol
-
Good one
-
her
-
Nice tutorial.
-
Awesome tuts
-
Links #5, #6 (Ariata – DeviantART, Flowers – DeviantART) as well as the last one do not work :(
-
This is too hard for me to make, I just wanna say that it looks amazing!
-
hey how are you . my name is Arsi actually nothing is Hard you do try .. is simple and easy possible . don’t say hard and go back .. do try and come to front side . Thanks
-
-
What is the custom filter for?
Leave a Reply