

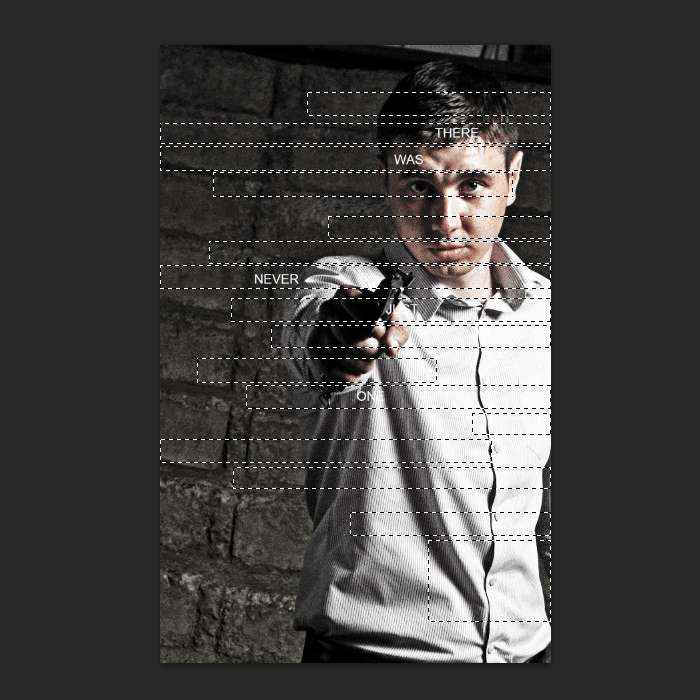
Draw some rectangles like shown in the image below. Start by drawing rectangles around the text and eyes then adding more afterwards. If you make a mistake, just press Ctrl+Z to undo. Want to start over? Press Ctrl+D to deselect and start over.
Step 14
In the Layers palette, select the Photo group then click on the Add Layers Mask button. This will create a layer mask from the selection you made in the previous step.

Here’s what our image looks like so far.

Step 15
We’re almost done! Select the Rectangular Marquee tool and create selections around the text. Make sure your foreground/background colors are set to the default white/black by pressing D to reset the colors. Press Delete to fill the selected area with black. Press Ctrl+D to deselect.

When you’re done, set the mode back to New Selection so that you don’t get confused the next time you use the Marquee tool.

Step 16
In the Layers panel, click on the layer mask of the Photo group – make sure you’re clicking on the thumbnail so that you are editing the layer mask.

Press D on your keyboard to reset your foreground and background colors then press delete on your keyboard. This will fill the selected area with black. Press Ctrl+D to deselect the selection when you’re done. Here’s what our image looks like.

Step 17
Remember earlier when we talked about Smart Filters? Here’s an example of a situation where you will find them useful. The photo of the background seems too strong and we need to make changes to the Shadows/Highlights adjustment. To do this, just double-click on the Shadows/Highlights adjustment in the Photos layer. Without Smart Filters, you would have had to undo many steps to do this.

I reduced the shadows and increased the highlights for a more realistic look. Click OK after you’ve adjusted your settings.

Step 18
To finish the image, we’re going to add a slight gradient to the text. Right-click on any one of the text layers then choose Blending Options.

Checkmark the Gradient Overlay style then set the settings shown below. The Dither option reduces banding in the gradient by dithering and should always be enabled. Click OK when done.
34 responses to “Create a Poster Inspired by the Movie “The Bourne Legacy””
-

cool
-
it sucks that you have to pay for the image
-
Any picture will work no matter what you use for the tutorial.
I used this one (free):
https://stock.adobe.com/uk/images/confidence-businessman-in-suit-standing/339829407
-
-
tell me which software i have to use to get my photos with effect like this.
-
download link dont work plz help
-
Thanks link has been fixed :)
-
-
thnx man it really help me alot
-
j
-
-
thank you much for share :) really nice
-
quick, take this down. illuminate
-
Guns are bad please take down this tutorial
-
Awesome! Excellent tutorial. Thanks for sharing.
-
very good!! well explained tutorial
-
Nice,cool tutorial
-
i use ps cs3,,cs 3 hvant viberance?so how i do this step 6?? plz help me
-
Thanks A lot. This tutorial was really helpful.
-
awesome
-
gk tau buat’a
-
NICE WRITTEN. EASY TO UNDERSTAND (I DID A LOT OF TUTORIALS AND SOME CONFUSE ME) CLEAR AND WELL EXPRESSED.
THANKS A LOT.
GREETINGS FROM SPAIN -
I couldnt do it in CS4. At step 14 the effect did take place. i dont know where i went wrong.
-
Thank you very much. Now my facebook avatar ‘s cool
-
nice
-
Nice one
-
So… what happens after step 11?
-
Click next page to go to the next page ;)
-
-
thank you…. it worked well
-
nice
-
Thank you so much for this detailed tutorial!
-
Thanks for the great tutorial! Will this work the same in CS4?
-
Thank you so much.You’re way of teaching is very detailed and that’s the biggest part.Keep up the great work.
-
really nice :) couldnt get the stock but used another and went just as well thanks so much
-
hjg
-
Great tutorial!
Simple, nice, well written.
Thank you! -
wow, thank u much for sharing this.
Leave a Reply