

Step 7
Create a Gradient Map Adjustment layer (Layer > New Adjustment Layer > Gradient Map) with the default settings (black and white). Set the blending mode to Soft light. This will increase the contrast.


Step 8
Create a Curves Adjustment Layer (Layer > New Adjustment Layer > Curves). Drag the right slider to the left in order to boost the highlights.


Step 9
This step is optional, follow it only if you want to add a little artistic effect.
Create a Gradient Map Adjustment Layer and choose one of the colored presets. Set the blending mode to Soft Light and lower the Opacity if the effect is too strong.
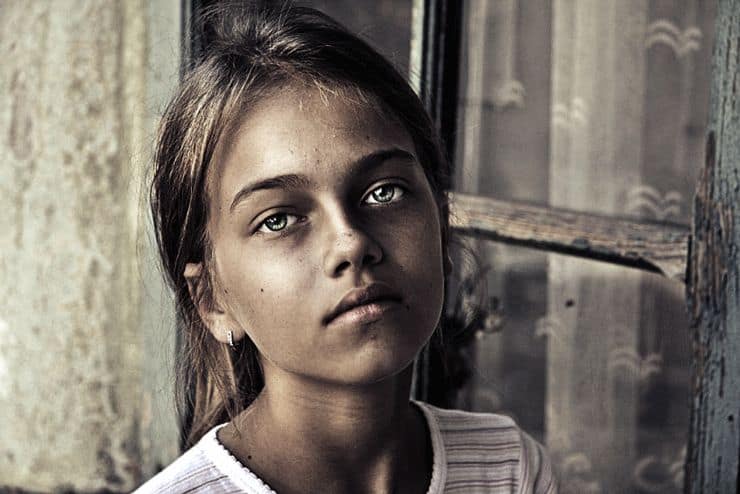
![final-results[1]](https://cdn.photoshoptutorials.ws/wp-content/uploads/2014/08/finalresults1-1.jpg?strip=all&lossy=1&webp=82&avif=82&w=1920&ssl=1 "final-results[1]")

Below you can see some before and after comparison photos.


Final Results
![final-results[2]](https://cdn.photoshoptutorials.ws/wp-content/uploads/2014/08/finalresults2-1.jpg?strip=all&lossy=1&webp=82&avif=82&w=1920&ssl=1 "final-results[2]")
Download the PSD
Tutorial by Adrian Scheff
 Thank you for following this quick-tip tutorial. I hope you learned something useful. You can find me at fantmayo.deviantart.com.
– Adrian Scheff
46 responses to “Create a Powerful Emotional Effect for Your Portraits in 9 Easy Steps”
-

Photography judges would be amazed by this effect…….. 15 years ago
-
Thanks Adrian for sharing this awesome tutorial. I really appreciate it!
-
I like it but you have completely changed the person on the image…it isn’t her anymore
-
VERY GOOD
-
yeah exactly I followed your instructions in this tutorial and I got god level powerful and emotional photo I want to send you my work but don’t know how??
-
Awesome Work
-
The eyes are WAY too bright
-
Thanks for this tutorial :D
-
Perfect tutorial. Thank you so much. :)
-
Cool effect
-
It’s a bad habit to use “apply image”, it’s a destructive workflow. Merge layers to smart objects and dublicate and apply effects on those for a non-destructive work flow. Other than that, great tutorial on how to get a grasp on “proper” effects (i.e. curves vs brightness/contrast etc)
-
where are the steps of this tut???(((
-
where are the steps of this tut?(((
-
It’s really nice and very important way to make photos as the desired looking, whatever is it I like this post as a designer, I appreciate you, thanks.
-
your photo looks good, as for mine these steps made me look like a mental case. Thanks for the tutorial
-
Great tutorial. In just 10 easy steps you are seeing a completely different image. Bravo!
-
Nice job really worked on an image of mine. Much appreciated.
-
does anyone know who the original image belongs to?
-
Thank you, awasome!
-
Hello,
it’s great & very helpful for Photoshop image editor. Thanks
-
Thanks , great tutorial
-
nice work dude
-
Tks. keep on good work
-
I just skimmed through but yes, dodge is clearly used in step 4, as illustrated.
-
is dodge and burn in any of d steps
-
do dodge and burn in any of d steps
-
Thanks for this tutorial :D
-
Awesome Post. Lighting is most beautiful. Thanks for the Post.
-
(y) :D
-
Ok. I am just in the beginning and honestly it doesn’t do anything. I am really a beginner and don’t know exactly what all mean, that’s why I am trying to find step by step tutorials. What does your first step do?
-
you need to go to Adobe and start with their tutorials first
-
-
Command + Option + Shift + E
For those on a Mac -
Can’t get why to ruin such a beautiful picture, such a nice face. What you made is just something one would not recognize because it is so boring.
-
Boring? Honey, based on your comments you personify boring.
-
It is just a tutorial…
-
its to make the picture more emotional. the original photo was just so boring, now look at it
-
-
awesome!
-
Thank you for this, it’s a stunning effect! I found it also useful to work a little with the saturation mask to make her green eyes pop a little more.
-
Thanks for this tutorial about how to make people look homeless
-
LOL i salute you
-
HAHHAHAHAHA
-
Best comment of the post! xD
-
LOOOOL
-
you rock xDD
-
dustin speaks the truth
-
Loooool
-
Leave a Reply