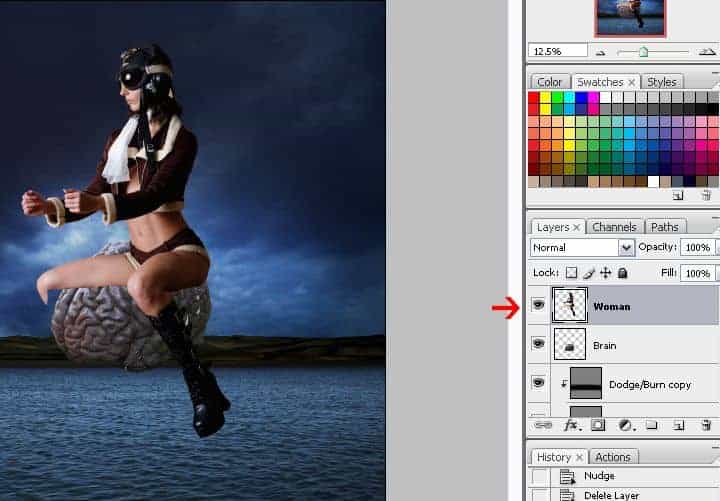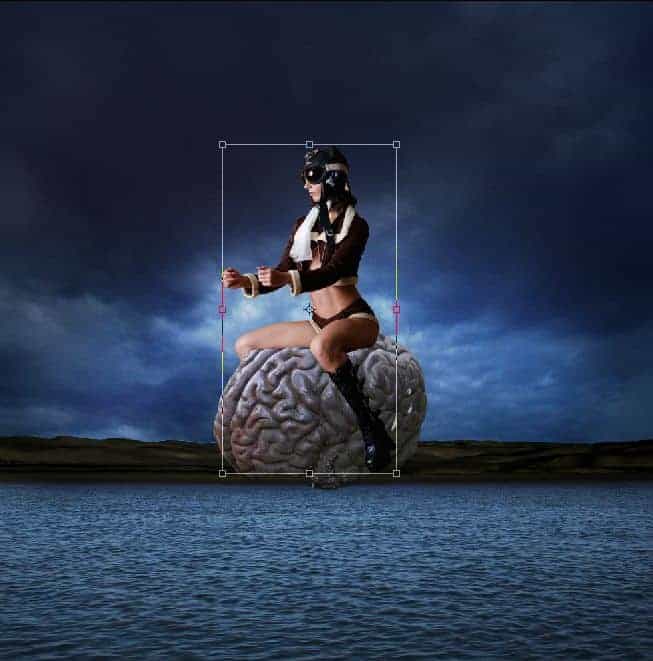
Step 10
Use the Free Transform tool (Ctrl/Cmd+T or Edit > Free Transform) to scale the image like shown in the image below.

Position the layer to the bottom of your document.

Step 11
Now we’re going to create a selection of the sky. Select the Magic Wand tool (W) then set the tolerance to 50%. Click on the sky then press Delete on your keyboard to delete the selected area.

Step 12
Now we’re going to dodge/burn the sky using a nondestructive editing technique. Create a new layer (Ctrl+Shift+N or Layer > New > Layer) and position it as the top layer. Set the foreground color to #808080 (This is 50% gray). Fill the layer with this gray. Change the blending mode of this layer to Overlay then right-click on the layer and choose “Create Clipping Mask”.

Step 13
Select the Burn tool and make sure that the range is set to Midtones and exposure to 100%. Paint over the mountain to darken it like shown in the image below.

Step 14
Duplicate the layer (Ctrl/Cmd+J) then reduce the opacity of this new layer to 70%. The layer should be clipped to the previous layer as well – if it isn’t, right-click on the layer and choose Create Clipping Mask.

Step 15
Open the Brain image then copy and paste it to your main document. Use the Free Transform tool (Ctrl/Cmd+T or Edit > Free Transform) to scale it like shown in the image below. Hold shift to constrain the proportions.

Step 16
Create a cutout of the brain. There are many ways of doing this such as using the Lasso Tool (L).

Step 17
Open the image of the model then copy and paste it to your main document. Use the Free Transform tool (Ctrl/Cmd+T or Edit > Free Transform) to scale the image like shown below then go to Edit > Transform > Flip Horizontal.

Step 18
Create a cutout of the model like shown in the image below. Erase her right leg to around the knees.

Step 19
Use the Free Transform tool (Ctrl/Cmd+T or Edit > Free Transform) to scale the model so that it looks seated on the brain.

Step 20
Create a new layer (Ctrl/Cmd+Shift+N or Layer > New > Layer) and position this layer below the layer of the model.
19 responses to “How to Create a Surreal Flying Brain Photo Manipulation in Photoshop”
-
Wonderful tutorial. thank you so much for sharing it!
-
This is very nice! Wonderful tutorial.
-
A very smart approach to explain the things,like your step by step tutorial.Thanks for sharing.
-
nice tutorial, can you send me more tutorial please on my email, thanks! bcoz i’ve wanted to be as good as you :)
-
Thanks for this tutorial…I got stuck in some parts, specially on step 23 and also I skip or did some steps a bit different (layer order) but result was almost the same (except for the glow above the mountain)…anyway Im happy to be able to do this without much issue since I started learning photoshop one month ago. tks again, Adriano
! -
Dani, I didn’t know you did tutorials outside of dA – this is awesome!
<3
Ivy -
Results are nice.
Keep posting good tuts -
nice bro!…
-
Wow! This is very nice Bro! invited eko15_p
-
@DzulmarEGG eko15_p Thank you so much for the attention!
-
-
Thanks
-
Thanks
-
@Ayaron You’re welcome!
-
-
Wonderful! But it’s quite hard for a beginner like me.
-
@ PBX I understand, but breathe… take your time and try to do it slowly, I try to build my tutorials well detailed, step by step, just try, I believe you! :D
-
-
Wonderful, Wonderful tutorial. So creative and interesting Technics. Thank you for sharing.
-
@nue110 Thank you for your kind words, dear!
-
-
Wonderful tutorial, very beautiful and creative thank you so much for sharing it!
-
@Nully Thank you so much, hope this tutorial can be useful.
-


Leave a Reply