
Step 34
Select the Dodge tool then set the range to Highlights and brush size to around 1000 pixels. Paint the front of the brain to brighten it up.

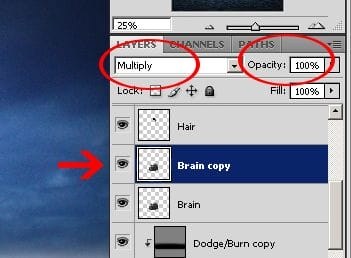
Step 35
Select the Brain Copy and Brain layer (Hold Ctrl or Cmd to select multiple layers) then merge the layers (Ctrl/Cmd+E).

Step 36
Now we’re going to create two iron bars for the handle. Create a new layer then move it to the top. Name this layer “Iron”.

Step 37
Select the Rectangular Marquee tool then create a selection like shown in the image below.

Step 38
Select the Paint Bucket Tool (G) then fill it with black. Press Ctrl+D to deselect.

Step 39
Now we’re going to apply some effects to the iron with layer styles. Go to Layer > Layer Style > Bevel & Emboss. Apply the settings as shown below.


Step 40
Create a new layer under the Iron layer. Select the original Iron layer then press Ctrl/Cmd+E to merge this Iron layer to the empty layer. We have only one layer again.

Step 41
Select the Eraser tool then with a hard brush (7-0100% feather), delete the bottom and top areas of the iron so that it looks like it fits in the models hands.

Step 42
Dodge and burn the layer a bit. Burn the part next to the hand and hole of the brain and dodge the middle of the iron to lighten it a bit.

Step 43
Press Ctrl/Cmd+J to duplicate the Iron layer. Now we have two bars. Use the Free Transform tool (Ctrl/Cmd+T) to scale and position the iron rod like shown below. Delete the unnecessary parts of the iron just like what you did earlier with the other iron bar.

Step 44
Create a new layer above the Brain layer and name it “Shadow”.

Select the Brush tool (B) then using a soft brush, paint under the model like shown below.

Step 45
We’re almost done! Let’s apply some more adjustment layers for the whole image. Select the Brain layer then apply the adjustment layers in the order shown in the image below.

Here’s how your layers should look.

Step 46
Select the Sea layer then use the Blur tool at 50% strength to blur the top of the mountain.

Step 47
Now go to Layer > Flatten Image.
Editors Note: This tutorial suggests to flatten the image which will merge all of your layers into one. Instead of flattening the image, you can convert all the layers into a Smart Object. To do this, select all of the layers then right-click on the layer and choose Convert to Smart Object.
19 responses to “How to Create a Surreal Flying Brain Photo Manipulation in Photoshop”
-

Wonderful tutorial. thank you so much for sharing it!
-
This is very nice! Wonderful tutorial.
-
A very smart approach to explain the things,like your step by step tutorial.Thanks for sharing.
-
nice tutorial, can you send me more tutorial please on my email, thanks! bcoz i’ve wanted to be as good as you :)
-
Thanks for this tutorial…I got stuck in some parts, specially on step 23 and also I skip or did some steps a bit different (layer order) but result was almost the same (except for the glow above the mountain)…anyway Im happy to be able to do this without much issue since I started learning photoshop one month ago. tks again, Adriano
! -
Dani, I didn’t know you did tutorials outside of dA – this is awesome!
<3
Ivy -
Results are nice.
Keep posting good tuts -
nice bro!…
-
Wow! This is very nice Bro! invited eko15_p
-
@DzulmarEGG eko15_p Thank you so much for the attention!
-
-
Thanks
-
Thanks
-
@Ayaron You’re welcome!
-
-
Wonderful! But it’s quite hard for a beginner like me.
-
@ PBX I understand, but breathe… take your time and try to do it slowly, I try to build my tutorials well detailed, step by step, just try, I believe you! :D
-
-
Wonderful, Wonderful tutorial. So creative and interesting Technics. Thank you for sharing.
-
@nue110 Thank you for your kind words, dear!
-
-
Wonderful tutorial, very beautiful and creative thank you so much for sharing it!
-
@Nully Thank you so much, hope this tutorial can be useful.
-
Leave a Reply