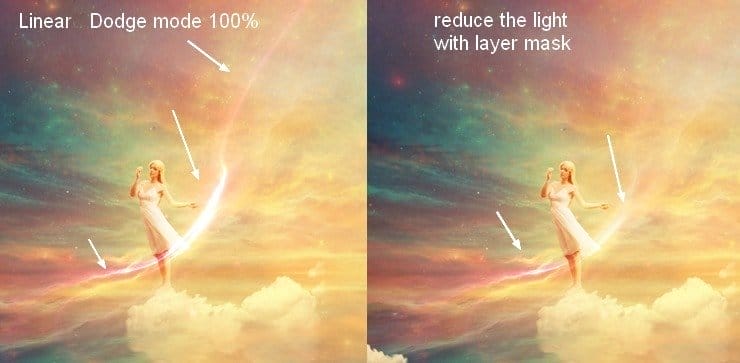

Step 45
Duplicate this layer and alter the mode to Color Dodge 100%. Here are the results of its layer mask and the picture:
Step 46
Open the light 2 images pack and choose number 38 (feel free to take the one you like). Press Cmd/Ctrl+J to duplicate this layer. Go to Filter > Liquify and choose the Forward Warp Tool with the settings below:

Step 47
Drag this result onto the model part and bend it a little with the Warp Tool:

Step 48
Use Hue/Saturation to change the light color to a bright yellow:
Step 49
Add a Vibrance adjustment layer to the top of the layers:

Final Results
![dream49-final[1] dream49-final[1]](https://cdn.photoshoptutorials.ws/wp-content/uploads/2014/06/dream49final1.jpg?strip=all&lossy=1&webp=82&avif=82&w=1920&ssl=1)
Download the PSD
DownloadTutorial by Jenny Le
21 responses to “Create a Wonderfully Colorful and Everlasting Dream Fantasy Manipulation”
-
beautiful thanks a lot
-
Amazing tutorial!!
-
beautiful thank you
-
Thank you! really great work.
-
More posts like this. Excellent
-
Yup Indeed
-
My pic http://j-p-g.net/if/2015/08/16/0941499001439726706.jpg
Thanks. I love this wonderful lesson. Author – genius. the great manipulator adjustment layers -
What a great tutorial and different to what you usually see. Thanks.
-
Dank memes brah
(look at the date) -
Thanks a lot! Loved this tutorial =) Here is my version http://milanaserk.deviantart.com/art/Sensibilia-489040508?ga_submit_new=10%253A1413571430
-
amazing!! great to see the amazing work of great experienced art directors!!
-
Awesome…
-
Thanks, really good work!
-
Thank you for the tutorial!
-
amazing…
-
super
-
-
Thank u..
-
Breathtaking picture!! I will try
-
خوب بود.ممنون
means:good thank you!! -
Final image looks amazing brilliant job !!
-
okay only…


Leave a Reply