Step 15
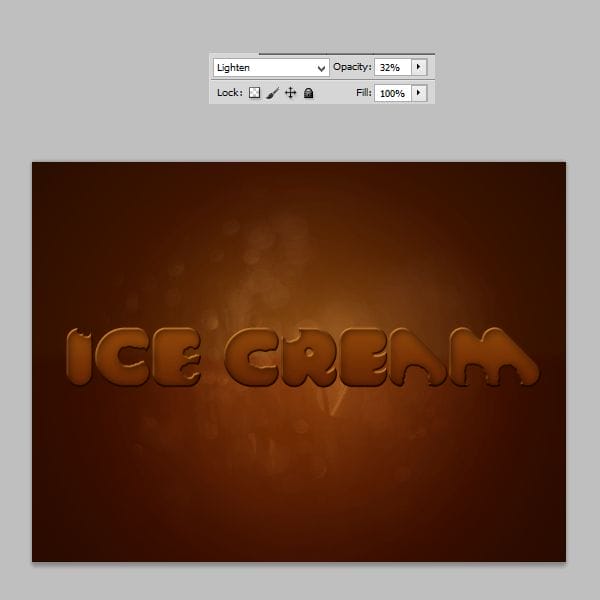
Add new layer. Choose gradient tool and fill it with #f8941d color as is shown.

Step 16
Click on this layer with RMB. Choose Create clipping mask.

Step 17
Change blending mode to Lighten and opacity of this layer to 32%.

Step 18
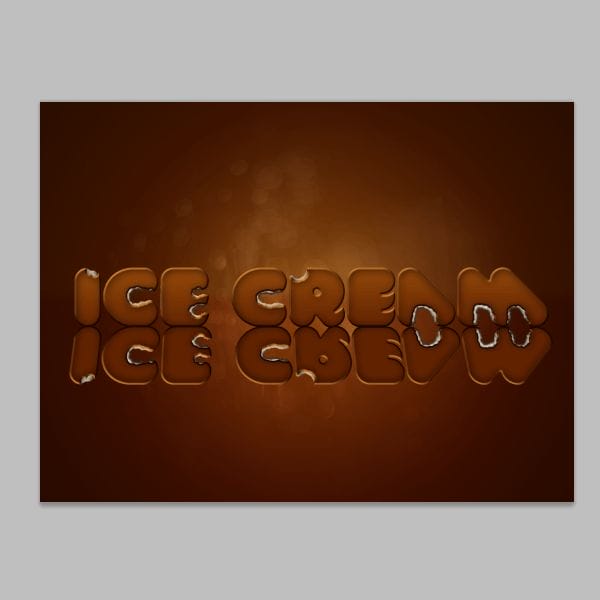
Duplicate layer with text. Change positon of this layer below first layer with text. Change mask with hard round brush as shown.

Step 19
Place Food texture above duplicated layer. Everything is shown on the image:

Step 20
Make this layer clippy by RMB > Create Clipping Mask.

Step 21
By holding ctrl choose layers with: Text, Grafient, Food and text below food. Then duplicate it and click RMB, then choose Convert to Smart object.

Step 22
By ctrl + T transform it as shown: vertically and perspectively.

Step 23
Place converted smart object below text layers. Then add mask to this layer. Use black and white gradient.

Step 24
Above reflection layer add new layer. With soft round, gray brush draw some small strokes below text, as shown.

Step 25
Change layer blending mode to Multiply and decrease opacity to 40%.

Step 26
Add new layer. Copy layer style from the first text layer. With small brush draw somewhere unequal broken pieces of ice cream.

Step 27
By RMB choose Convert to Smart Object. Then from top menu pick Filter > Blur > Radial blur. Set it as is shown.

Step 28
On new layer repeat 26 step.

Step 29
Convert it to Smart Object. Use from the top menu Filter > Blur > Gaussian blur… Choose 14 px blur.

Step 30
I also addewd mask to this layer, because i draw too much ice cream pieces.

Step 31
Duplicate layer with radial blur, or just add new and drew some ice cream pieces. Clear filters and transform it as shown.

Step 32
On this layer use from the top Filter > Gaussian blur…

Step 33
Add new layer. With small brush and #f7941d color draw drops of the filling. Yummy! :3

Step 34
Click on this layer with RMB. Choose blending options and pick Bevel and Emboss. Set it as shown:

Then add contour

Step 35
On new layer use bigger brush with the same settings of layer (Bevel and emboss and contour).

Step 36
Convert layer to Smart Object. Then from top menu choose Filters > Blur > Gaussian blur.

Step 37
Next, add Filter > Blur > Radial blur.
18 responses to “How to Make Delicious Ice Cream Text in Photoshop”
-
Interesting Tutorial
-
Nice tutorial
-
This tutorial is incomplete.
-
Click on page 2
-
-
Nice tutorial . .so help ful
-
nice
-
where is bokeh stock
-
Thats a good turtorial
-
nice tutorial.. but all the steps r not visible… :/
-
cool & attractive
-
لطفا به صورت تصویری اموزش هارو بذارینl
-
Thanks for sharing such informative post its help me to know deeply Photoshop work step by step.
-
Nice but very tough
-
I can’t understand the correct position of various layers, because the layer panel screenshots don’t match the descriptions exposed in the tutorial. Could you kindly help me? Thank you very much!!
-
This applied to the lesson
http://i.imgur.com/kV10uuh.jpg-
So much #4. I actually had a cuometsr in my store today, printing his photos from Europe, lamenting a beer bottle sitting on a statue in a picture he really wanted to print. but then, I also couldn’t explain to this guy what aspect ratios were and why the picture he had edited into a square wouldn’t print properly onto a 4 6.
-
-
Thanks for the nice tutorial :)
-
nasike


Leave a Reply