
Paste in our triangle. You can modify it a bit. Here is a rotation:

Go to the Image > Adjustments >> Brightness/Contrast to make a particle more visible.

For changing tones you can use levels as well.

Now, with a Polygonal lasso tool, create third dimension of particle. Make a selection and fill it with some dark color.


Then (on a new layer) use Polygonal lasso tool to add some shadow to the particle. Select similar area (it may vary if you set your light source somewhere else), fill it with gradient with very dark color…

… and then deselect it and blur at the end with blur tool.


These are very small details, so you don’t have to pay full attention to them, but they will be visible in the final product, so don’t forget about them. The house is built from bricks. So big house and so small bricks…
Step 39
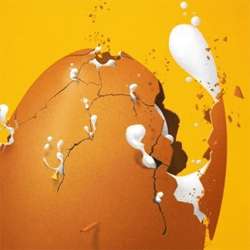
So you know how to create cracks and single particles. I’ve made some more of them:

Also I cut out some pretty huge part of the egg. I shouldn’t do that for we are so far, but I will tell you the last time: pick Polygonal marquee tool, create a selection and then hit [Delete] while you having egg’s base layer selected.


Step 40
Now we are going to make a huge fragment of a detached eggshell. But before that we will try to hide eggs flatness. In Step 26 and 27 I told you to make a copy of our egg’s layer. I assume you did so. You can now [Ctrl] + [Click] on a thumbnail of this copy so you will have a selected full shape of the original layer.

Take the Polygonal marquee tool, set the selection mode to Intersect with selection and select the only part that we need.

Create new layer and place it under the base egg’s layer. Then fill a selection with color #7d4b1a. Next, create some funky selection to simulate the inner part of the eggshell.

Then hit [Delete]. You can also use Liquify filter to make edges of newly created layer more interesting.
Step 41
We will add some shadows to this layer to make a deep effect. Create a clipping layer to our new inner eggshell. Now pick a color #543516 or even darker and play with gradients.
12 responses to “How to Break an Egg in Photoshop”
-

Grrrrreat! I applied these and thank you!
-
Thank you so much for this tutorial, I managed to do something really nice by modifying it a bit :)
I need more ! :D -
What a design tutorial. but very difficult. I want to video tutorial.
-
Awesome & nice tuts
-
Nice work. I did find the initial coloring and clipping mask steps could have used some screen shots of the layers palette. I find this makes it a little easier to follow along.
Otherwise, very cool effect. -
Hats off!
-
thank you so much! it is people like you who make it possible for the rest of us to learn and grow! I can’t thank you enough!
-
very nice
-
Loved the tutorial! I’m an ass.. I read it all!! :D
This tut taught me a lot of things at the same time it also made me recall the tricks I used to use but forgot with the time passing..Kudos. \m/
Sir Masiej Kwas.. Respect to you…Also, I was looking for some kinda tut which could teach me the way to turn a red apple into a golden one, or can say an apple covered with shiny golden foil.. If you can gimme a link of such a tut, if it’s already on internet, or post a tut on that, that would be really cool and generous of you guys..
Appreciate the hard work done by people behind this website.. :)
-
Wow! This is by far the most amazing photoshop tutorial I have seen. I realy mean it. Looking forward to trying it out sometimes. – Respect!
-
very niceeeeeeeeeee
-
wow great work
Leave a Reply