
Now create a selection of the inner eggshell, on a new layer paint with very light color, then move a selection and hit [Delete]. You know what I’m talking about for we have made that two times in this tutorial. What we want to achieve are a small light reflections on the edges that will simulate a 3d look. You can also do this on a clipping layer to avoid hard edges.


My color was too bright so I’ve changed opacity a bit (to 40%).
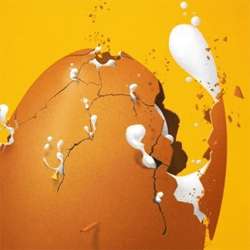
Step 42
Now we will use a copy of our untouched egg to create a big particle. Make it visible, then [Ctrl] + [Click] on a thumbnail so you will have a selection.

Then find current egg’s layer (which is already detached) and use [Ctrl] + [Alt] + [Click] on a thumbnail. You will have a selection similar to this:

Then use Intersect with selection on a Polygonal marquee tool to choose a selection that we are interested in.

You can copy and paste the content of selection, or go to Select > Inverse and hit [Delete] (but in this way make another copy of original egg). Anyway, you should get this:

Rotate it a bit.

Step 43
This particle also should have its inner part. Make a selection of original egg. Go in exactly same way to achieve a selection and fill it with some dark color.

With Edit > Transform >> Warp fit this layer to the second part.

You can also scale the outer part as I did.

Do not be afraid to modify things if they don’t fit perfectly. We are working with a huge document size, so possible pixelization won’t be seenable.

Simulate a deep effect and 3d look as we did before. Clipping masks are your friends.

Darken part selected below with gradients or by burn tool:

At the end I’ve changed the position of our huge particle.

Step 44
We could name it a milestone of our detachment. Now we will take care of small particles. We want a tons of them scattered everywhere. For this step we will use a custom brush made by ourselves. Create a new document with size 328×400 pixels (to be exact with my original piece). Then create four tetragons in different sizes.

Create these selections with Polygonal marquee tool, then fill them with black. After that, go to the Edit > Define brush preset. Now you have your custom brush done- just name it. You can close the document without saving.
12 responses to “How to Break an Egg in Photoshop”
-

Grrrrreat! I applied these and thank you!
-
Thank you so much for this tutorial, I managed to do something really nice by modifying it a bit :)
I need more ! :D -
What a design tutorial. but very difficult. I want to video tutorial.
-
Awesome & nice tuts
-
Nice work. I did find the initial coloring and clipping mask steps could have used some screen shots of the layers palette. I find this makes it a little easier to follow along.
Otherwise, very cool effect. -
Hats off!
-
thank you so much! it is people like you who make it possible for the rest of us to learn and grow! I can’t thank you enough!
-
very nice
-
Loved the tutorial! I’m an ass.. I read it all!! :D
This tut taught me a lot of things at the same time it also made me recall the tricks I used to use but forgot with the time passing..Kudos. \m/
Sir Masiej Kwas.. Respect to you…Also, I was looking for some kinda tut which could teach me the way to turn a red apple into a golden one, or can say an apple covered with shiny golden foil.. If you can gimme a link of such a tut, if it’s already on internet, or post a tut on that, that would be really cool and generous of you guys..
Appreciate the hard work done by people behind this website.. :)
-
Wow! This is by far the most amazing photoshop tutorial I have seen. I realy mean it. Looking forward to trying it out sometimes. – Respect!
-
very niceeeeeeeeeee
-
wow great work
Leave a Reply