
Step 45
Now we need to set up our particle brush. Go to the brush settings and use settings as follow:


Step 46
We are ready now. Pick a color like #9d5e25 and play around, but carefully. You can also dynamically change the brush size. In tip at the beginning of the tutorial I told you how to do it quickly.

We have all the small particles on a single layer. Now [Ctrl] + [Click] on a thumbnail for a selection of them. Choose some dark color, could be #704219. Create a new layer underneath our particles. Fill it with dark color and move a bit down. We will get simple 3d effect.

Use dodge tool to lighten some particles, so they will vary from eachother.

In this step we used dark color to achieve a 3d look, but we can do exactly the same with light color, just imagine how particle will be rotated in space. We did this before. Here is a fast workflow: New layer > selection > paint with light color > move selection > [Delete].


They look just fine, now create more of them by repeating this step. You don’t need any other knowledge.


Step 47
The egg is almost complete. Now you can fix any errors and mistakes. I’ve forgotten about third dimension of the main eggshell.

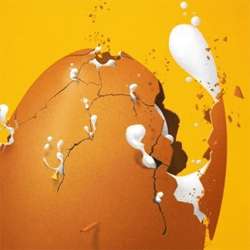
And the final egg:

Step 48
What I have to cover to finish the illustration is an egg white. We will work with Pen tool. Pick very light color (but not white) like #f7f5f3. We want our white flowing out from holes and cracks. The thing is, that we have to correctly shape it. I will do this in pretty noobish way, but that’s how I like to work. I am creating a lot of points (polygons) and then modifying each of them with Convert Point tool to get a smoothness.

As you can see, a lot of points that indicates a simple shape. Now with Convert point tool I am changing every single point.

To get something like this:

Our egg is falling down, so egg white should be directed to top.

Some fixes here and there:

We can now rasterize this layer, but this is not necessary for we will work on clipping layers.
Step 49
So, create new layer, it is good practice to use clipping mask. Pick white color (yes, now use pure white) and create some highlights with brush tool.
12 responses to “How to Break an Egg in Photoshop”
-

Grrrrreat! I applied these and thank you!
-
Thank you so much for this tutorial, I managed to do something really nice by modifying it a bit :)
I need more ! :D -
What a design tutorial. but very difficult. I want to video tutorial.
-
Awesome & nice tuts
-
Nice work. I did find the initial coloring and clipping mask steps could have used some screen shots of the layers palette. I find this makes it a little easier to follow along.
Otherwise, very cool effect. -
Hats off!
-
thank you so much! it is people like you who make it possible for the rest of us to learn and grow! I can’t thank you enough!
-
very nice
-
Loved the tutorial! I’m an ass.. I read it all!! :D
This tut taught me a lot of things at the same time it also made me recall the tricks I used to use but forgot with the time passing..Kudos. \m/
Sir Masiej Kwas.. Respect to you…Also, I was looking for some kinda tut which could teach me the way to turn a red apple into a golden one, or can say an apple covered with shiny golden foil.. If you can gimme a link of such a tut, if it’s already on internet, or post a tut on that, that would be really cool and generous of you guys..
Appreciate the hard work done by people behind this website.. :)
-
Wow! This is by far the most amazing photoshop tutorial I have seen. I realy mean it. Looking forward to trying it out sometimes. – Respect!
-
very niceeeeeeeeeee
-
wow great work
Leave a Reply