
Step 4
Now we are making the step into basic shapes. Hold down left mouse button or right click on the rectangle tool and choose Ellipse tool.

When the ellipse tool is picked, hold [ shift ] and create the circle with color #be713d. I have also aligned it horizontally.
Tip: To center your layer horizontally, click on a background layer in layer’s window, then hold control and click on a layer you wish to center. Pick move tool and click button shown below that exist on a tool’s option panel. You can center your image with grids or selection, but i think it’s an easiest way to achieve this.


Step 5
Once you have a circle you need to modify it a bit to achieve an egg’s shape. To do this, take the Direct selection tool and play with each of the squares of a circle.

It’s very important part, so get focus on the shape until you will think that is perfect. Here’s my workflow:

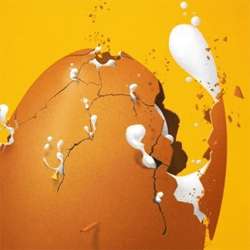
And my output:

You can download my shape here if you have problem with your own.
egg-shape.csh | 1 KB
Step 6
Right-click in layer’s window on our newly created shape and choose Rasterize layer. We are doing so for we will need it as a bitmap rather that vector shape.

Now create a new layer and make clipping mask.
Tip: We are making clipping masks for several reasons. Here we need to avoid ugly edges. To do a clipping mask move the cursor between layers in layer’s window. Hold alt, and when cursor will change, left-click.

Further explanation: When you are, for example, creating circle, not all pixels are filled with 100% of your color.

When you want to add some shadow on a new layer, you would probably just select a base layer and put gradient on new one. Wrong- you also have to create a clipping mask. Just see how the edges will looks like after adding some gradient in a selected area of a base layer:

They are pixelized and ugly- now you know why. In next steps up to 20 we will work only on clipping masks.
Step 7
So we have a clipping layer. On this kind of layers we will create all lights, shadows and textures. You can attach as much clipping layers to a base layer, as you want. First of all, we should make some outline that will add some contrast to our egg and will separate it softly from the background. Fill our clipping mask with some semi-dark brown color, like #854317. Now select our base layer. To do this, hold down [ctrl] and left-click on a thumbnail of an layer.
12 responses to “How to Break an Egg in Photoshop”
-

Grrrrreat! I applied these and thank you!
-
Thank you so much for this tutorial, I managed to do something really nice by modifying it a bit :)
I need more ! :D -
What a design tutorial. but very difficult. I want to video tutorial.
-
Awesome & nice tuts
-
Nice work. I did find the initial coloring and clipping mask steps could have used some screen shots of the layers palette. I find this makes it a little easier to follow along.
Otherwise, very cool effect. -
Hats off!
-
thank you so much! it is people like you who make it possible for the rest of us to learn and grow! I can’t thank you enough!
-
very nice
-
Loved the tutorial! I’m an ass.. I read it all!! :D
This tut taught me a lot of things at the same time it also made me recall the tricks I used to use but forgot with the time passing..Kudos. \m/
Sir Masiej Kwas.. Respect to you…Also, I was looking for some kinda tut which could teach me the way to turn a red apple into a golden one, or can say an apple covered with shiny golden foil.. If you can gimme a link of such a tut, if it’s already on internet, or post a tut on that, that would be really cool and generous of you guys..
Appreciate the hard work done by people behind this website.. :)
-
Wow! This is by far the most amazing photoshop tutorial I have seen. I realy mean it. Looking forward to trying it out sometimes. – Respect!
-
very niceeeeeeeeeee
-
wow great work
Leave a Reply