Digital painting is an incredible way of creating awesome arts. In this tutorial you will learn how to create a hulk digital painting by following these simple steps. Here, I will share some fundamental techniques used while creating this painting.
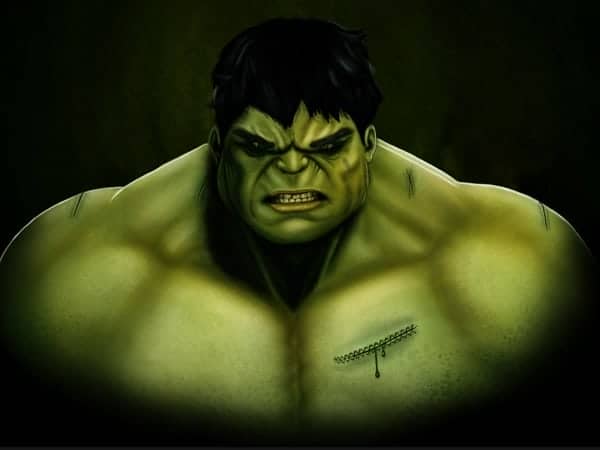
Preview of Final Results
Tutorial Resources
Step 1
Before starting, we will first understand some basics important for digital painting.
Light
Lights plays a crucial role in digital painting that affects several other factors like shadows, shading, environment, etc. It is important to decide your light source in the scene before going too far with painting to avoid the re-work on lighting and spending several hours fixing them.
Shadow
Proper shadows is a very important factor that gives an object realism. It gives depth to the scene and give it natural look. Poor shadows can make whole scene fake looking and objects hanging in the space without shadows. Always double-check the shadows, focus on details how shadows forms in different light source.
Blending
Smooth blending of colors is very important to get the desired result. Without proper blending your scene may look unfinished and crowded with brush strokes. There are several methods of blending the colors. You can blend your colors with blending tools or you can use a soft brush & color picker to blend your colors.
Step 2
Now we are aware about the painting basics that are crucial for a good digital painting. Let’s start by creating a new document of size 3000 X 4000 pixels dimension. It’s better to start with a large document because you won’t like to recreate the whole art again when you want to print it in bigger size.
Step 3
In this tutorial we are going to use brush tool extensively and a tablet to use the brush tool at its full potential. Select a hard round brush by pressing “B”, now press F5 to access brush panel. Set the ‘Flow Jitter’ to pen pressure and check ‘smoothing’ on.
Step 4
Set your brush size to 4 pixels and start sketching rough outline of the character. This is a rough sketch hence you need not to spend too much time to make your stroke perfect. Just rough stroke would work.
Step 5
Change the brush size to 3 pixels and add some more details in the character to get all features you want. Add more wrinkles to face to get perfect expression. Duplicate sketch layer two-three times to make your light strokes in the sketch visible. Now we are ready to add colors to it.
Step 6 Choosing a color palate
Choosing a color palate is an important step that help choosing right color for your artwork. Hence, decide your colors early would be helpful. Set some neutral color like #46563c as background and choose a soft round brush. Now start adding colors with large soft round brush. Try different colors for lights, shadows, hair areas then pick colors from color picker tool to create your colors palate. Don’t worry about roughness or imperfection because we are not coloring our character right now, but deciding right colors palate to start with. Here, I created my color palate in the same way.
Here I created my color palate in the same way.
Step 7 Blocking the color
Now we have our color palate and we can start adding colors to our character. Delete the layer in which you added colors to make your color palate. Select a default chalk brush of size 44 pixels, set its color to #506320 and add this color to character as base color. Change the brush color to #01080b and define the hair area. Change the size of brush where needed to speed your coloring process.
Step 8
Change the brush color to #314305 and start adding shadows. Reduce the size of brush to create shadows in face, eyes, neck, etc.
Step 9
Create a new layer and add some dark shadows to the character for this set your brush color to #001500 and paint some shadows around eyes, chin area, ears, neck. Avoid using pure black or white or pure green color for better results.
Step 10
Set your brush color to #768a4e and add some lights to your character. Change your brush size where needed that would speed your process. Create several layers while coloring that would give you a control on your process and you can go back at any time if something goes wrong.
Step 11 Blending colors
Next step is blending of colors, but before we start we need to tweak our brush a little to get desired results. Open brush panel by pressing key ‘F5’ and set “Opacity Jitter” to “Pen Pressure” by its drop-down menu.
Do not change “Flow Jitter” which is turned off because both options are different and used for different purpose. Opacity Jitter allows you to control your stroke opacity on your pen pressure so that you can blend your colors perfectly, but if you use ‘Flow Jitter’ then you won’t get sufficient control on opacity and hence may not get perfect blending. Here you can see the difference between strokes made by using “Opacity Jitter” & “Flow Jitter”.
Step 12
So now you have your brush with “Opacity Jitter” set to “Pen Pressure” and we are ready to go. Keep your brush selected, re-sample color by pressing ALT key to quickly get color picker tool and start mixing colors because you have turned “Opacity Jitter” to “pen pressure” your brush stroke would have less opacity when you press lighter and higher opacity when you put more pressure pen. This means your brush stroke will have transparency and your brush color will mix with background color and you will get a new color whenever you make a new stroke on any color. Pick the new color you got from your stroke and then make another stroke then again pick new color. Continue with blending by re-sampling colors.
Step 13
Repeat step 12 and blending lights in the character. Change your brush size to get perfect blending in narrow areas like ears, eyes, etc.
Step 14
Blend shadows by repeating step 12. This will give volume to your character. Change your brush sizes whenever necessary to get perfectly blended character.
Step 15
You left some dark shadows in the character that would also need to be blended. Reduce the size of your brush and blend the dark shadows near eyes, chin, neck and ears. Don’t forget to do all this work in a new layer so that you can go back if something goes wrong.
Step 16 Adding Light Source
We have completed our basic blending of character and to now we will add light to the character. Before starting painting lights to the character, we will add light source to the scene. A light source will give you an idea about which direction your light is going to fall on the character and how it will affect your scene.
Step 17 Shadows
Based on light your shadows will fall in opposite direction of light source. In our scene shadow will fall on left side of character. Proper shadows gives the character a natural look. If you add shadows to everywhere, then your scene may not look natural.
Step 18
Select a round brush with size 50 pixels and hardness 75%. Press F5 to access brush panel, set “Opacity Jitter” to “Pen Pressure”. Change the brush color to #041b00 and paint shadows below neck area.
Step 19
Paint some more shadows on face too to make it realistic. Reduce your brush size to 30 pixels and add shadows to the left ear, cheek, etc. Change the brush size when necessary to get desired shadows.
Step 20
Change your brush size to 50 pixels color to #030602 and add some dark shadows to the character.
Step 21
We have added sufficient shadows to the character, but you will notice that the brush strokes visible in character. To fix that we will smooth the blending we did in previous steps. Select a soft round brush of size 50 pixels and opacity to 70%. Open brush panel by pressing “F5” and set “Opacity Jitter” & “Flow Jitter” to “Pen Pressure”. Turn “Smoothing” ON and set “Spacing” to 11%. Save this brush with name “Smooth blending brush”.
Step 22
Now select the brush you created in last step and start smooth blending by repeating step 12. With your soft brush you will get perfectly smooth blending.
Step 23
Repeat step 22 and smooth all other parts of the character. Pay more attention while smoothing small details like face, ears, eyes, etc. Avoid over smoothing because if you smooth too much, you may lose some finer details in character.
Step 24
Now it’s time to add some fine details in face including wrinkles, edges, etc. Turn off your sketch layer, set your brush size to 2 pixels and set your “opacity jitter” to “pen pressure”. Save this brush and rename it to “Sketch brush”. Change your brush color to #142406 and start adding details to the nose of character.
Step 25
Similarly add details below eyes and smooth the details where necessary, change your brush size whenever needed to get better features in the face of character. Don’t forget to set Opacity Jitter to pen pressure in your brush setting. This is important and would be used everywhere so keep the brush setting same as in this step and use it in this tutorial instead a default brush.
Step 26
Repeat the step 25 & 26 to add the rest details in the character. Change the brush size and color whenever necessary and smooth with a soft brush to get rid of hard brush strokes. After adding all details your result will look like this.
Step 27
Now we will add details in eyes for this, select sketch brush with opacity jitter set to pen pressure. Change its color to #051102 and size to 5 pixels and start adding details in the eye.
Step 28
Change your brush size to 5 pixels & color #0f1a09 and brush to add more details brush inside pupil. Now we will add some light reflection to the eye to give it natural look. Reduce your brush hardness to 25% and set your brush color to #699e5c and add lights reflection to the eye.
Step 29
Select the sketch brush that you created in this tutorial, set its hardness to 50% and size 3 pixels. Set brush color to #4a422c and add shading to the eyeball to give it depth. Change brush color to #27210e and more details to the eyeball.
Step 30
Now we will add vein in eyeball to give eye more natural look. To add veins select sketch brush of size to one pixels and color to #2e1d0f and paint veins in the eye.
Step 31
Repeat the step 27 to 30 and add details to the other eye to give it natural look. Pay attention to the light reflections in the eye to make it realistic.
Step 32 – Adding details to the mouth
Now we will add the details to the mouth for this we will create teeth first. Select sketch brush, change its color to black and reduce its size to one or two pixels to create teeth in the mouth.
Step 33
We will first add details to the lips to create desired outline of mouth. Select a soft round brush of hardness 70%, color #5f3d10, set “Opacity Jitter” to “Pen Pressure”. Change brush color to #563810 and add shading to the lips. Change brush hardness whenever required to get better results.
Step 34
Now change your brush color to #3a2c0a and add some dark shading to the lips.
Step 35
Now we will add some lights to the lips. Change your brush hardness to 50% and set its color to #9f8925 and start adding lights to the upper and lower lip.
Step 36
Change your brush color to #afa66c and add some more lights to the lips in random order. Avoid too hard brush strokes. This would give a nice light reflection effect to the lips.
Step 37
We will need to define the outline of lips that is blurry right now. Hence, change your brush color to #302605 and add shadows to define the lips edges.
Step 38
Add more shading to the lips with a soft brush of size 15 pixels and color #56431a. Set “Opacity Jitter” & “Flow Jitter” to pen pressure to get better results. Save this brush and rename it to “smooth brush”.
Step 39
Keep selected the smooth brush and brush around mouth to define its edges with color #22340b and 67722f.
Step 40
Change your brush color to #bcbb86, reduce its hardness to 25%. Brush around upper lip edges to add some lights to give it a natural look.
Step 41 – Painting the teeth
It’s time to paint teeth of the character. Select “sketch” brush which you created in earlier steps, change its size to 8 pixels start painting teeth of the character with color #7a7036. Change brush color to #7f855b and add some highlight of the teeth.
Step 42
Change your brush color to #6d6738 to add shadows to the teeth to give them depth and natural look. Pay special attention while adding shadows between teeth gaps, excessive shadows can darken the teeth and lose the details.
Step 43
Now we will add light to the teeth. Change your brush color to #8d9377 and paint some lights to the teeth to give it natural look. Add lights to the teeth based on the position of light source that we defined in earlier steps.
Step 44
Now we will add dark shadow behind teeth row to give character’s mouth depth. Select a sketch brush with hardness 75% and color #090900 and brush behind the teeth row.
Step 45
Now we will add dark shadows to the lips. Change your brush size to 5 pixels and color to #090900 and add shadows to add the depth. Change the brush size to 35 pixels & hardness to 0%, turn “Opacity Jitter” & “Flow Jitter” to pen pressure and add some more shadows around the edge of lips to give it natural look. Save this brush and rename it to “smoothing”.
Step 46
Now we will add smooth to the skin to remove roughness. Select the “smoothing” brush, change its color to #081603 and brush the cheek, neck, wrinkles, nose to highlight the expression.
Step 47
Now we will add smooth blending to the character skin. Select smudge tool by pressing N and press ‘F5’ to access brush panel. Select a brush of size 20 pixels, hardness 0% and spacing 25%. Set scattering to 38% and count to three then go to transfer and set ‘flow jitter’ to pen pressure. Don’t forget to turn smoothing ON. Save the brush and rename it to “blending”.
Step 48
Press Ctrl + A, to select whole canvas and go to “Edit” and click to “Copy Merged”. You can access this command by pressing Shift + Ctrl + C. Now paste it in a new layer, select “Smudge Tool” and select the “blending” brush that you created in previous step. Start blending to smooth then skin and get perfect skin texture.
Step 49 – Adding hairs to eyebrow
In this step we will paint hairs to the eyebrow of the character. For this, select “smoothing” brush, change its size to 2 pixels and color #0a100d and paint hairs in the eyebrow. Change the brush color to #172018 and add highlights in the hair of eyebrow. Next, change the size of brush to 10 pixels and add smoothing to the edge of eyebrow.
Step 50
Download the “Blur’s good brush 4.0 pro” and load the brush set to brush panel and select “Silk brush – 1”. Change the brush color to #090d11 and size 50 pixels and paint the hairs in the character.
Step 51
Select “Hair – fine” brush from “Blur’s good brush 4.0 pro” brush collection, change brush color to #505e6d and paint fine hair details in the character. Change brush sizes when needed to give hairs a realistic look.
Step 52
Now we will fine-tune our character. Select a soft brush and fine-tune the shadows to get perfect shadow in the character. Fine-tune the character’s muscles and chest. Change the color of brush where needed and avoid 100% saturated colors and pure black color.
Step 53
Select a soft brush of size 40 pixels and color #9aad6d and fine-tune the lights to the character.
Step 54 – Adding texture to skin
Now we will add texture to the skin of character. For this, select “Concrete – 2” brush, change the brush color to #bdbaac and start adding details to the skin of the character. Change the brush color to #394c16 and add dark texture to balance the skin texture. Reduce the texture layer opacity to 80% if needed.
Step 55
After adding texture, you may need to mask the extra texture details from some areas because skin texture is not even at all areas. Select the texture layer and click on “layer mask” icon in layer panel to add the mask. Select a soft round brush with opacity 40%, press D to set background & foreground color to black & white and mask the excess texture details from the skin.
Step 56
Select “Concrete – 2” brush and change the brush color to #b4b3a2. Now add lights to the skin of the character.
Step 57
Repeat the step 56 and add more lights to the character to give it a natural look. Your character will look like this.
Step 58
Our character looks monotonous in green color hence we will add some warm colors to add life to the character. Select a soft brush of color #cbc129 and add warm colors to the character. Change the blending style of layer to “color” and rename this layer to “warm color”.
Step 59
Increase your brush size to 100 pixels and set its hardness to 0%. Change the brush color to #d5c600 & db8c16 and add some more warm colors to the character. Set the blending mode of layer to “color”.
Step 60
Now we will add bright lights to the character. Select “sketching” brush that you created in this tutorial and set “opacity jitter” to pen pressure. Change the brush size to 10 pixels & color to #cfddbf and start adding light strokes around the edges of the character.
Step 61
Select a soft brush of color black and hide the lower edges of character. Now select “Spotted -3” brush, change its color to #081f05 and add some texture to the lower side of the character. Group all layers, press Ctrl + E to merge all layers and rename the layer to “Character”. Duplicate the character layer, de-saturate the layer and change the blending mode to “Hard light” then change its opacity to 20%.
Step 62 – Adding cut to skin
Now we will add cut & stitches to the character. Select “Cut(Multiply)” brush, change its color to #1d1f11and add cuts to the skin. Select “Stitch(Multiply)” brush to add stitches.
Step 63
Now we will add some blood from stitched cuts. Paint the blood by hard brush of size 10 pixels and color #490707. Select “sketch” brush that you created in this tutorial, change the brush color to #ce9696 and add lights to the blood. Change brush color to #36180e and add shading to the blood. Now add some shadows of blood on the body to give it a natural look. To change the blood color from red to green create a new layer and fill it with color #093900. Right click to the layer and select “Create Clipping Mask” to clip the layer to blood layer and change the layer’s blending mode to “color”.
Step 64 – Adding color correction
This is the last step of tutorial. Now we will add some color corrections to the hulk so to make our character perfect. Add Curves layer with following setting; Input-113, Output-113. Add color balance with following setting; red +5, Green +10, Blue -5.
Step 65
Finally our hulk is complete. Here is the final preview. Enjoy!
Final Results
Download the PSD
Tutorial by Narendra Keshkar
So that was the tutorial explaining some basic fundamentals of digital painting that I learned myself. Since long time I was thinking about writing a tutorial on digital painting as I was missing such tutorial explaining the digital painting process in-depth, but when I completed this painting I decided to share the knowledge I gained while painting this art. You can check my blog to see more interesting articles like this.
– Narendra Keshkar