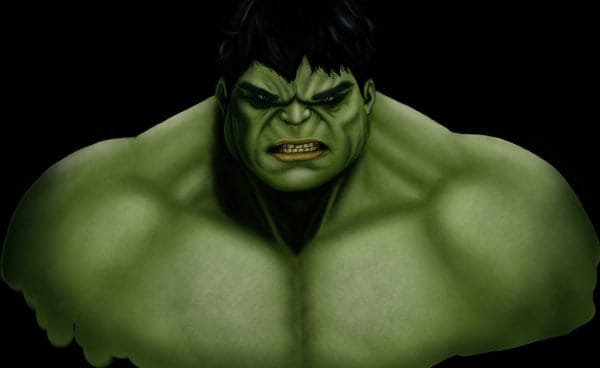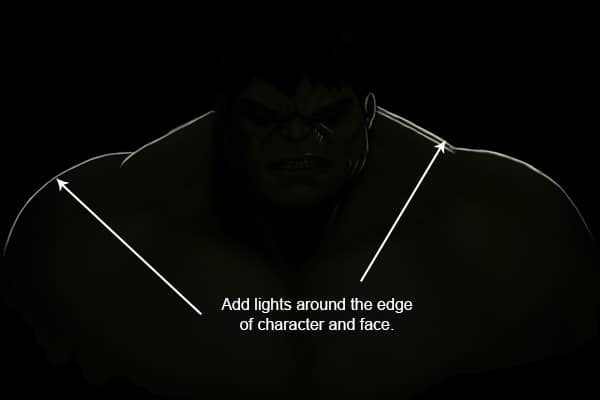

Step 55
After adding texture, you may need to mask the extra texture details from some areas because skin texture is not even at all areas. Select the texture layer and click on “layer mask” icon in layer panel to add the mask. Select a soft round brush with opacity 40%, press D to set background & foreground color to black & white and mask the excess texture details from the skin.


Step 56
Select “Concrete – 2” brush and change the brush color to #b4b3a2. Now add lights to the skin of the character.


Step 57
Repeat the step 56 and add more lights to the character to give it a natural look. Your character will look like this.

Step 58
Our character looks monotonous in green color hence we will add some warm colors to add life to the character. Select a soft brush of color #cbc129 and add warm colors to the character. Change the blending style of layer to “color” and rename this layer to “warm color”.


Step 59
Increase your brush size to 100 pixels and set its hardness to 0%. Change the brush color to #d5c600 & db8c16 and add some more warm colors to the character. Set the blending mode of layer to “color”.


Step 60
Now we will add bright lights to the character. Select “sketching” brush that you created in this tutorial and set “opacity jitter” to pen pressure. Change the brush size to 10 pixels & color to #cfddbf and start adding light strokes around the edges of the character.


Step 61
Select a soft brush of color black and hide the lower edges of character. Now select “Spotted -3” brush, change its color to #081f05 and add some texture to the lower side of the character. Group all layers, press Ctrl + E to merge all layers and rename the layer to “Character”. Duplicate the character layer, de-saturate the layer and change the blending mode to “Hard light” then change its opacity to 20%.

Step 62 – Adding cut to skin
Now we will add cut & stitches to the character. Select “Cut(Multiply)” brush, change its color to #1d1f11and add cuts to the skin. Select “Stitch(Multiply)” brush to add stitches.


Step 63
Now we will add some blood from stitched cuts. Paint the blood by hard brush of size 10 pixels and color #490707. Select “sketch” brush that you created in this tutorial, change the brush color to #ce9696 and add lights to the blood. Change brush color to #36180e and add shading to the blood. Now add some shadows of blood on the body to give it a natural look. To change the blood color from red to green create a new layer and fill it with color #093900. Right click to the layer and select “Create Clipping Mask” to clip the layer to blood layer and change the layer’s blending mode to “color”.
21 responses to “Create an Amazing CG Illustration of The Incredible Hulk”
-
How do you download blur’s good brush 4.1 pro :(
-
güzel video abone oldum oh
-
bu video mu gerizekalı
-
-
k
-
Stuck in step 12 :(
-
What are you stuck with? If you’re using a mouse, the pen pressure won’t work. So you’ll need to adjust the brush opacity manually.
-
-
Dude you’re insane … i love your work. I followed this with procreate because the concepts are the same.
-
Tengo un problema con Photoshop me. Podrían ayudar es sobre el error 22
-
Please Sir photoshop serial number
-
Who else loves unlocked cell phones ?
-
I do pls aw can i get access to it
-
-
That is one badass hulk drawing!
-
Ye bina Pen Tablet ke kaise draw hongi starting lines, Please jaldi batana mujhe ek Digital Painting jaldi banani hai.
-
These are amazing. Super creative and imaginative and all things that are good.
-
how do you do step #6.. I cant find the color palate.. help
-
There are very incredible themes!.Thank you for your amazing effort.
-
WoW! Thanks so much for the tutorial and specially the PSD file. I learnt a lot more than any other tutorial.
-
How the heck are ya gonna put stitches on the Hulk?
-
A good tutorial but “tablet” should be listed in the tutorial resources.
-
xalk
-
A good post with the technique of illustrator design.


Leave a Reply